

Automation Plugin
The Automation Plugin allows you to implement custom business logic, create your own Socotra API endpoints, define request and response objects, and send HTTP requests to both third-party and Socotra API endpoints. This allows implementing teams to address most automation, integration, and orchestration requirements directly within the core platform.
This plugin can be executed manually by calling the Execute Automation Plugin API endpoint. It can also be configured to execute in response to events that occur within the Socotra Insurance Suite.
The Automation Plugin must be implemented as a Global implementation, not a Product implementation. See the Plugins Overview guide for more information.
We recommend using the Configuration SDK for plugin development.
The Automation Plugin currently supports API calls only via the Java HttpClient . A Socotra API-specific client is planned for a future release to simplify the process of calling Socotra API endpoints.
Use Cases
The Automation Plugin supports a wide variety of use cases. Some examples include:
- Generating and attaching documents such as certificates of insurance or delinquency notices
- Updating static data
- Monitoring, reporting, and analytics
The rest of this guide is based on the config-sdk-template project used in the Configuration SDK guide.
Configuring the Automation Plugin
The Automation Plugin can be configured through AutomationPluginRef configuration objects.
Here's an example of the folder structure:
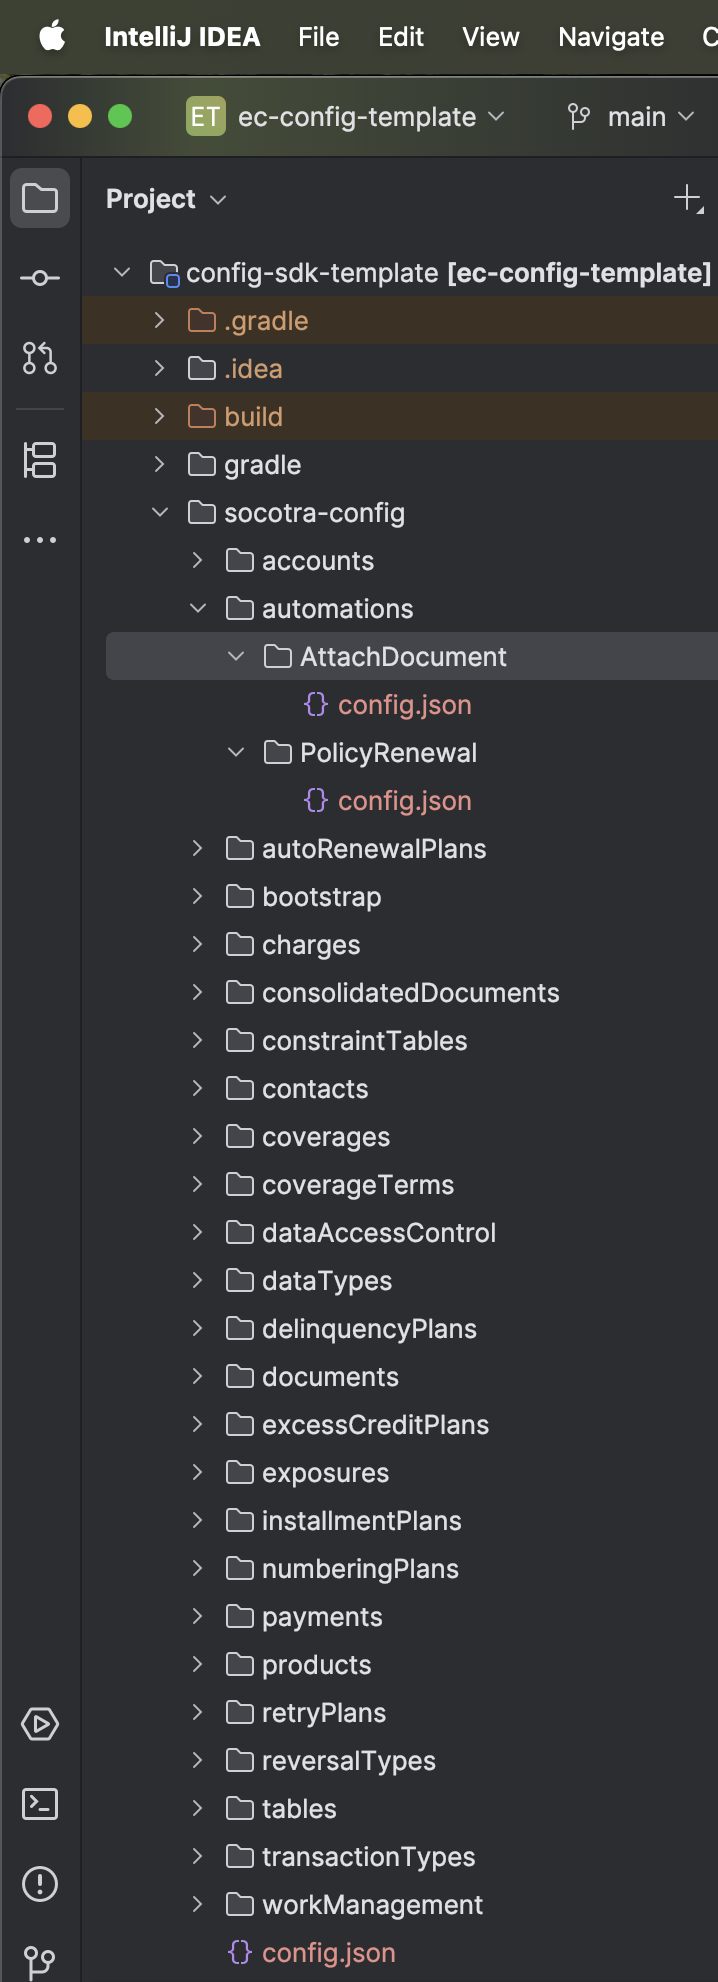
In the example above, the AttachDocument and PolicyRenewal folders refer to the names of your Automation Plugin implementations. You can create as many implementations as you'd like. Each implementation can contain multiple actions, which correspond to method names in your Java implementation classes.
Here's an example of a config.json file for the AttachDocument implementation:
{
	"actions": {
		"attachCertificateOfInsurance": {
			"timeout": 3,
			"request": {
				"contactName": {
					"displayName": "Contact Name",
					"type": "string"
				},
				"policyNumber": {
					"displayName": "Policy Number",
					"type": "string"
				}
			},
			"response": {
				"result": {
					"displayName": "Result",
					"type": "boolean",
					"defaultValue": "true"
				}
			}
		},
		"attachReport": {
			"timeout": 10,
			"request": {
				"reportType": {
					"displayName": "Report Type",
					"type": "string"
				},
				"reportName": {
					"displayName": "Report Name",
					"type": "string"
				}
			},
			"response": {
				"result": {
					"displayName": "Result",
					"type": "boolean",
					"defaultValue": "true"
				}
			}
		}
	}
}
In the example above, attachCertificateOfInsurance and attachReport are the names of actions available within the AttachDocument implementation, and each action specifies properties within the request and response objects.
Request and response objects can contain both built-in data types and custom data types. The built-in object data type can accommodate more complex data models.
Request and response objects used by Automation Plugin implementations do not currently support data scopes.
Once you've finished making changes to your configuration, execute the deployConfigToTenant Gradle task to deploy your configuration.
Implementing the Automation Plugin
Create a new Java class in the src/main/java/com/socotra/deployment/customer folder using the following naming convention for the class name: PluginNameAutomationPluginImpl. You can name your class whatever you'd like, but we suggest following this naming convention. Your Java implementation classes must be contained within this folder.
Here's an example of the AttachDocumentAutomationPluginImpl class for the AttachDocument implementation:
public class AttachDocumentAutomationPluginImpl implements AttachDocumentAutomationPlugin {
    private static final Logger log = LoggerFactory.getLogger(AttachDocumentAutomationPluginImpl.class);

    @Override
    public AttachDocumentAttachCertificateOfInsuranceResponse attachCertificateOfInsurance(AttachDocumentAttachCertificateOfInsuranceRequest attachDocumentAttachCertificateOfInsuranceRequest) {
        PluginExecutionContext context = PluginExecutionContext.get();
        AutomationPluginContextData automationContext = context.getAutomationPluginContext().orElseThrow();
        log.info("In AttachDocumentAutomationPluginImpl.attachCertificateOfInsurance()");
        log.info("Request fields: {} {}", attachDocumentAttachCertificateOfInsuranceRequest.contactName(), attachDocumentAttachCertificateOfInsuranceRequest.policyNumber());
        log.info("Context: {} {} {} {}", context.getRequestId(), context.getTenantLocator(), context.getBusinessAccount(), automationContext.secret());
        return new AttachDocumentAttachCertificateOfInsuranceResponse().builder().result(true).build();
    }

    @Override
    public AttachDocumentAttachReportResponse attachReport(AttachDocumentAttachReportRequest attachDocumentAttachReportRequest) {
        PluginExecutionContext context = PluginExecutionContext.get();
        AutomationPluginContextData automationContext = context.getAutomationPluginContext().orElseThrow();
        log.info("In AttachDocumentAutomationPluginImpl.attachReport()");
        log.info("Request fields: {} {}", attachDocumentAttachReportRequest.reportType(), attachDocumentAttachReportRequest.reportName());
        log.info("Context: {} {} {} {}", context.getRequestId(), context.getTenantLocator(), context.getBusinessAccount(), automationContext.secret());
        return new AttachDocumentAttachReportResponse().builder().result(true).build();
    }
}
The request and response classes are generated automatically using the following naming conventions: PluginNameActionNameRequest and PluginNameActionNameResponse. Request data can be retrieved through the fields defined in the request object configuration for each action. The response object can be constructed using the builder pattern to set a value for each field defined in the response object configuration.
In addition to the PluginExecutionContext methods available to all plugins, the AutomationPluginContextData class contains the following methods:
- accessToken()
- secret()
- apiUrl()
- eventData()
HTTP requests can be performed using the Java HttpClient . Refer to the Plugins Overview for more information.
Once you've finished making changes to your implementations, execute the deployConfigToTenant Gradle task. This will generate an API endpoint for each action defined in your implementations.
Creating an Event-Driven Automation Plugin Implementation
A maximum of one Automation Plugin implementation can be configured to execute in response to events that occur within the Socotra Insurance Suite.
To designate an implementation as event-driven, add the following field to your Automation Plugin configuration.
For example:
{
	"enableWebhooks": true
}
Execute the refreshReferenceDatamodel Gradle task to update the interface for your implementation.
Override the handleWebhookEvent method in your implementation.
For example:
@Override
 public void handleWebhookEvent() {
     PluginExecutionContext context = PluginExecutionContext.get();
     AutomationPluginContextData automationContext = context.getAutomationPluginContext().orElseThrow();
     log.info("In AttachDocumentAutomationPluginImpl.handleWebhookEvent()");
     log.info("context: {} {} {} {}", context.getRequestId(), context.getTenantLocator(), context.getBusinessAccount(), automationContext.secret());
     log.info("context: {}", automationContext.eventData());
 }
Event-driven actions cannot have request and response objects. Context data can be retrieved from the PluginExecutionContext and AutomationPluginContextData classes.
Lastly, call the Create Webhook API endpoint to create a webhook for your event-driven action. The useAutomationPlugin flag must be set to true.
Here's an example request:
{
	"name": "Attach Document Webhook",
	"useAutomationPlugin": true,
	"enabled": true,
	"eventTypes": [
		"policy.account.create",
		"policy.account.update",
		"policy.account.validate",
		"policy.quote.create",
		"policy.quote.update",
		"policy.quote.validate",
		"policy.quote.price",
		"policy.quote.underwrite",
		"policy.quote.accept",
		"policy.quote.refuse",
		"policy.quote.discard",
		"policy.quote.manualunderwrite",
		"policy.quote.reset",
		"policy.quote.issue"
	],
	"failureHandling": {
		"removeAlertEndpoint": false,
		"alertEndpoint": {
			"url": "https://webhook.develop.socotra.com/cf276a2e-f48d-449d-9279-a1faf24ba51a",
			"headers": {
				"single": 0
			}
		},
		"triggers": ["4xx", "5xx", "timeout"],
		"retryStrategy": {
			"type": "linear",
			"interval": 1000,
			"attempts": 3
		},
		"divert": false,
		"suspend": false
	}
}
Unlike a regular webhook, this webhook does not send a request to an external API endpoint. It executes the handleWebhookEvent action instead.
Executing the Automation Plugin
After deploying your implementation, execute your Automation Plugin action by sending a GET or POST request to the API endpoint that was automatically generated by the system, based on the following naming convention: plugin/{tenantLocator}/automation/{pluginName}/{actionName}.
The only difference between sending a GET request and sending a POST request is that a GET request requires a response object to be configured for the specified action.
Here's an example request for the attachReport action:
{
	"reportType": "Regulatory",
	"reportName": "GDPR Compliance"
}
Configuring Secrets
By default, the token that was used to authenticate a request sent to an Automation Plugin API endpoint will be available in the accessToken field within the AutomationPluginContextData class.
Additional secrets can be included in the AutomationPluginContextData class by adding the following field to the top level of the configuration for your Automation Plugin implementation:
{
	"secret": "ExternalService"
}
In the example above, ExternalService refers to the staticName of a SecretRef configuration object that must be specified in the tenant configuration. Each Automation Plugin configuration can specify a distinct SecretRef object or the same SecretRef object if necessary.
Here's an example of a SecretRef configuration object named ExternalService:
{
	"items": {
		"url": {
			"dataType": "string"
		},
		"apiToken": {
			"dataType": "string"
		},
		"timeOutSeconds": {
			"dataType": "int"
		}
	}
}
Execute the deployConfigToTenant Gradle task to deploy your configuration.
Once these configurations have been deployed, create your secret using the Create a Secret API endpoint.
For example:
{
	"name": "ExampleSecret",
	"staticName": "ExternalService",
	"secret": {
		"url": "https://example.url.com",
		"apiToken": "Bearer EXAMPLE_TOKEN",
		"timeOutSeconds": 1000
	}
}
Secrets must be added to at least one resource group before they can be accessed through the AutomationPluginContextData class by using the Create a Resource Group or Update a Resource Group API endpoint.
Here's an example request for the Create a Resource Group API endpoint:
{
	"name": "ExampleResourceGroup",
	"selectionStartTime": "2023-12-22T19:09:27+0000",
	"resourceNames": ["ExampleSecret"]
}
Here's an example request for the Update a Resource Group API endpoint:
{
	"name": "ExampleResourceGroup",
	"selectionStartTime": "2023-12-22T19:09:27+0000",
	"addResources": ["ExampleSecret"]
}
Once the secret has been added to a resource group, execute the refreshReferenceDatamodel Gradle task to generate the Java class containing your secrets.
Secret fields can now be accessed through the AutomationPluginContextData class.
For example:
PluginExecutionContext context = PluginExecutionContext.get();
AutomationPluginContextData automationContext = context.getAutomationPluginContext().orElseThrow();

var mapper = AbstractDeploymentFactory.defaultMapper();
ExternalService externalService = mapper.convertValue(automationContext.secret().get(), ExternalService.class);

String url = externalService.url();
String apiToken = externalService.apiToken();
Integer timeOutSeconds = externalService.timeOutSeconds();
Custom Data Types
Request and response objects can contain custom data types in addition to built-in data types.
Here's an example of a configuration for a custom data type called Driver:
{
	"dataTypes": {
		"Driver": {
			"data": {
				"firstName": {
					"type": "string"
				},
				"lastName": {
					"type": "string"
				}
			}
		}
	}
}
This custom data type can now be referenced through the type field when configuring a request or response property.
For example:
{
	"actions": {
		"attachCertificateOfInsurance": {
			"timeout": 3,
			"request": {
				"primaryDriver": {
					"displayName": "Primary Driver",
					"type": "Driver+"
				}
			},
			"response": {
				"secondaryDriver": {
					"displayName": "Secondary Driver",
					"type": "Driver+"
				}
			}
		}
	}
}
Request and response property configurations can include quantifiers and arrays, which can be used to store multiple values.
For example, the above configuration uses the + quantifier, which indicates that the property is an array that can store one or more Driver objects.
See the Data Extensions and Custom Data Types feature guides for more information.
Error Handling
By default, if an exception is encountered while executing an Automation Plugin implementation, an HTTP status code of 500 will be returned. You can return specific HTTP status codes and error messages by throwing an AutomationPluginException:
throw new AutomationPluginException(500, "Error Message");Refer to the Webhooks guide for information on defining error-handling strategies for webhooks.
Logging
The Logging API can be used to view the history of Automation Plugin executions and Java logging messages.
First, retrieve a list of plugin executions using the Fetch a List of Logs API endpoint. Optional query parameters can be used to narrow down this list.
For example, use the createdAtMin query parameter to view plugin executions that occurred after a specified timestamp:
createdAtMin=2026-07-25T22:00:00.000ZFor executions triggered via API requests, the pluginType within the corresponding PluginLogsMetadata object will be set to automationHttp, and the ObjectReference locator will be set to the event locator of the event that triggered the plugin execution.
For event-driven executions, the pluginType within the corresponding PluginLogsMetadata object will be set to automationWebhook, and the ObjectReference locator will be set to the same value as the requestId.
Next, retrieve Java logging messages for a plugin execution by calling the Fetch Logs for a Request API endpoint and specifying the target PluginLogsMetadata locator as the locator for the request.