Deployment Pipeline Basics: How-To Guide
Introduction
Before we begin, it’s important to know this guide is about Socotra configuration, and how to build a deployment pipeline around it. If you’re looking for more information on the basics of our configuration, you’ll want to explore our Getting Started Guide.
At this stage you’ve likely constructed some configuration and deployed it to a tenant. If you’re a team of one, you could simply make your changes from time to time and manually deploy, but what if you’re looking to collaborate with other engineers, continuously test your rating logic, and automate your deployment? That is exactly what this guide is about. We’ll go step-by-step through a basic deployment pipeline process as well as touch on some additional opportunities for abstracting your Socotra configuration for making complex builds easier.
Before we dive in, let’s start by looking at the nature of Socotra’s configuration.
The Socotra platform allows for the creation of products (i.e. lines of business), each containing exposure types and associated perils. The definition of these products lives as JSON, which is intended to be interpreted by the Socotra engine. By design JSON is best used as a no frills way to store structured data. This is great for systems needing to process information quickly.
Document templates are written in HTML and CSS, while allowing you to embed logic using the Liquid templating language developed by Shopify.
Rating, and more advanced logic, is implemented as JavaScript.
All of these file types lend themselves very well to being version controlled and abstracted upon.

For instance, you can style your documents with LESS and compile it down to CSS, or you can write your configuration in YAML and compile it down to JSON. Doing this is completely optional and you may find one method suits you, your staff or contractors best. With Socotra our goal is to give you the options you need to effectively take your implementation to the finish line.
Getting Started
A pipeline consists of either all or a combination of, version control, build automation, testing, and deployment. In order to accommodate these components we find it best to place your Socotra configuration in a parent project directory. This provides a place for your deployment pipeline resources to live.

An example project might have a directory structure that looks like this (also pictured on the right). You may note that we’ve added version control, tests and a few tools to our parent directory and our project actually contains a couple Socotra configurations, one called “base” and the other called “variant_california”.
For this guide we’ll be using a simple auto insurance product configuration (you can find the configuration in the main_config in this project folder on Github). Once you’re familiar with these components, adapting them to your configuration should be straightforward.
Adding Version Control
You can choose any version control tool that works best for your organization. We utilize Git internally and as part of our guides and demonstrate setting that up here.
Create your project folder and navigate to it via the command line.(e.g. mkdir tofu_insurance and then cd tofu_insurance)
Run git init within your project directory. If you manage your codebase through a server or online services such as GitHub you can learn about adding remotes or further explore the basics within the Git Handbook and the Github Cheatsheet.
Now, let’s copy our configuration to our project folder.We’ll call it main_config.(e.g. cp -R /path/to/config tofu_insurance/main_config)
Note: You can obtain a full copy of our sample config from the repo on Github.
Adding Basic Tests
There are three primary types of testing (Unit Tests, Integration Tests and UI Tests), what we’ll be demonstrating here is most similar to Integration Tests. We’ll be preparing payloads (JSON objects with policy information) and running them through our rater to get rates. We’ll then compare these rates to those in a file of expected outputs. When a mismatch occurs, the test will fail. We might use this as a way to determine if a bug fix or new feature has inadvertently affected otherwise bonafide policy rates.
This process is relatively straightforward but there is some background we need to know and some specifics that’ll help get us up and running.
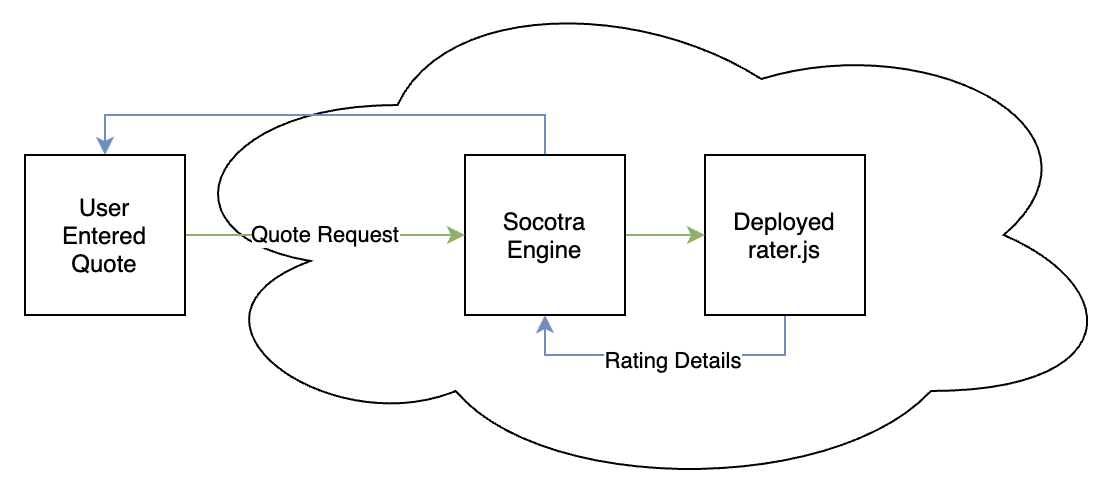
Any time a user sends in a quote for pricing, your rater.js file is essentially called by Socotra with a payload. The rater.js file then returns a rate object to the Socotra Engine which records this data as part of the quote. You can see this demonstrated in the above graphic.
In order to test scenarios involving this process we’ll have to invoke your rater.js file in a similar fashion to that of the Socotra Engine, which means passing it the right data.
Take a moment to familiarize yourself with what the expected payload and response look like. You can explore these in the rater plugin documentation.
Create tests folder within our project folder.(e.g. mkdir tests)
To get started testing our rater we’ll need two things, one payload.json containing the data we want to pass the rater and a file capable of calling our rater.js with the payload and logging / checking the results (included as testrater.js).
If you’re following the example project the following is already supplied for you. To quickly get an instance of one of these payloads as it pertains to your configuration you can simply take the response from a create quote call, place it in a JSON file and then run the testutils.js utility packaged in the sample repo, use the –payload and –destination flags to indicate which file to use and where to store the output. Once you have the output file, you can place this in your tests folder.
What is happening in testutils.py? It’s actually very simple. The rater needs the policy data, but that’s not quite all. The type of rating event, (new_business versus endorsement, etc), and timezone play a role. One additional attribute called “policyExposurePerils” is added, this simply links characteristic locators for the purpose of making code in the rater easier. The testutils.js script takes a policy payload and places it in a higher level object with some defaults.
Because our rater has to run locally for testing it means the socotraApi will, by default, be unavailable to us. This is because the library is supplied by the Socotra Engine. In order to get around this, we’ll pass a socotraApi object into our rater that’s capable of performing the same functions. The following code block shows how you’ll adapt your rater.js file.
function getPerilRates(data, socotraApiOverride=false) {
  if(typeof global !== 'undefined') {
    global.socotraApi = socotraApiOverride ? socotraApiOverride : socotraApi;
  }
  lib.polyfill();

  let policy = data.policy;
  let policy_c = policy.characteristics;
  if (Array.isArray(policy_c)) {
    policy_c = policy_c[policy_c.length - 1];
  }
  ...
We’ve created a utility for running tests, this should supply you with a good place to start. You can find it packaged in this guide’s repo as testrater.js. Our first test is located in the tests folder and named basic-single-exposure.json (which was created using the testutil.js utility).
At this point, we can go ahead and run our test, making sure to specify the payload.
Runtestrater.js(e.g. node testrater.js –payload tests/basic-single-exposure.json)
You should see a few console.logs as well as some return values. We can use these return values to build some test scenarios.
[DEBUG vehicle_rate_table_simple_auto] key: Car, value: 1
[DEBUG vehicle_rate_table_simple_auto] key: Car, value: 1
{
    pricedPerilCharacteristics: {
        'f1d99d59-a925-4a67-a0a3-df47ccad6f9d': { premium: 0, technicalPremium: 299.7, commissions: [Array] },
        'bd62c5e4-98cd-474f-8d73-124390b2d3eb': { premium: 0, technicalPremium: 299.7, commissions: [Array] }
    }
}
This gives us the values we’d expect from the UI! We can now build around this to determine if a payload has run and while returning proper values. We’ll do this by creating an expected-rates.json file inside our tests folder.
Adding Github Actions
Github Actions can be a very important part of a deployment pipeline. These actions can ensure everyone is aware of whether a PR has passed tests or not and whether a build is healthy. Included in our sample project you’ll find a .github/workflows/rating-checks.yml yaml file. This contains the definition for running our node testrate.js –runAll script, which returns a failure when a test within that script fails.
- Update your configuration to include a .github/workflows/rating-checks.yml file.
- Copy the rating-check.yml file to your new .github/workflows folder.(e.g. mkdir .github/; mkdir .github/workflows)Push add all your files and push your changes to github.(e.g. git add .; git commit -m “Add rating workflow”)
You can now observe your Github actions running from the “Actions” tab in your Github repo!
When building out complex Github actions you may wish to test them locally. This is possible with certain third party utilities (e.g act, which depends on docker).
Adding Deployment
Any number of steps can occur during the deployment phase, but here we’ll focus on some of the material in the last section, running tests and then pushing the Socotra configuration to a tenant.
Often running tests before deploying can save a lot of headache. If you know something is broken before you deploy, it, at the very least, saves you the headache of fixing a production issue.
Any tenant can accept configuration as part of an API call. Though this could be done manually, it saves a lot of hassle to write a deployment script. This can be done in whatever language you’d like and will include and pre-deploy and post-deploy actions we’d like to perform. Included in this guide is a deploy.py script that performs the steps described in this guide.
Onward and Upward!
Additional follow-on guides are in development, once available, appropriate content links will be updated. In the meantime, if you find yourself with any pressing questions, please do not hesitate to reach out to your Socotra contact for details.
Socotra has several plugins outside of the rater (i.e. prorater, installments, underwriting). These work in a similar way as described within this articles and can be tested in a similar fashion. The best advice if you’re starting from scratch with these is to explore the plugin payloads and response. Using those, you should be able to manually call any plugin as the Socotra Engine would.