Migration
Overview
With Socotra Insurance Suite's dedicated migration service, you can put your entire book of business into the system in a precise, efficient way.
The basic migration process looks like this:
- Deploy a configuration to the target tenant that will receive migrated data.
- Convert your source data to the form specified in the AccountMigrationRequest or MigrationRequest.
- Upload your data to the appropriate migration service endpoint.
- If necessary, address any errors reported during migration and resubmit problematic entities.
Migration Structure
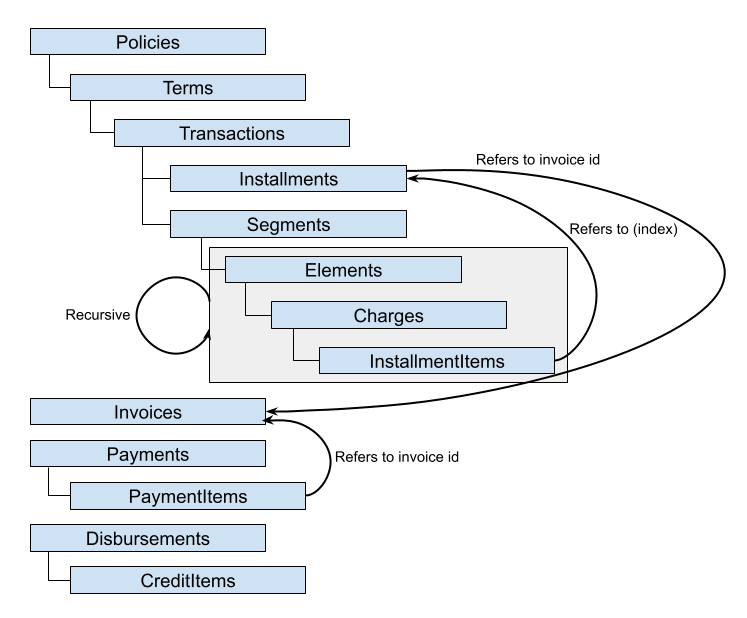
You can easily import policies, accounts, invoices, payments, and disbursements from other systems by providing those entities in a form natural to the Socotra data model.
These are the top-level entities that you can provide in a migration request:
- Accounts
- Policies
- Invoices
- Payments
- Disbursements
A policy is the atomic unit for a migration request: when you supply a policy, you should supply all necessary transaction history, along with any applicable invoices, payments, and disbursements. Once a policy has been migrated, it is a full-fledged policy in Socotra, and cannot be altered further through the migration service.
Since you may wish to import accounts, or already have accounts in the target tenant for which you would like to import data, the service offers two distinct entry points:
- Start Migration: takes an AccountMigrationRequest
- Start Migrations for an Existing Account : takes a MigrationRequest
In either case, the migration request contains all information required for Socotra to create supplied entities in the platform. Where possible, essential relationships are conveyed in Socotra's natural hierarchy: a policy contains one or more terms, each of which contains one or more transactions, each of which may have one or more installments, and so on. This essential structure is reflected in the PolicyMigrationRequest. Likewise, InvoiceMigrationRequest, PaymentMigrationRequest, and DisbursementMigrationRequest allow you to specify related sub-entities as children of the parent entity.
Billing Entities
Invoices, payments, and disbursements are not required for a migration request. If you specify installments but do not assign them to invoices provided in the migration request, the system will generate invoices for those installments, following typical system behavior for unbilled installments.
Invoice migration requests
with an invoiceState of settled will result in a settled invoice, even if
payments assigned to the invoice do not sum to the total amount due on the
invoice. The outstanding amount on any such invoice will be written off. As in
normal platform operation, payment amounts in excess of the total amount due
will go to the account balance.
If your target config has the Auto Credit Application feature enabled, you can use AccountingMigrationRequest to tell the platform what the expected account balance is following migration, so that the platform takes the following actions automatically:
- Issuing a negative invoice if the post-migration balance is lower than expected.
- Issuing a positive invoice, paid with funds from the account balance, if the post-migration balance is higher than expected.
An AccountingMigrationRequest expecting the result balance to be $0 would look like this, in its AccountMigrationRequest context:
{
	// ...,
	"accounting": {
		"originalAccountBalances": {
			"USD": 0
		}
	}
	// ...,
}
We recommend that you limit migration requests to 50 megabytes, which ensures rapid completion for a range of scenarios, such as "many policies with few transactions" or "few policies with many transactions". Contact your Socotra representative for performance and request size limit details relevant to your specific needs.
Bring Your Own Identifiers
Most migration request entities allow you the option to assign your own identifier to an id property. To specify a relationship that cannot be inferred from the migration hierarchy, such as an installment (contained in a transaction on a policy) that should be assigned to an invoice (a peer of policies in the migration request), you can assign your own identifiers to entities and refer to them elsewhere in the request. Socotra will convert custom identifiers to platform identifiers, maintaining referential integrity. Two migration endpoints expose the mappings from your own identifiers to Socotra identifiers:
Migration Management
A migration request to Start Migration or Start Migration For Account will receive a MigrationResponse with information that can be used to track the status of the migration, which is processed asynchronously. You can check on migration progress using the Get Migration Summary endpoint.
A forthcoming release will allow you to fetch migration events in the event stream and set up webhooks to listen for key events, eliminating the need for status polling.
If a migration is processing, you may pause it with Pause Migration and resume it with Resume Migration. Any in-flight transactions will be fully processed before the pause takes effect, and you may interact with accounts and policies that had already been migrated prior to the pause. To view detailed lists of migrated entities, use the migration mappings endpoints.
Remediation
The migration service distinguishes between failure and error states: if any migrated entity in the request set fails validation -- for example, you supply an account to be migrated with some data that violates some rule in your validation plugin -- then the migration service will have a migrationState of failed. If a system error causes the migration to fail, then the migrationState will be error.
You can attempt to recover from an error state with the recoverMigration endpoint. For migration failures due to invalid data, you can follow this procedure:
- Determine which specific elements failed, and why, with Get Migration Failures.
- Patch the migration request, supplying updated versions of the entities that failed validation.
- Issue a
recoverMigrationrequest.
Migration recovery for a failure state will return the same failure result if no patch attempt has been made. This is true even if, after a failure due to validation errors, you deploy a configuration that removes validation rules that caused the failure. The Migration Client is especially helpful for failure recovery scenarios since it automatically writes patch files to disk, which you can modify or simply resubmit.
Idempotency Key
Purpose
The migration service supports idempotent requests via the optional X-Idempotency-Key header. When you include an idempotency key, the first request starts a new migration as usual. Subsequent requests that use the same key (for that tenant) will reuse the existing migration instead of creating a new one.
In this way, the key allows you to safely retry a request after timeouts or network issues without duplicating work or double‑migrating data.
The header is case-insensitive: for example, "test" and "TEST" are treated as the same key.
Recommendation
Use X-Idempotency-Key whenever your client might retry a migration request, especially for scenarios like these:
- The client times out waiting for a response from the migration service.
- The connection drops partway through a large payload.
- You are running migrations in an automated pipeline that can rerun failed jobs.
In all of these cases, re-sending the request body with the same idempotency key makes the operation safe: the service either continues the existing migration or returns its completed status without starting a new migration.
Example: Safely Retrying a Large Migration
Suppose you send a large file of account data, and your client times out. If the client never receives a response, you can retry with the same payload and the same X-Idempotency-Key value. The service will not create a second, duplicate migration; instead, it will treat it as the same logical request.
If you change the payload, you should also change the key so that the new migration is treated as a distinct operation.
Generating an Idempotency Key
The migration service does not generate keys for you. It is the client’s responsibility to:
- Generate a unique idempotency key value.
- Supply it on the first
POSTfor a given logical migration. - Reuse exactly the same value for any retries of that same logical migration.
Guidelines
- Treat the key as an opaque token scoped to a single logical request (for example, "this specific input file to this endpoint on this tenant").
- Use a value that is resistant to collisions (such as a UUIDv4 or ULID) and easy for your tooling to log and correlate.
- Do not reuse the same key for different migration payloads. If the input data or target account set changes, generate a new key.
Because comparison is case-insensitive, you should either:
- Always generate lowercase (recommended), or
- Always normalize casing before sending, to avoid accidental mismatches in your own code.
Migration Tutorial
We'll walk through a simple case, showcasing the Migration API endpoints.
Prerequisites
- Access to a Socotra environment, with configuration deployment and migration privileges
- A personal access token (PAT)
Get the sample config and source data
You can find a sample configuration and source data for migration in this GitHub repository: https://github.com/socotra/migration-tutorial.
The configuration is based on the "Blank" model you'll find in Configuration Studio. Deploy it to a tenant and record the tenant locator for subsequent API calls.
Make a migration request and check results
You'll see a convertedSource.json file in the converted directory of the tutorial repository. Use it as the body of a Start Migration request.
After making the request, check the status with the Get Migration Summary endpoint. You'll see a result like this:
{
	"locator": "01K04P56E46KN3DDY6695M2T9P",
	"migrationState": "finished",
	"processedAccounts": 1,
	"totalAccounts": 1
}
The migration has completed successfully. You can use the locator to fetch additional details, such as the mappings of source data to Socotra equivalents. If you submit a request to Get Migration Mappings, you'll see a result like this:
{
	"listCompleted": true,
	"items": [
		{
			"migrationLocator": "01K04P56E46KN3DDY6695M2T9P",
			"accountLocator": "01K04P5750Z06AEMZN0XAT5SQF",
			"originalAccountId": "1234",
			"policies": {
				"01K04P576TNEFFR6R6N9W8GEGP": {
					"originalId": "policy_1000",
					"childrenMappings": {
						"01K04P576TNEFFR6R6N9W8GEGP": {
							"transactions": ["01K04P576TNEFFR6R6N9W8GEGP"]
						}
					},
					"migratedAt": "2025-07-14T14:41:54.681829Z"
				},
				"01K04P57H8RK5CV0STSH3CBDG9": {
					"originalId": "policy_1001",
					"childrenMappings": {
						"01K04P57H8RK5CV0STSH3CBDG9": {
							"transactions": [
								"01K04P57H8RK5CV0STSH3CBDG9",
								"01K04P57Q13EGHXWDJ72SAB9BF"
							]
						}
					},
					"migratedAt": "2025-07-14T14:41:54.975834Z"
				},
				"01K04P57SAXDE057CHYSS2MDZG": {
					"originalId": "policy_1002",
					"childrenMappings": {
						"01K04P57SAXDE057CHYSS2MDZG": {
							"transactions": [
								"01K04P57SAXDE057CHYSS2MDZG",
								"01K04P57SFMS0PJT9SZSTNPGR4",
								"01K04P57SFJFZ51GNN745KQGPG"
							]
						}
					},
					"migratedAt": "2025-07-14T14:41:55.229591Z"
				}
			}
		}
	]
}
Note how key entities such as accounts and policies are shown with their original IDs from the source data, with a clear indication of the corresponding locator in Socotra. For example, policy_1002 was mapped to policy locator 01K04P57SAXDE057CHYSS2MDZG. This makes it easy to understand how the source data maps to the Socotra rendition.
Handle a failed migration
The migration API allows you to recover from errors and failures. An error migrationState arises if an issue arises on the platform side -- you can retry the migration without modifying the input data. A failed migrationState indicates that there was an issue with the input data.
The Migration API exposes failure fetch, patch, and recover endpoints to address a "failed" migrationState. To see this sequence in action, we'll introduce a data error, make the migration request, fetch failure details, patch our data, and issue a recover request.
Remove the firstName entry from the accountData in the original migration request, leaving the account with just a lastName. Submit the migration request. When you get the migration summary, you should see a failed state:
{
	"locator": "01K04V1HK97GYPWHP48PNDQQRT",
	"migrationState": "failed",
	"processedAccounts": 1,
	"totalAccounts": 1
}
To see details, make a request to Get Migration Failures. You should see that the supplied data failed to pass validation, with enough information to identify the problematic account:
{
	"listCompleted": true,
	"items": [
		{
			"accountLocator": "01K04V1J98ED34S2DRDBZMCTD1",
			"accountOriginalId": "1234",
			"accountError": {
				"originalId": "1234",
				"errors": {
					"validationItems": [
						{
							"elementType": "SampleAccount",
							"errors": [
								"Non optional property 'sampleAccount.firstName' is missing"
							]
						}
					],
					"success": false
				}
			}
		}
	]
}
In order to rectify this issue so that the account migrates successfully, you'll use the Patch an Existing Migration Request endpoint. Even though the account has not been migrated, it has been assigned a provisional locator: 01K04V1J98ED34S2DRDBZMCTD1. We will use this locator to indicate to the system which account is to be patched. Here's the patch body:
{
	"defaultCreatedBy": "dc68c494-6918-487a-bf08-58c2983175dc", // update with your uuid
	"accountLocator": "01K04V1J98ED34S2DRDBZMCTD1", // update with your account locator
	"accountData": {
		"id": "1234",
		"accountType": "SampleAccount",
		"data": {
			"firstName": "Ambrose",
			"lastName": "Bierce"
		},
		"billingLevel": "policy",
		"createdAt": "2024-08-29T22:40:11.538Z"
	}
}
After submitting the patch request and once again checking the migration status, you will see that the errors list is now empty:
{
	"listCompleted": true,
	"items": []
}
Next, submit a Recover Migration request. Staged updates via data patches will not be applied to a migration until you issue a migration recovery request.
Upon checking migration status, you will see it has succeeded:
{
	"locator": "01K04V1HK97GYPWHP48PNDQQRT",
	"migrationState": "finished",
	"processedAccounts": 1,
	"totalAccounts": 1
}
And that's it! So far, you've
- Learned about the primary migration endpoints
- Submitted an account migration request
- Submitted an erroneous migration request, examined the reason for failure, fixed the data, and "recovered" the migration
Using a converter
Of course, in a typical migration scenario, you'll have raw data that needs to be converted to the Migration API input format. In the tutorial GitHub repository, you'll see these directories:
source: a sample set of raw data from a hypothetical policy administration serviceapps/converter: a sample converter, written in Python, that converts the source data to the Socotra Migration API format
You can run the converter to transform the source data into a format ready for input into the Migration API, and also execute the checker (apps/checker) to validate results in Socotra. Since such tasks -- fetching data from a source system, transforming it, sending it to the Migration API, and performing any post-migration tests and related tasks -- follow a predictable pattern, we have created a Migration Client to coordinate those steps. Read on to learn more about the Migration Client and how it works.
Migration Client
We publish a Migration Client that orchestrates common migration pipeline tasks, helping you to get your data into Socotra as quickly as possible. Here's how it looks from a high-level perspective:
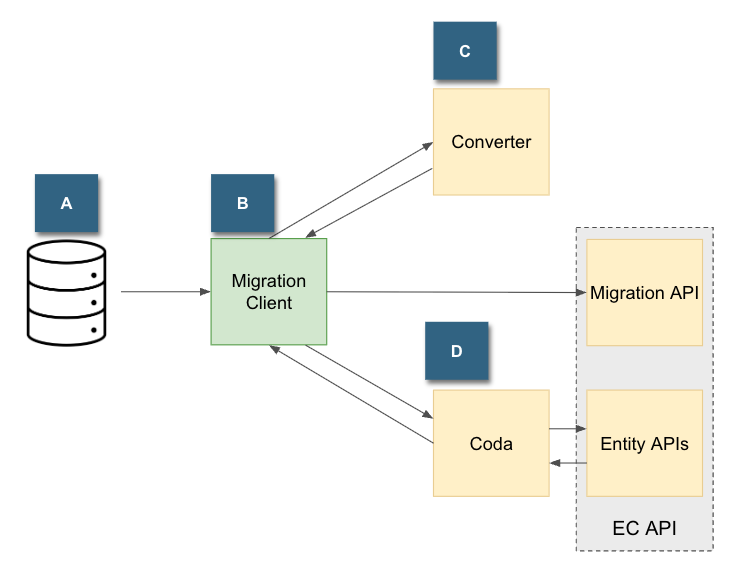
- A: Raw data source on disk. We may augment the client with connectors to fetch from other source types, as demand warrants.
- B: Migration Client, serving as an orchestrator that fetches raw source data, shepherds it through conversion and input into the migration API, and optionally calls post-migration checks.
- C: Converter, a custom application that turns raw source data into the format expected by the Migration API, and which conforms to the target tenant configuration.
- D: Coda, a custom application capable of performing post-migration activities, such as inspecting data after migration to ensure expected results. While we depict checks as interacting with the EC API, it could conceivably connect to other services, such as Data Lake, to perform tasks.
The Migration Client abstracts common migration patterns, isolating necessary custom logic to specific components. As long as your converter and coda apps are exposed as callable binaries, placing results on disk, they can be used with the migration client.
Obtaining the Client
The Migration Client can be downloaded as a package from our Config SDK Template repository :
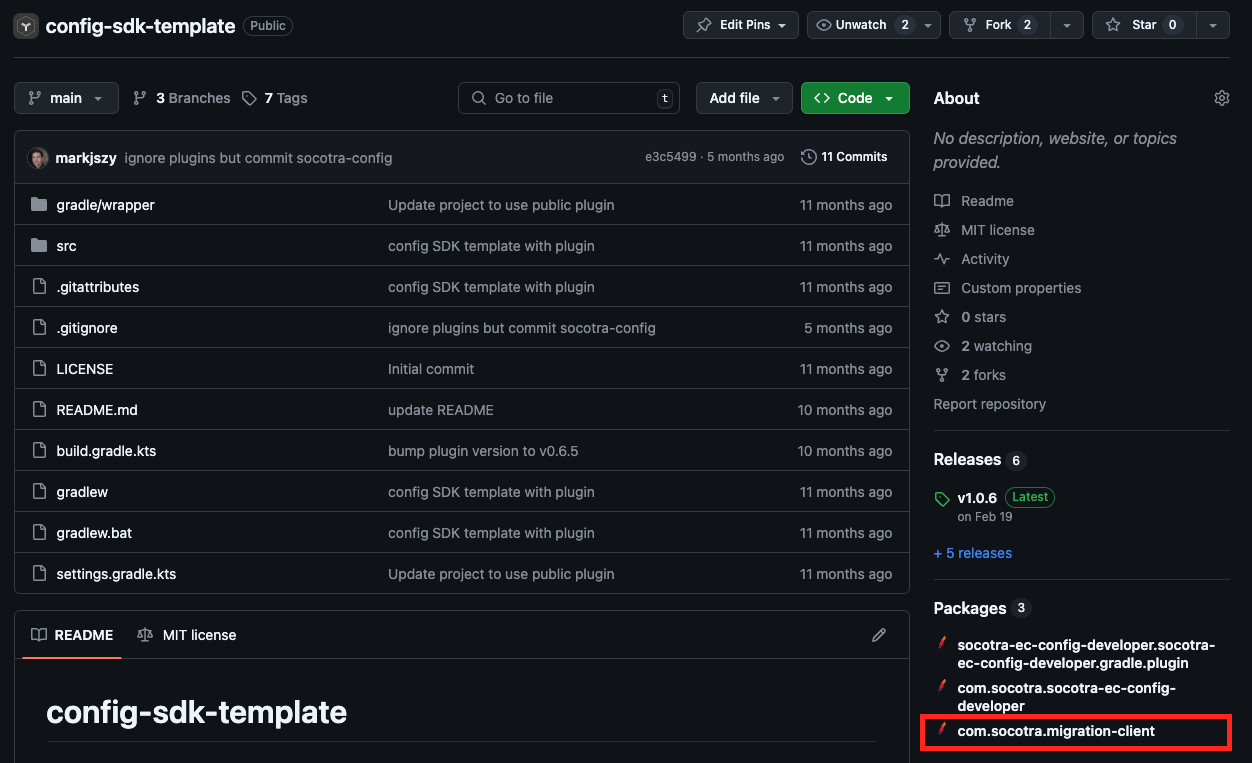
On the package page, you'll just need migration-client-[version]-distribution.zip, listed under "Assets".
After unzipping the archive, you should be able to confirm that you can run the client by navigating to the bin directory and running the ./migrate command:
(.venv) alice@machine1 bin % ./migrate
Usage: ./migrate <path-to-config-file>

Options:
<path-to-config-file>   Specify the location of the configuration YAML file.
help                    Show this help message.

Configuration file help:
help pipeline            Show configuration details for the Migration Pipeline.
help service-api         Show configuration details for the Service API.
help converter           Show configuration details for the Migration Request Converter.
help processor           Show configuration details for the Request Processor.
help patcher             Show configuration details for Patch Migration Failures.
help coda                Show configuration details for the Post Migration.
As you can see from the default screen, the client takes a YAML configuration file as input. The YAML file tells the migration client which components should be run, and what the command-line arguments to those components are. Follow the tutorial below for a complete example of a working migration.
The Migration Client requires a Java 17+ runtime. If you encounter an error while attempting to execute the launch script, make sure that you have a JRE installed on your system.
Migration Client Tutorial
In this tutorial, we'll set up a migration to Socotra, pretending we have raw source data from another system that needs to be converted to the Socotra format and sent to the Migration API.
Prerequisites
- Migration Client
- Python 3.x for the sample converter and checker apps
After you've obtained the Migration Client package and confirmed that you can run it, clone or download this repository: https://github.com/socotra/migration-tutorial. This repository contains a basic sample config, mock source data from a chimerical policy administration system, a converter app, and a coda app.
├── apps
│   ├── coda
│   └── converter
├── config
└── source
The configuration is based on our simple "Blank Config", available in Configuration Studio.
After deploying the configuration, you're ready to start configuring the Migration Client.
Configuring the Migration Client
The Migration Client package contains the following configuration template in migrate-properties.yaml:
migration:
  pipeline:
    converter-enabled: true
    processor-enabled: true
    patcher-enabled: true
    coda-enabled: true
  converter:
    application:
    command: # a command-line statement; in the example below, a primary "app" has two subcommands, "analyze" and "convert"
      - <absolute path>/path/to/app
      - analyze
      - <absolute path>/path/to/sample/data
      - convert
      - '-o<absolute path>/path/to/converter/output' # example of passing an arguments to a subcommand
      - '<absolute path>/path/to/data'
  service-api:
    url: https://api-ec-sandbox.socotra.com
    personal-access-token: <PAT>
    tenant-locator: <tenant_locator>
  processor:
    concurrency: 10 # number of concurrent requests
    poll-interval-duration: 5s # max time to wait on migration API response to a migration request
    input-requests-folder: <absolute path>/path/to/converter/output
    output-summary-folder: <absolute path>/path/to/processor-summary
  patcher:
    input-requests-folder: <absolute path>/path/to/converter/output
    input-summary-file: <absolute path>/path/to/processor-summary/migration-result.csv # default result name is "migration-result.csv"
    output-patch-requests-folder: <absolute path>/path/to/output-patch-summary/
  coda:
    application:
    command:
      - <absolute path>/path/to/checker
      -  # other args for checker...
Copy this configuration template to a preferred location.
First, we'll set up the converter. In a terminal, go to the apps/converter directory, and perform the usual steps to ready a Python script for execution, like this:
python3 -m venv .venv     # create a virtual environment
source .venv/bin/activate # activate the environment
Since this converter implementation only uses facilities from the Python standard library, there's no need to install any requirements. You should operate within this active environment for the remainder of this tutorial.
You can verify that the converter is ready for work by typing python converter.py. You should see the following:
usage: convert.py [-h] --defaultCreatedBy DEFAULTCREATEDBY input_dir output_file
convert.py: error: the following arguments are required: input_dir, output_file, --defaultCreatedBy
While we could execute the converter on the command line, we'll set up the Migration Client to call the converter for us in the context of a complete migration pipeline. To do so, let's first make sure we have all the values we need:
DEFAULTCREATEDBY: this is the UUID of a user who will be treated as the default creator of a migration record if another is not specified. For testing purposes, just issue a Fetch My User Details request and use your UUID.input_dir: this is the source data directory. In our case, it'll be the absolute path to thesourcedirectory in your local copy of the tutorial repository.output_file: the absolute path to a file where the converter should write its output. The output is what the migration client will send to the Migration API.
With this information, you're ready to run the Migration Client and have it call the converter on your behalf. Suppose the argument values are as follows:
DEFAULTCREATEDBY:dc68c494-6918-487a-bf08-58c2983175dcinput_dir:/Users/alice/projects/migration-tutorial/sourceoutput_file:/Users/alice/projects/migration-tutorial/converted-data.json
Then we can update the first portion of the Migration Client YAML as follows:
migration:
  pipeline:
    converter-enabled: true
    processor-enabled: false
    patcher-enabled: false
    coda-enabled: false
  converter:
    application:
    command: # a command-line statement; in the example below, a primary "app" has two subcommands, "analyze" and "convert"
      - python
      - /Users/alice/projects/migration-tutorial/apps/converter/convert.py
      - '--defaultCreatedBy=dc68c494-6918-487a-bf08-58c2983175dc'
      - '/Users/alice/projects/migration-tutorial/source'
      - '/Users/alice/projects/migration-tutorial/converted-data.json'
Note that we have disabled the other parts of the pipeline (processor, patcher, coda) for now. When you run the Migration client from the command line (./migrate in bin), passing it the path to your YAML configuration, you should see something like this:
(.venv) alice@machine1 bin % ./migrate /Users/alice/migration-tutorial-config-demo/migrate-properties.yaml
2025-07-15 17:27:53.443 [main] INFO  c.s.m.c.s.pipeline.MigrationPipeline - Executing step ApplicationConverter
2025-07-15 17:27:53.445 [main] INFO  c.s.m.client.services.CommandRunner - building external process from [python, /Users/alice/projects/migration-tutorial/apps/converter/convert.py, --defaultCreatedBy=dc68c494-6918-487a-bf08-58c2983175dc, /Users/alice/projects/migration-tutorial/source, /Users/alice/projects/migration-tutorial/converted.json]
2025-07-15 17:27:53.455 [main] INFO  c.s.m.client.services.CommandRunner - started process  for command [python, /Users/alice/projects/migration-tutorial/apps/converter/convert.py, --defaultCreatedBy=dc68c494-6918-487a-bf08-58c2983175dc, /Users/alice/projects/migration-tutorial/source, /Users/alice/projects/migration-tutorial/converted.json]
Wrote 1 account records to /Users/alice/projects/migration-tutorial/converted.json
2025-07-15 17:27:53.575 [main] INFO  c.s.m.client.services.CommandRunner - process completed
If you check converted.json, you'll see the expected converter output.
Next, let's have a look at the processor.
Configuring the processor
The processor component sends converted migration input files to the Migration API. It can be configured to make concurrent requests, cutting down on migration time, and can optionally create "patch" files automatically for records that failed migration and which can be resubmitted with corrected data.
Under the service-api portion of the client configuration, you'll need to specify the base API URL, a personal access token with appropriate privileges, and the target tenant locator. Then specify the location of your converted data in input-requests-folder, and the output location for processor records in output-summary-folder. Finally, enable the processor by setting processor-enabled to true (you can also set converter-enabled: false since, if you are following this tutorial in order, you already have converted files ready for import to Socotra).
Once you have taken these steps, run the Migration Client again. You should see output like the following:
2025-07-16 10:02:48.942 [main] INFO  c.s.m.c.s.pipeline.MigrationPipeline - Executing step RequestsProcessor
2025-07-16 10:02:48.946 [pool-2-thread-1] INFO  c.s.m.c.s.p.RequestsProcessor - Processing file: converted-data.json
2025-07-16 10:02:50.021 [pool-2-thread-1] INFO  c.s.m.c.s.p.RequestsProcessor - Migration[01K09RQ3AQAVXYPX4C2QCZ4YQ5] started for file converted-data.json
2025-07-16 10:02:50.113 [pool-2-thread-1] INFO  c.s.m.c.s.p.RequestsProcessor - Migration[01K09RQ3AQAVXYPX4C2QCZ4YQ5] in progress totalAccounts=1 processedAccounts=0
2025-07-16 10:02:55.210 [pool-2-thread-1] INFO  c.s.m.c.s.p.RequestsProcessor - Migration[01K09RQ3AQAVXYPX4C2QCZ4YQ5] completed with state: finished
2025-07-16 10:02:55.213 [main] INFO  c.s.m.c.s.p.RequestsProcessor - All tasks completed
2025-07-16 10:02:55.213 [main] INFO  c.s.m.c.s.p.RequestsProcessor - Processed 1 files
You should also see a migration-result.csv in the directory you specified for processor output. This file will contain contents like the following:
converted-data.json,01K09RQ3AQAVXYPX4C2QCZ4YQ5,finishedThe first column is the converted file name, the second is the migration locator corresponding to that input, and the third column is the status. The finished status indicates that this migration was successful. From here, you can fetch mappings to identify the equivalent entity locators on the tenant.
Using patch files
To demonstrate the use of patch files, we'll introduce a minor error in our source data, and have the Migration Client run a new conversion and migration processing step.
First, in the configuration YAML, set converter-enabled, processor-enabled, and patcher-enabled to true. In the patcher section, set input-requests-folder to the absolute path of the converted data directory, the input-summary-file to the absolute path to migration-result.csv, and output-summary-folder to the location to place patch files.
Next, in the source data, remove the lastName from the account record (source/accounts/account-1234.json).
Rerun the Migration Client. Towards the end of the run, you should see entries like this indicating that patch files have been written to help address the migration failure:
2025-07-16 10:20:21.793 [pool-2-thread-1] INFO  c.s.m.c.s.p.RequestsProcessor - Processing file: converted-data.json
2025-07-16 10:20:22.398 [pool-2-thread-1] INFO  c.s.m.c.s.p.RequestsProcessor - Migration[01K09SQ7BBJGFZRXHYYZVSAR66] started for file converted-data.json
2025-07-16 10:20:22.493 [pool-2-thread-1] INFO  c.s.m.c.s.p.RequestsProcessor - Migration[01K09SQ7BBJGFZRXHYYZVSAR66] in progress totalAccounts=1 processedAccounts=1
2025-07-16 10:20:27.592 [pool-2-thread-1] INFO  c.s.m.c.s.p.RequestsProcessor - Migration[01K09SQ7BBJGFZRXHYYZVSAR66] completed with state: failed
2025-07-16 10:20:27.596 [main] INFO  c.s.m.c.s.p.RequestsProcessor - All tasks completed
2025-07-16 10:20:27.597 [main] INFO  c.s.m.c.s.p.RequestsProcessor - Processed 1 files
2025-07-16 10:20:27.597 [main] INFO  c.s.m.c.s.pipeline.MigrationPipeline - Executing step RequestsPatcher
2025-07-16 10:20:27.606 [main] INFO  c.s.m.c.s.patcher.RequestsPatcher - Processing failed migration 01K09SQ7BBJGFZRXHYYZVSAR66 with request file converted-data.json
2025-07-16 10:20:27.751 [main] INFO  c.s.m.c.s.patcher.RequestsPatcher - Saving patch failures for 01K09SQ7BBJGFZRXHYYZVSAR66/01K09SQ7H0M7QCZ1Q02DQ45G10
2025-07-16 10:20:27.763 [main] INFO  c.s.m.c.s.patcher.RequestsPatcher - Saving patch request for 01K09SQ7BBJGFZRXHYYZVSAR66/01K09SQ7H0M7QCZ1Q02DQ45G10
You'll see two files in the patch directory: an <entityLocator>-failures.json, and <entityLocator>.json. Note that in this case, the entity locator is for the problematic account locator record. The -failures.json file details reasons for migration failure, and the corresponding <entityLocator>.json file is a ready-made template that you can feed back into the Migration API to get the record to succeed.
Let's have a look at <entityLocator>-failures.json:
{
	"accountLocator": "01K09SQ7H0M7QCZ1Q02DQ45G10",
	"accountOriginalId": "1234",
	"accountError": {
		"originalId": "1234",
		"errors": {
			"validationItems": [
				{
					"elementType": "SampleAccount",
					"errors": [
						"Non optional property 'sampleAccount.lastName' is missing"
					]
				}
			]
		}
	}
}
No surprises here. Let's enter the last name into the corresponding patch JSON:
{
	"defaultCreatedBy": "dc68c494-6918-487a-bf08-58c2983175dc",
	"accountLocator": "01K09SQ7H0M7QCZ1Q02DQ45G10",
	"accountData": {
		"id": "1234",
		"accountType": "SampleAccount",
		"data": {
			"firstName": "Ambrose",
			"lastName": "Bierce"
		},
		"createdAt": "2024-08-29T22:40:11.538Z"
	}
}
Now you can use this as the body of a patch migration request. When you do so, you'll get this response:
{
	"accountLocator": "01K09SQ7H0M7QCZ1Q02DQ45G10"
}
After staging patches, you must explicitly attempt a migration recovery with the Recover Migration. When you issue this request, you should get a 204 response. You can then affirm that the migrated account has succeeded by checking the Get Migration Summary endpoint:
{
	"locator": "01K09SQ7BBJGFZRXHYYZVSAR66",
	"migrationState": "finished",
	"processedAccounts": 1,
	"totalAccounts": 1
}
Using Coda
The Migration Client can also optionally call an application to run after migration. You just need to configure the coda portion of the configuration, in much the same way that you configured the converter. This can be useful to run custom validation checks and to perform any post-migration tasks via the Socotra API.
To use the sample post-migration application in the tutorial (apps/checks/checks.py), you'll need to install the Python prerequisites (pip install -r requirements.txt from the apps/checks directory). After you've done that, you can update the coda config like this:
coda:
  application:
  command:
    - python
    - /alice/projects/migration-tutorial/apps/checks/checks.py
    - '--tenant-locator=516...'
    - '--auth-token=SOCP_01...'
    - '--source-data=/alice/projects/migration-tutorial/source'
    - '--base-url=https://api-kernel-dev.socotra.com/'
    - '-o/alice/projects/migration-tutorial/checksreport.txt'
    - '/alice/projects/migration-tutorial/processor-summary/migration-result.csv'
If you run the entire migration attempt again, you'll see this line appear:
All migrations passed checks successfully.The sample checks app simply writes success to the console, after making some comparisons between source data and the migration results. In order to do so, it fetches mappings from the Migration API; check the source code for details.
In this Migration Client tutorial, you have completed the primary migration tasks:
- Setting up the configuration and toggling pipeline components
- Calling a converter and passing arguments via the configuration
- Using the processor and patch files for error remediation
- Calling a post-migration application for follow-up tasks, such as result verification
Note that the Migration Client is agnostic with respect to the converter and coda interfaces: if you have an application and can pass it some arguments, you can configure the Migration Client to call it as part of the migration pipeline.