Execute Quote to Bind
This article explains how to execute quote to bind in Socotra.
Overview
What will I learn?
By the end of this tutorial, you will know how to basically take a quote through each stage of its life cycle via wit the Socotra API, including:
Create a quote
Validate a quote
Price a quote
Underwrite a quote
Accept a quote
Issue a quote
What will I need?
You will need the following:
A Postman account
A workspace configured to use the Socotra API.
For more information about using Postman, see: Set up Postman to use the Socotra API.
Key concepts
What is a quote?
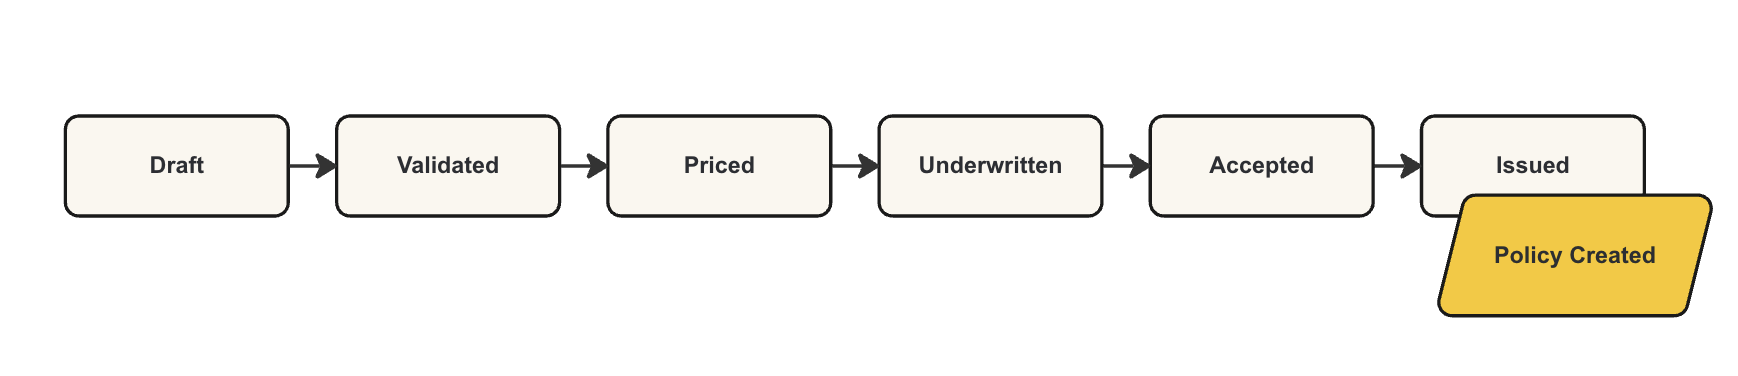
A quote is a price estimate for an insurance policy. A quote goes through six steps from creation to issuance:
Creation (as a draft quote)
Validation
Pricing
Underwriting checks
Acceptance
Issuance
Upon issuance of a quote, a policy is created.
What is a policy?
A policy is the actual insurance product contract provided to the applicant.
Life cycle of a quote
This section lists each chronological stage of a quote from creation to issuance.
Draft (creation):
When a quote is created, it’s in a draft state. While in a draft state, the quote’s data, coverage terms, and attributes (like startTime and endTime) can be freely modified.
This is the only state in which this information can be changed. Once validated, the quote cannot be modified any further.
Validated: When a quote goes through validation, it’s checked against the product configuration and any other custom validation. Upon successful validation, the quote’s attributes can no longer be changed.
Priced: The quote has pricing generated.
Underwritten: The quote passes underwriting checks.
Accepted: The quote has been accepted, but not yet issued. This state requires successfully passing underwriting checks.
Issued: The quote has been issued, creating a resulting policy.
Resetting a quote
Though a quote’s attributes can’t be modified after validation, it is possible to reset a quote. Doing so clears any of the data added to the quote by the pricing and underwriting process.
To reset a quote, use the Reset Quote route in the Socotra Sample
Collection (Policy > Quotes > Reset Quote), making sure to use the
locator for the quote you’d like to reset in the quoteLocator path
variable.
Atypical quote states
In addition to the typical lifecycle states of a quote, a quote can also exist in the following states when there are issues.
UnderwritingBlocked: The quote cannot proceed due to underwriting flags but is not in a denied state of declined or rejected.
Declined: The quote did not pass underwriting, but it can be re-underwritten or reset to draft.
Rejected: The quote did not pass underwriting and cannot be re-underwritten or reset, but it can be discarded.
Refused: Indicates that the customer has decided not to accept coverage. These quotes can be discarded or reset to draft.
Discarded: The quote has been disposed of, so it cannot be processed further. It will not appear in any response, unless directly fetched by locator.
Ready to begin?
Continue onto the next section to learn how to execute a quote to bind using the Socotra API.
Steps
Part 1 - Create a quote
The first step is to create a quote. Upon creation, the quote will exist as a draft quote that can be modified up until validation.
To create a quote, follow these steps:
Log into your Postman account and navigate to the Socotra Sample Collection.
While viewing the Socotra Sample Collection, navigate to Policy > Quotes > Create Quote.
Click the Body tab.
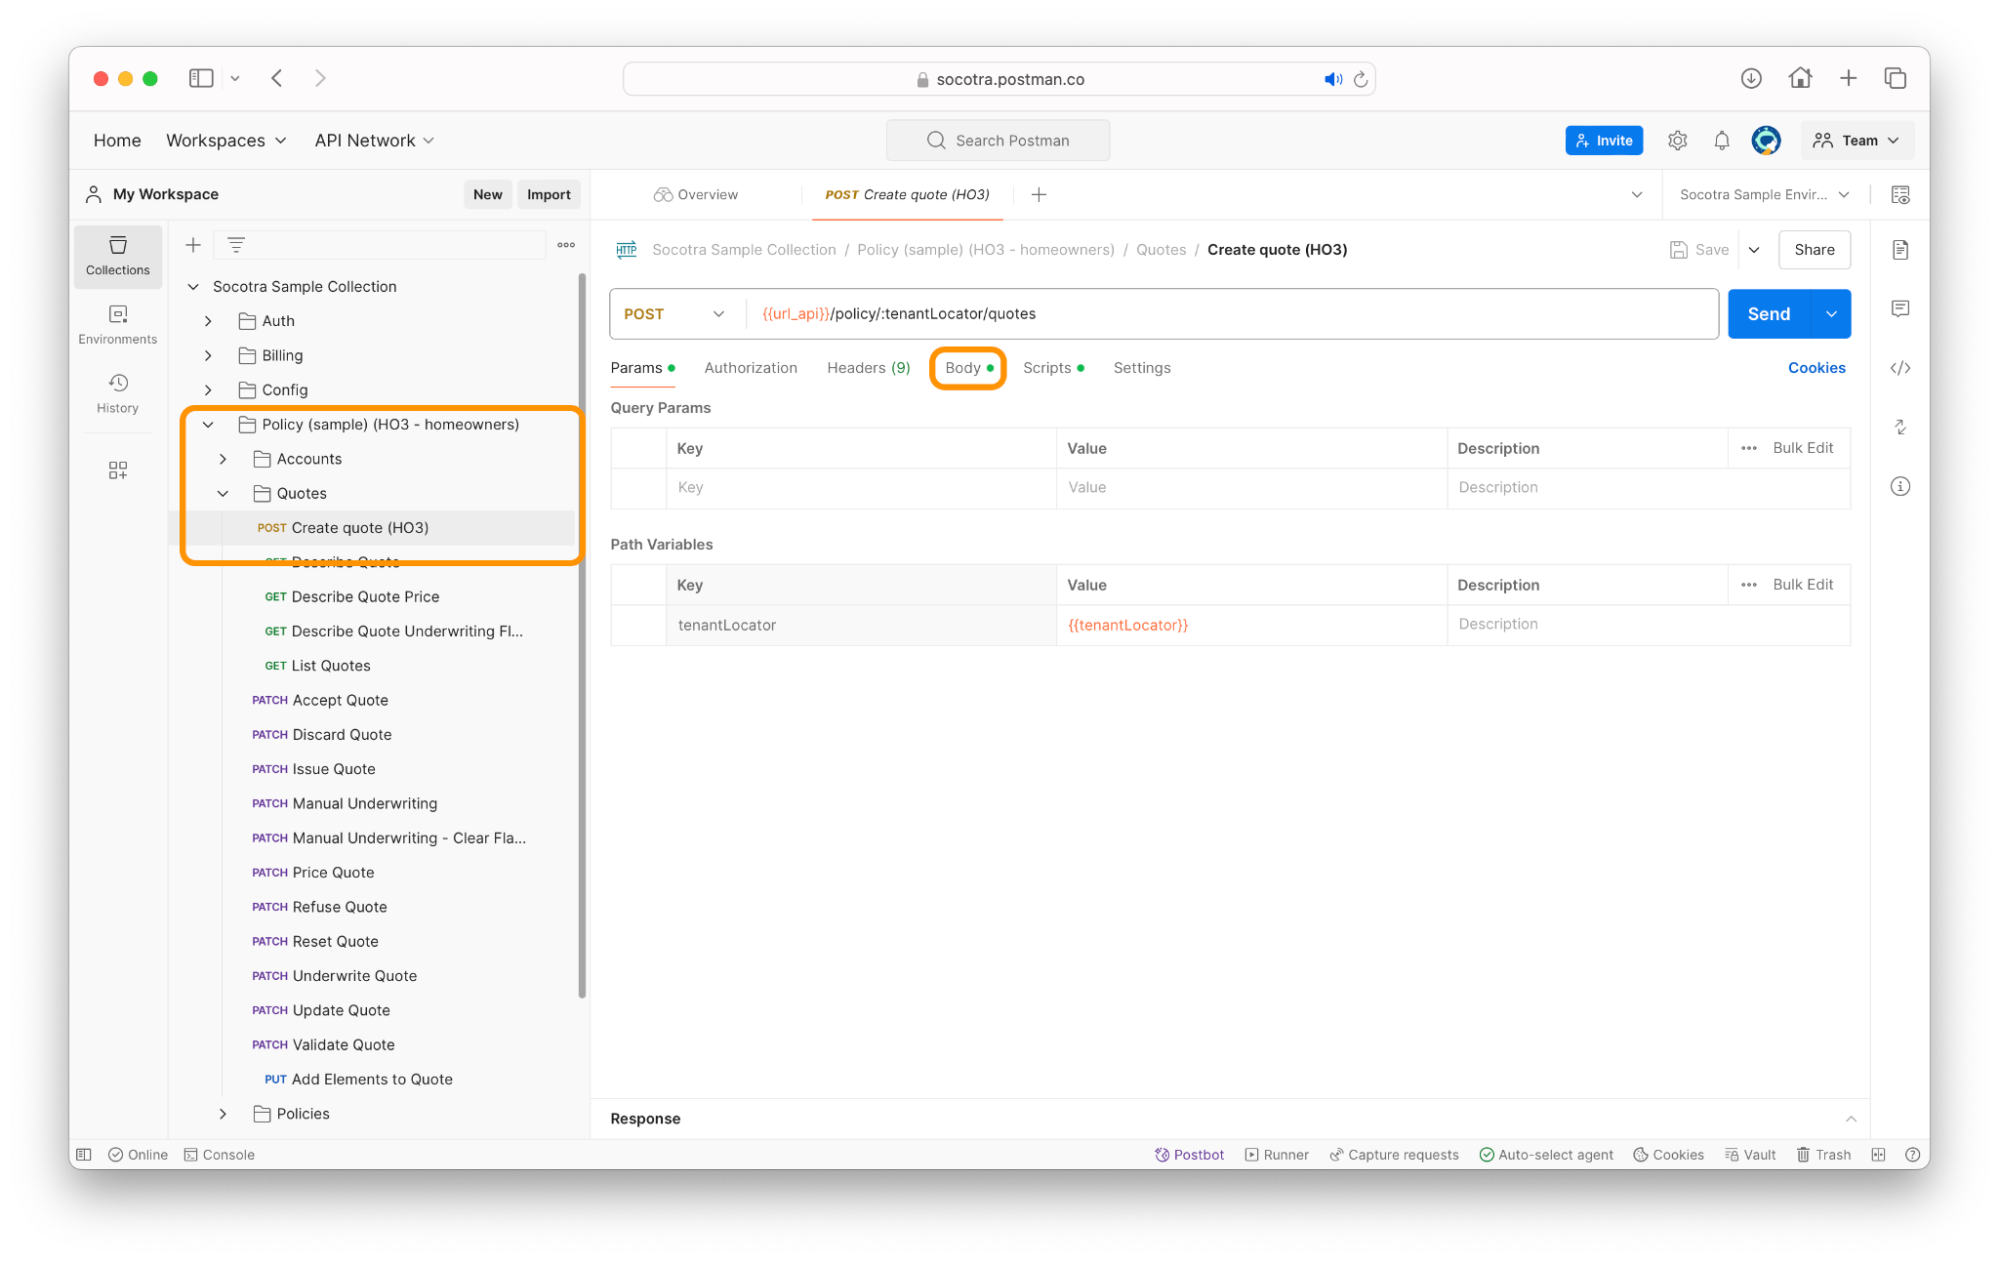
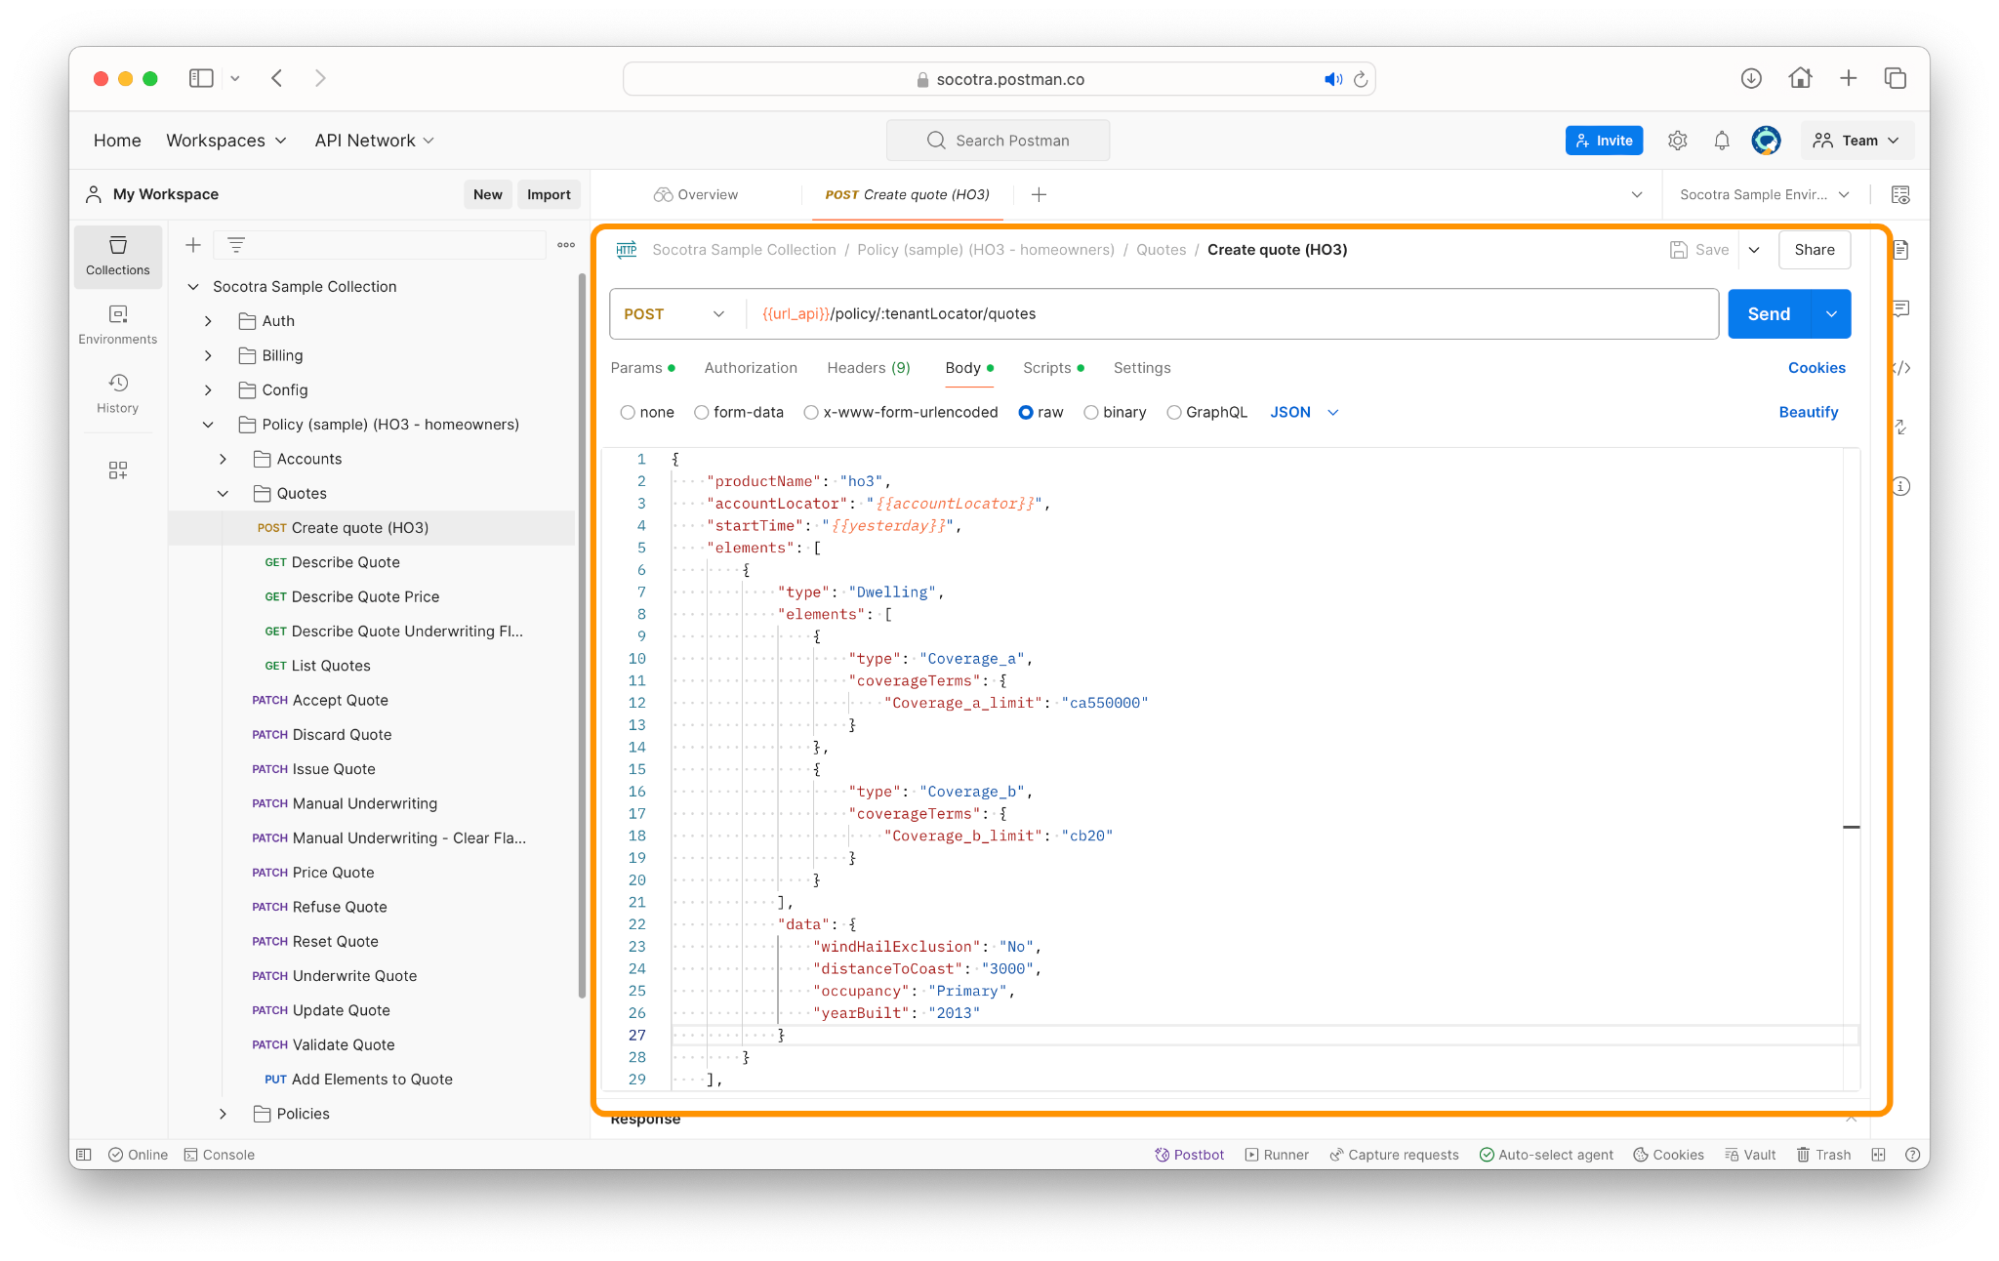
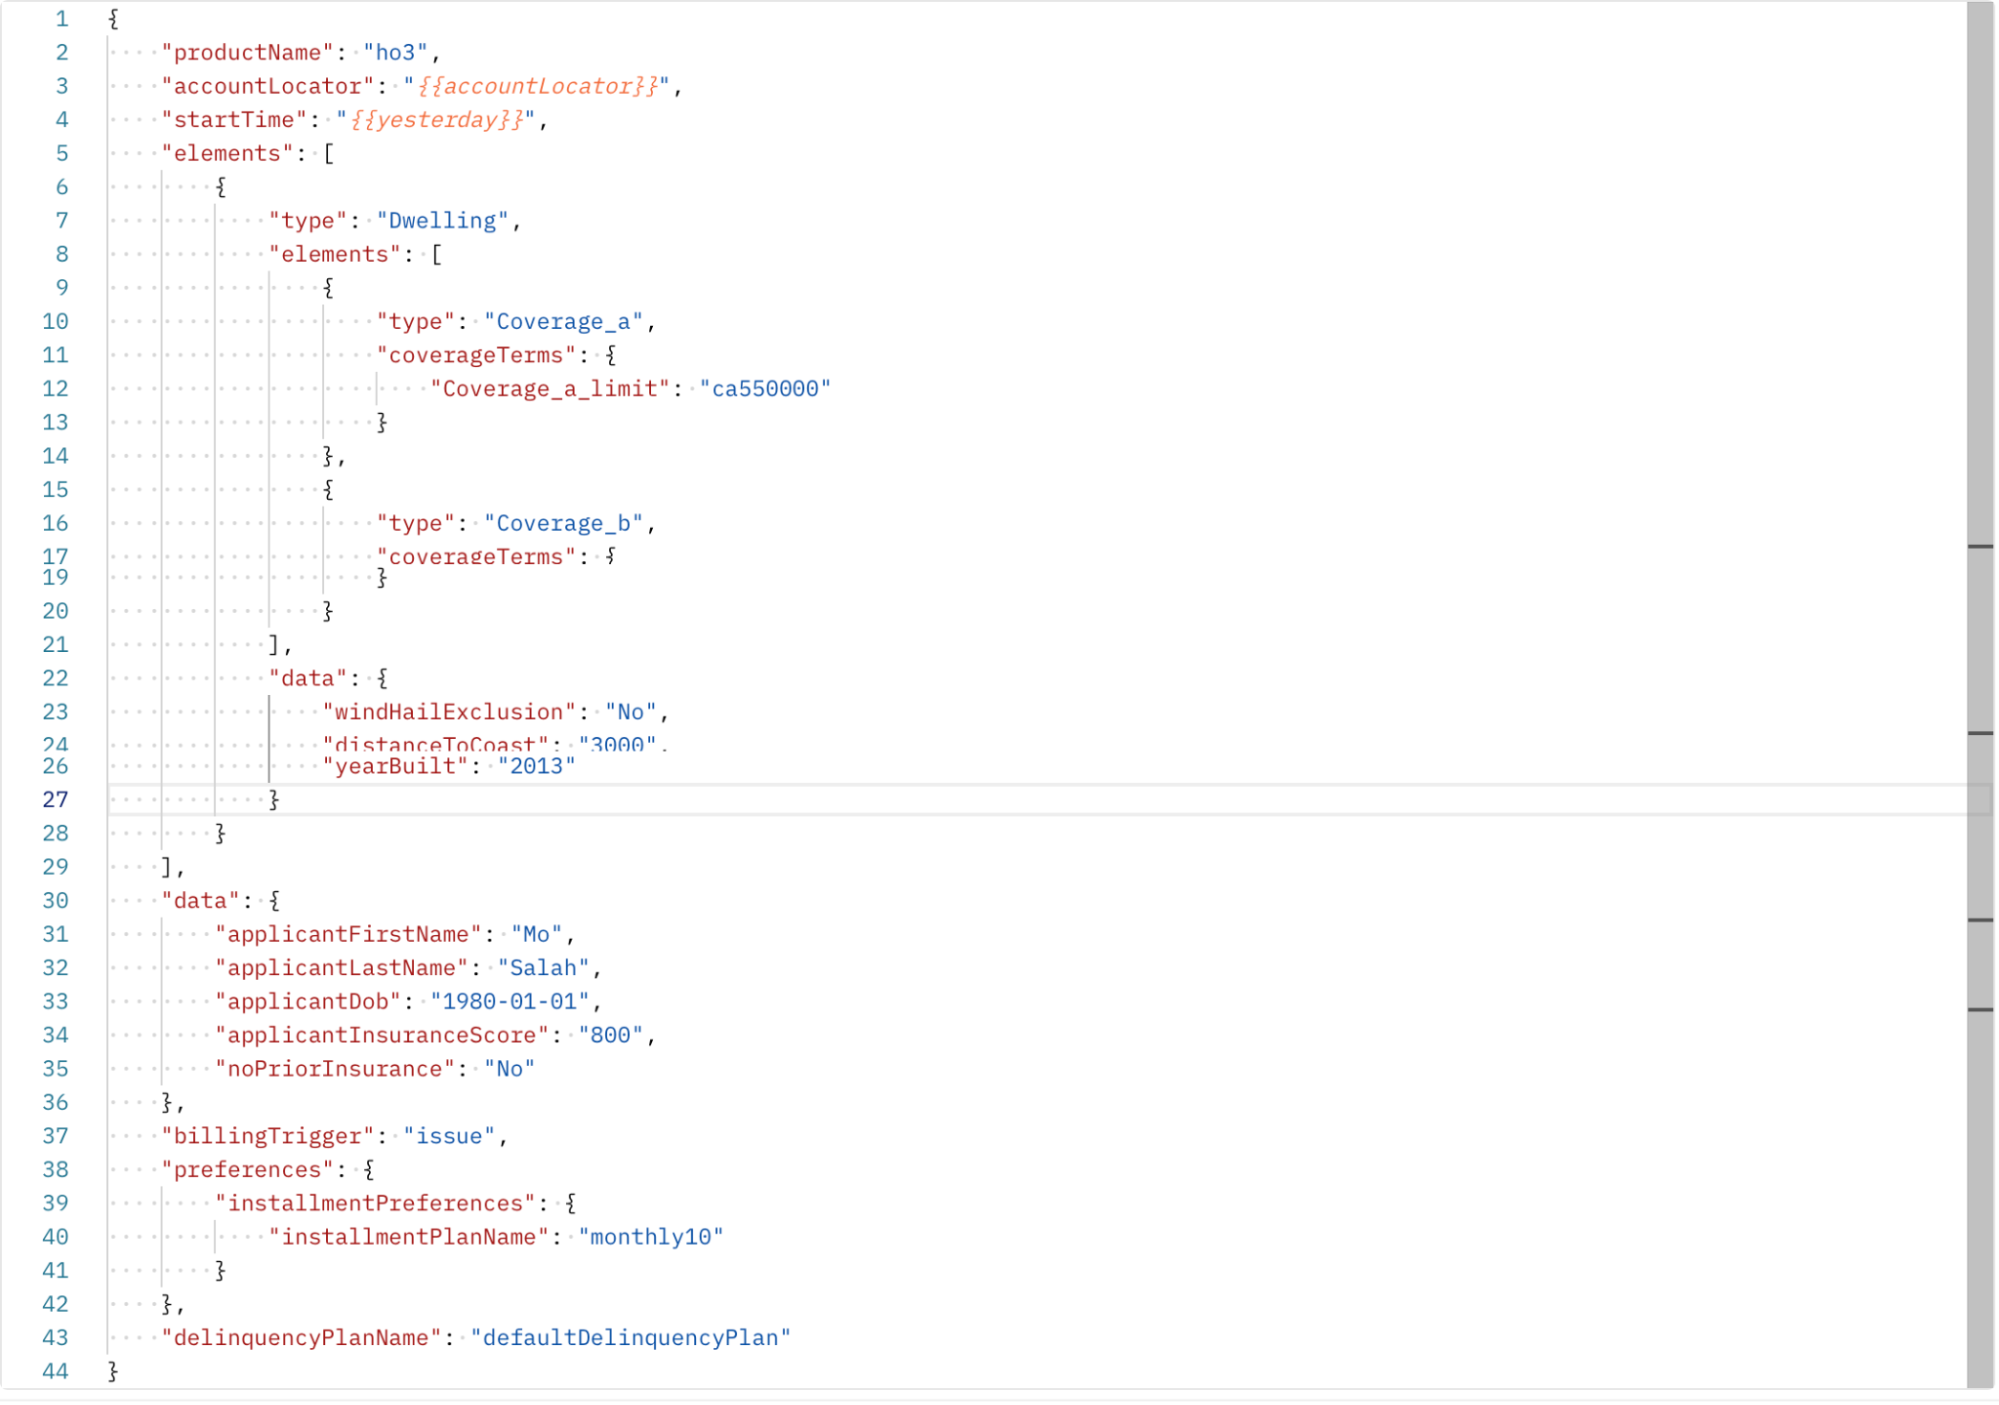
Once you’re viewing the Body tab of the Create Quote (HO3) request, you should see the following request information in JSON format (depicted in the screenshot below):
This data is set up for you to make a draft quote immediately.
For a description of how this is set up, see the subsection below: Request body breakdown.
To create the quote, click Send.
After clicking Send, you should receive a response message indicating success like the one below:
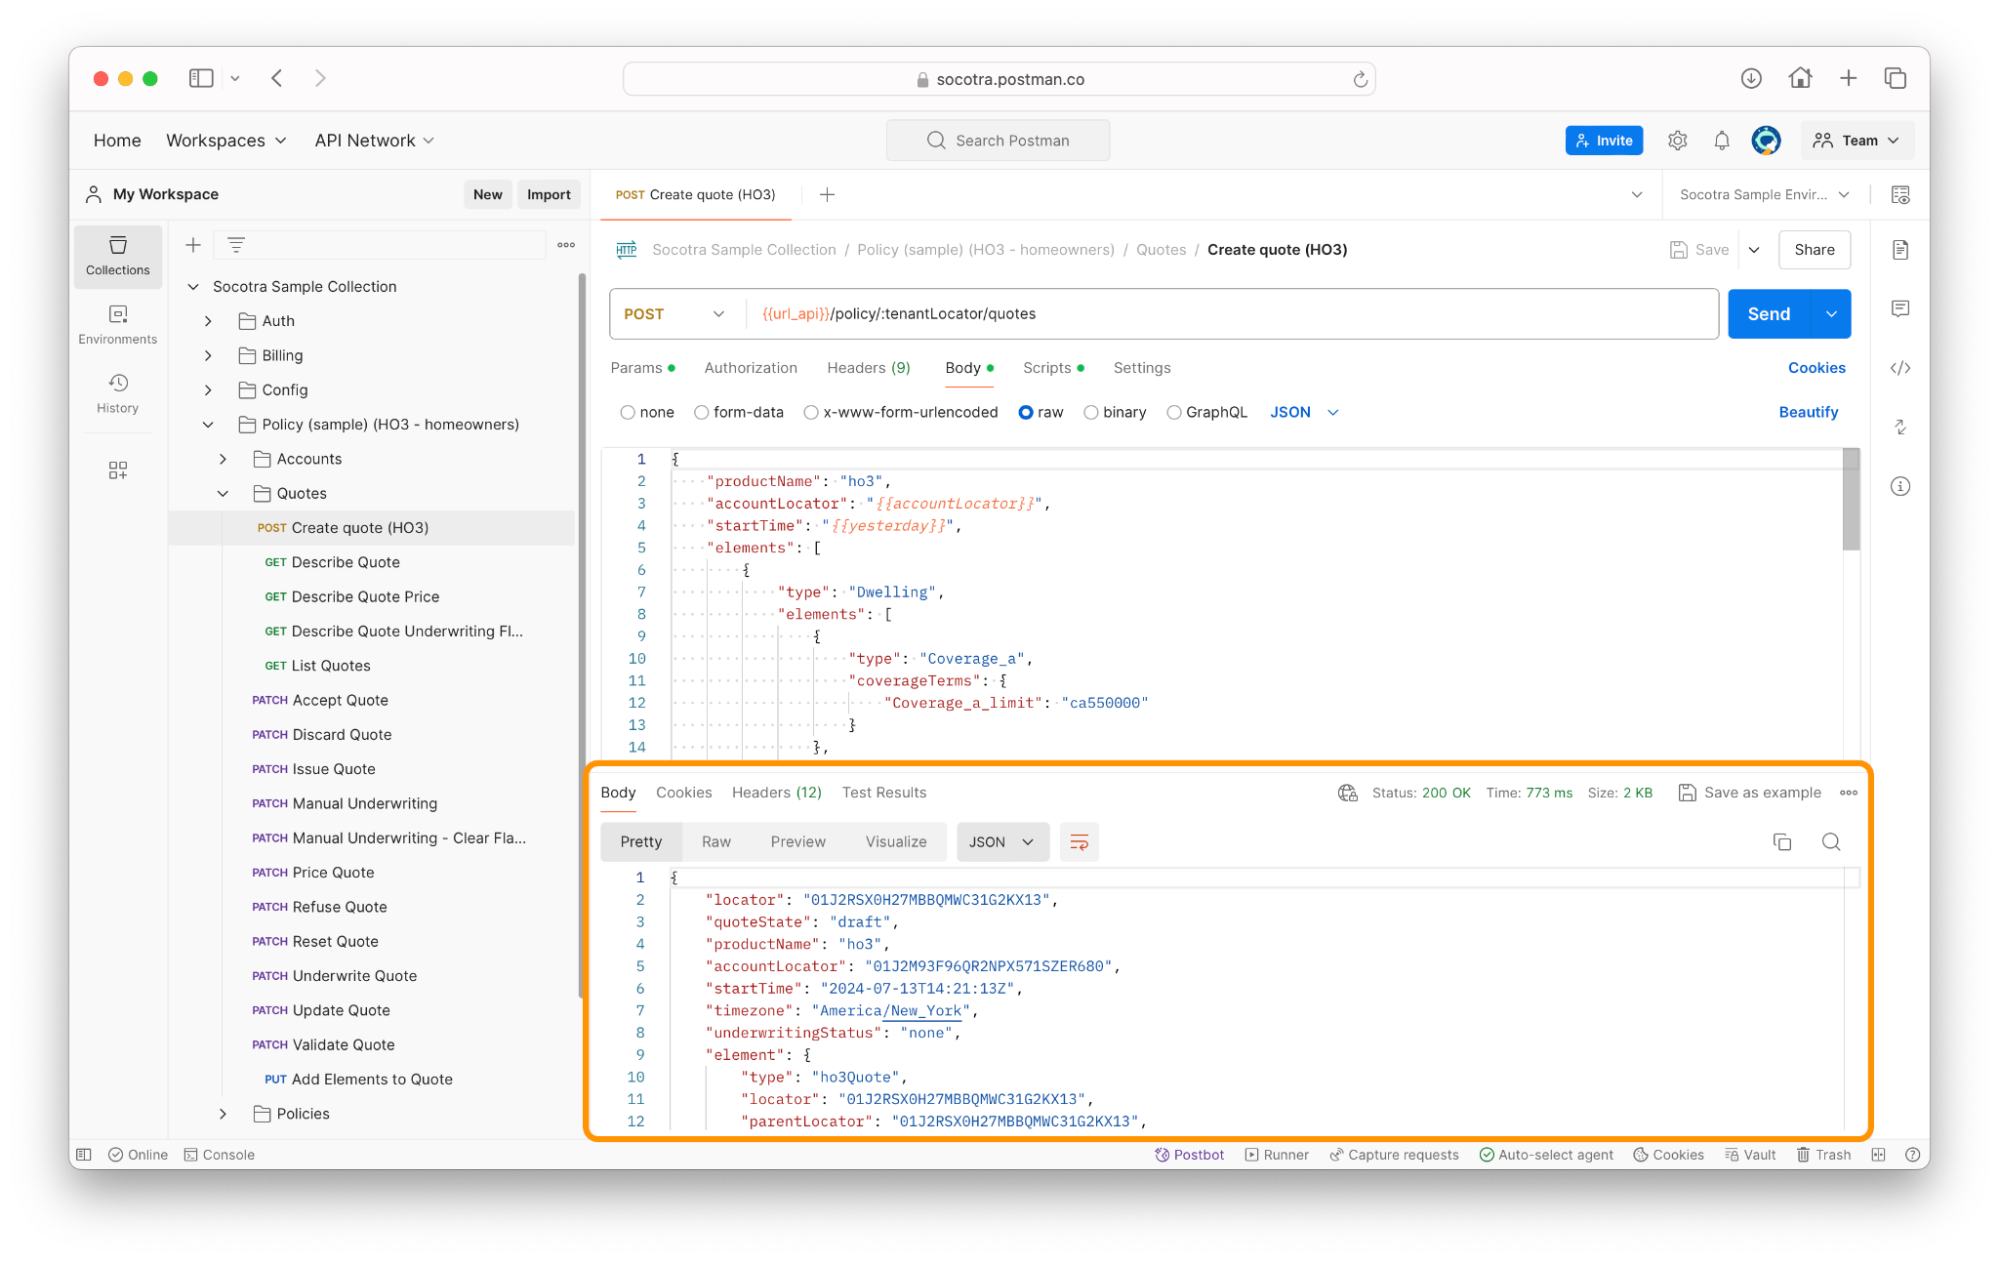
Once you’ve successfully created a quote in a draft state, the next step is validation.
Continue onto Part 2: Validate the quote to learn how to validate the quote.
We also recommend that you read the Request body breakdown section below to learn more about the request to make a draft quote.
Request body breakdown
 Screenshot of the request body in Postman.
In this section, we’ll break down each of the top-level attributes of the request body.
``productName``: This is the name of the product the quote is created for. This corresponds to an existing product on the tenant configuration (as established in 3: Create a tenant configuration file in Socotra).
``accountLocator``: This is the unique identifier of the policyholder account the quote is being created for.
The text in curly braces,
accountLocator, is referring to an environment variable in the Socotra Sample Environment in Postman.Double-check this value is populated by navigating to Environments > Socotra Sample Environment in Postman and checking to make sure the
accountLocatorfield is populated.
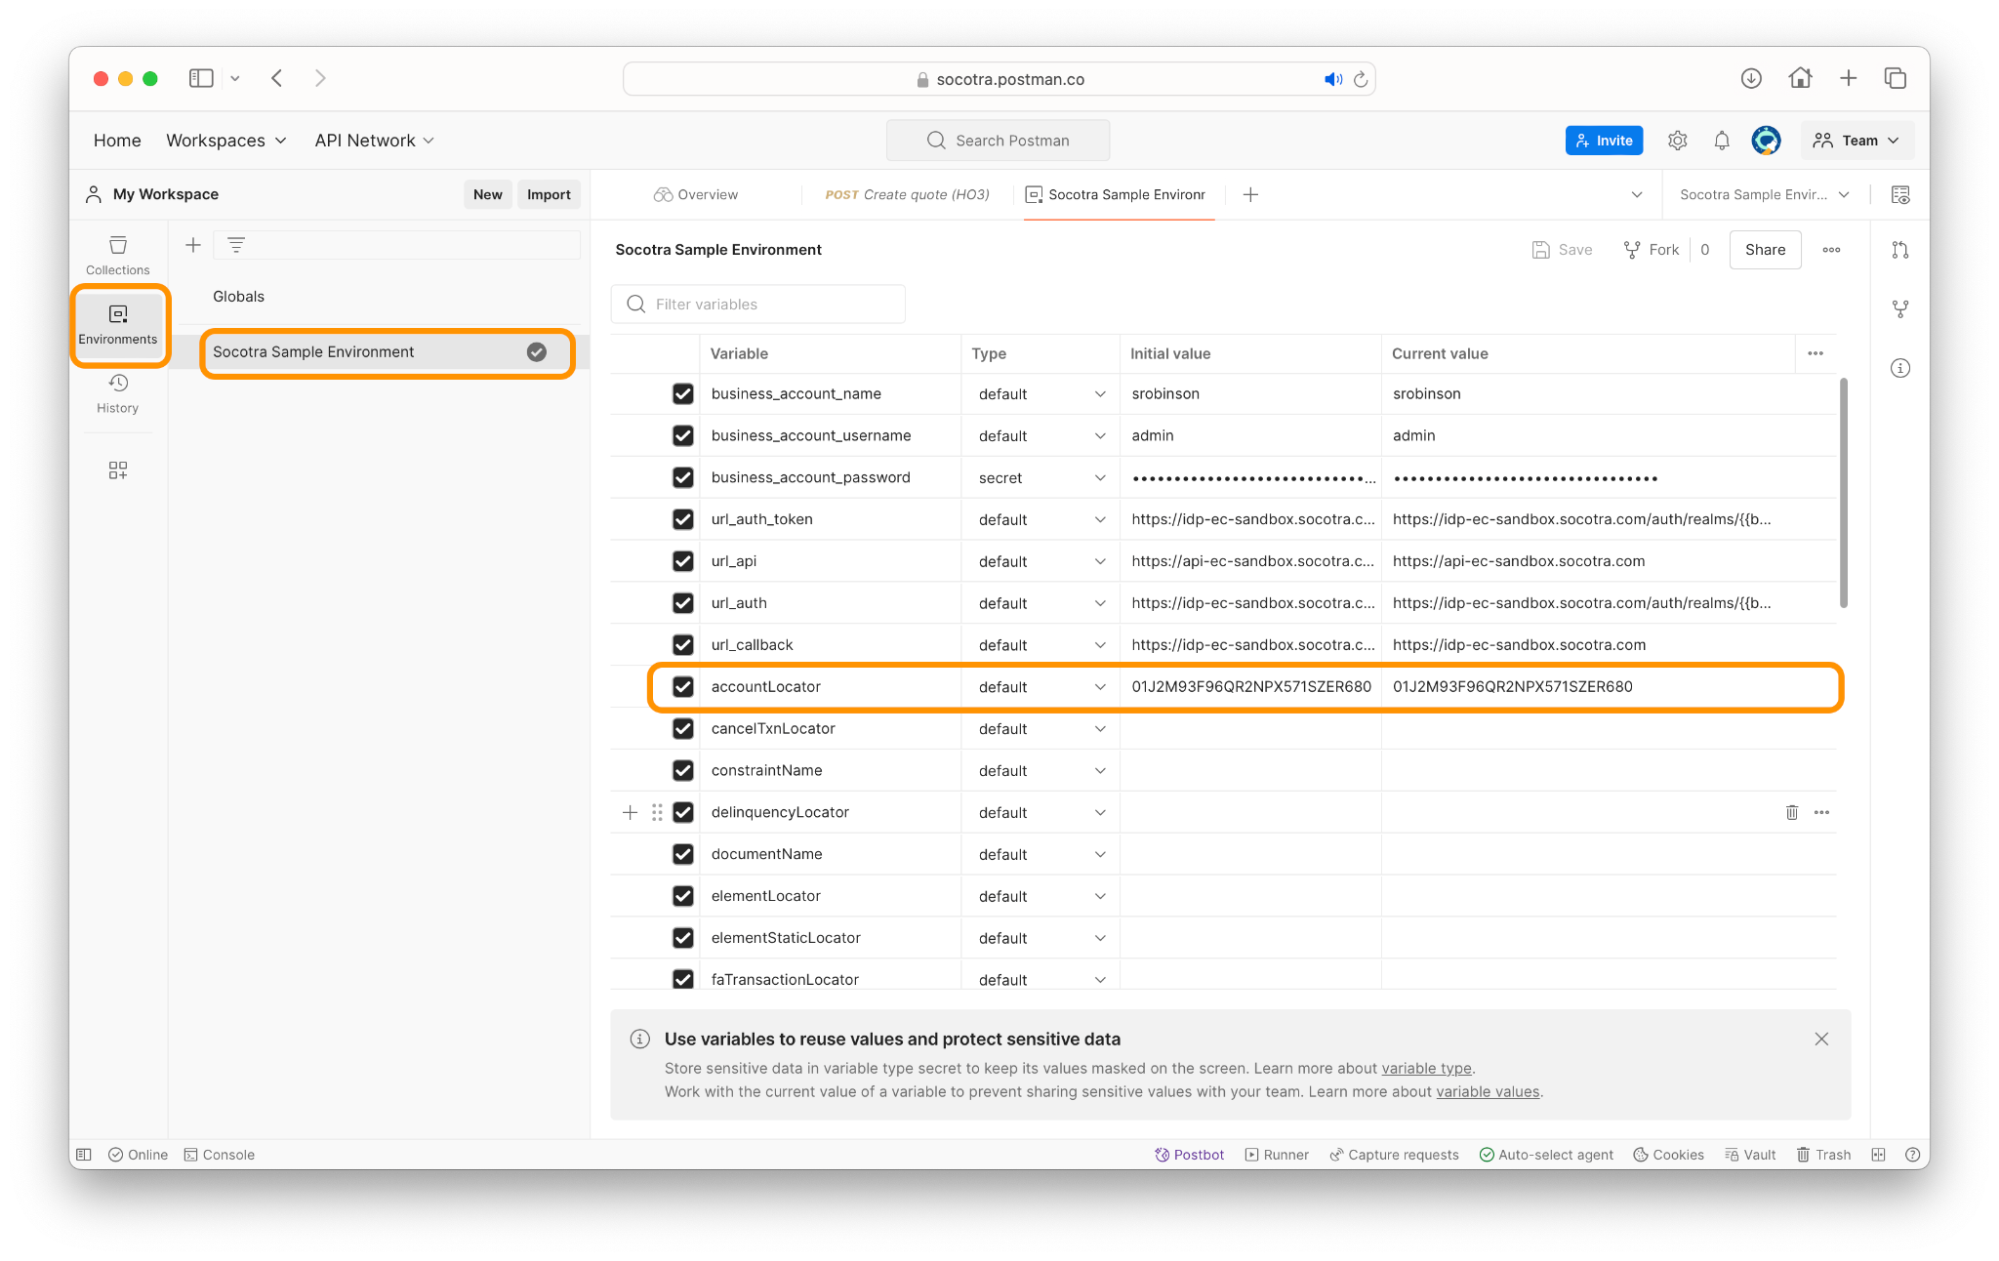 The location of the accountLocator environment variable in the
Socotra Sample Environment in Postman
The location of the accountLocator environment variable in the
Socotra Sample Environment in Postman
startTime: This is the datetime value of when the policy would go into effect.In this example, the startTime is
yesterday, a built-in Postman variable that automatically generates the datetime value for the day prior to the day the request runs.
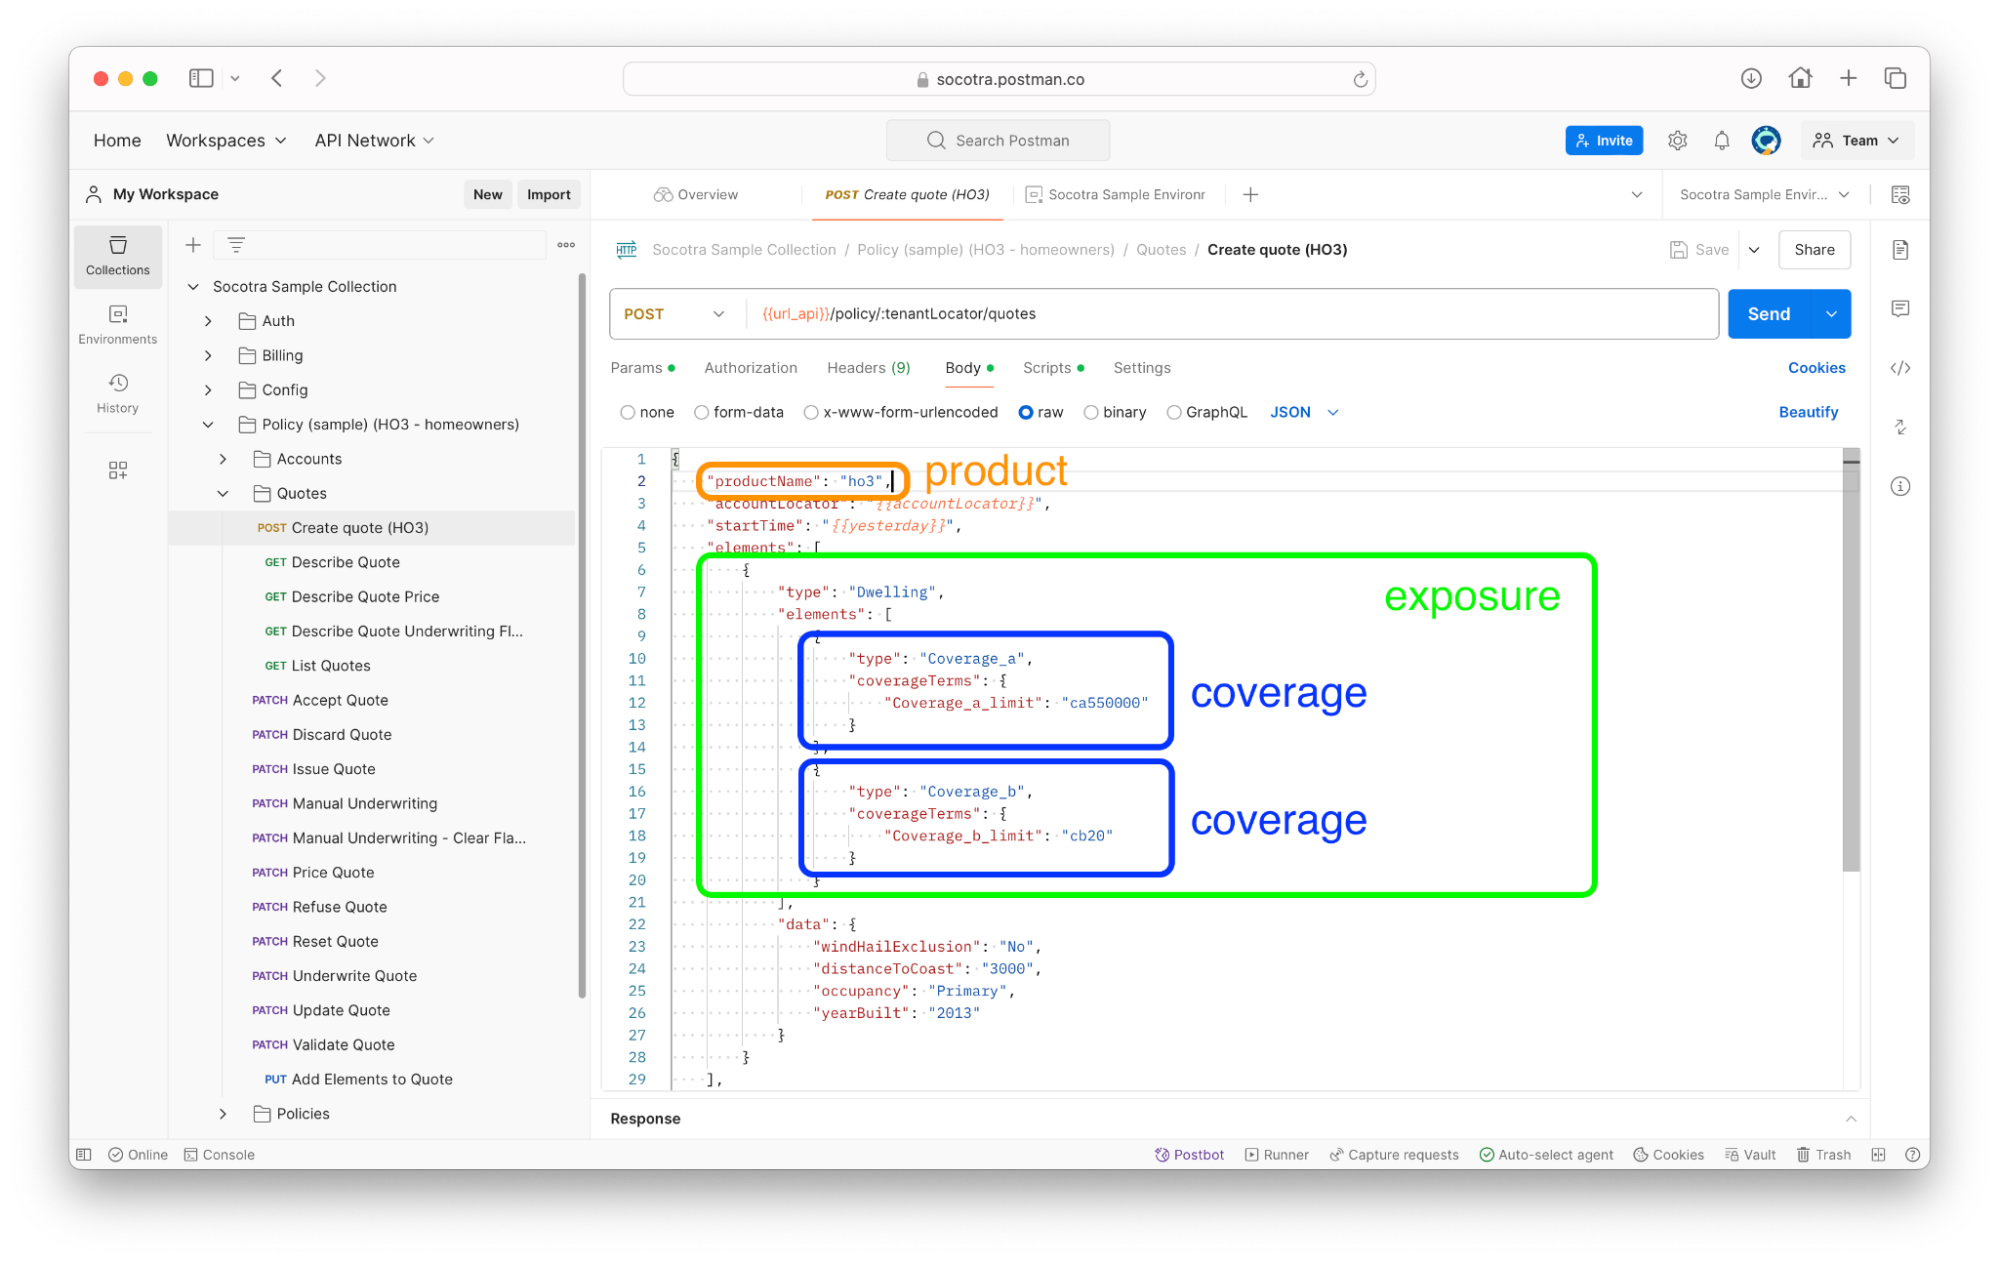
elements: The top-level elements field is an array of elements that form part of the insurance product.Remember from 3: Create a tenant configuration file in Socotra that an element is any policyLine, exposureGroup, exposure, or coverage.
Elements define what the product offers and how it’s administered.
In this sample, the product’s exposure is the object with the type
dwelling.The exposure has sub-nested elements. In this case, they are coverages.
The exposure also has its own
dataobject that contains information about the exposure, includingwindHailExclusion,distanceToCoast, andyearBuilt.The screenshot below shows a visual breakdown of the product, exposures, and coverages.
 A visual breakdown of the Product, Exposure, and Coverage in
the JSON request body.
A visual breakdown of the Product, Exposure, and Coverage in
the JSON request body.
``data``: The top-level data object contains information about the quote, including:
``applicantFirstName``: The first name of the person applying for insurance.
``applicantLastName``: The last name of the person applying for insurance.
``applicantDob``: The date of birth of the person applying for insurance.
``applicantInsuranceScore``: The insurance score of the person applying for insurance.
``noPriorInsurance``: Whether or not the applicant has never had insurance before.
``billingTrigger``: Sets when the applicant is billed for the insurance. In this example, it’s upon
issue, meaning that they will be billed when the quote is issued.``preferences``: Sets various preferences related to the quote. In this example, it’s setting the billing installment plan preference to
monthly10.``delinquencyPlanName``: Sets the default delinquency plan, which sets the behavior if payment is not received. In this example, it’s setting the delinquency plan to
defaultDelinquencyPlan.
Part 2 - Validate the quote
The next step in the quote lifecycle is validation. When a quote goes through validation, it’s checked against the product configuration and any other custom validation.
Once validated, the quote’s attributes cannot be changed any further.
Follow the steps below to validate the quote.
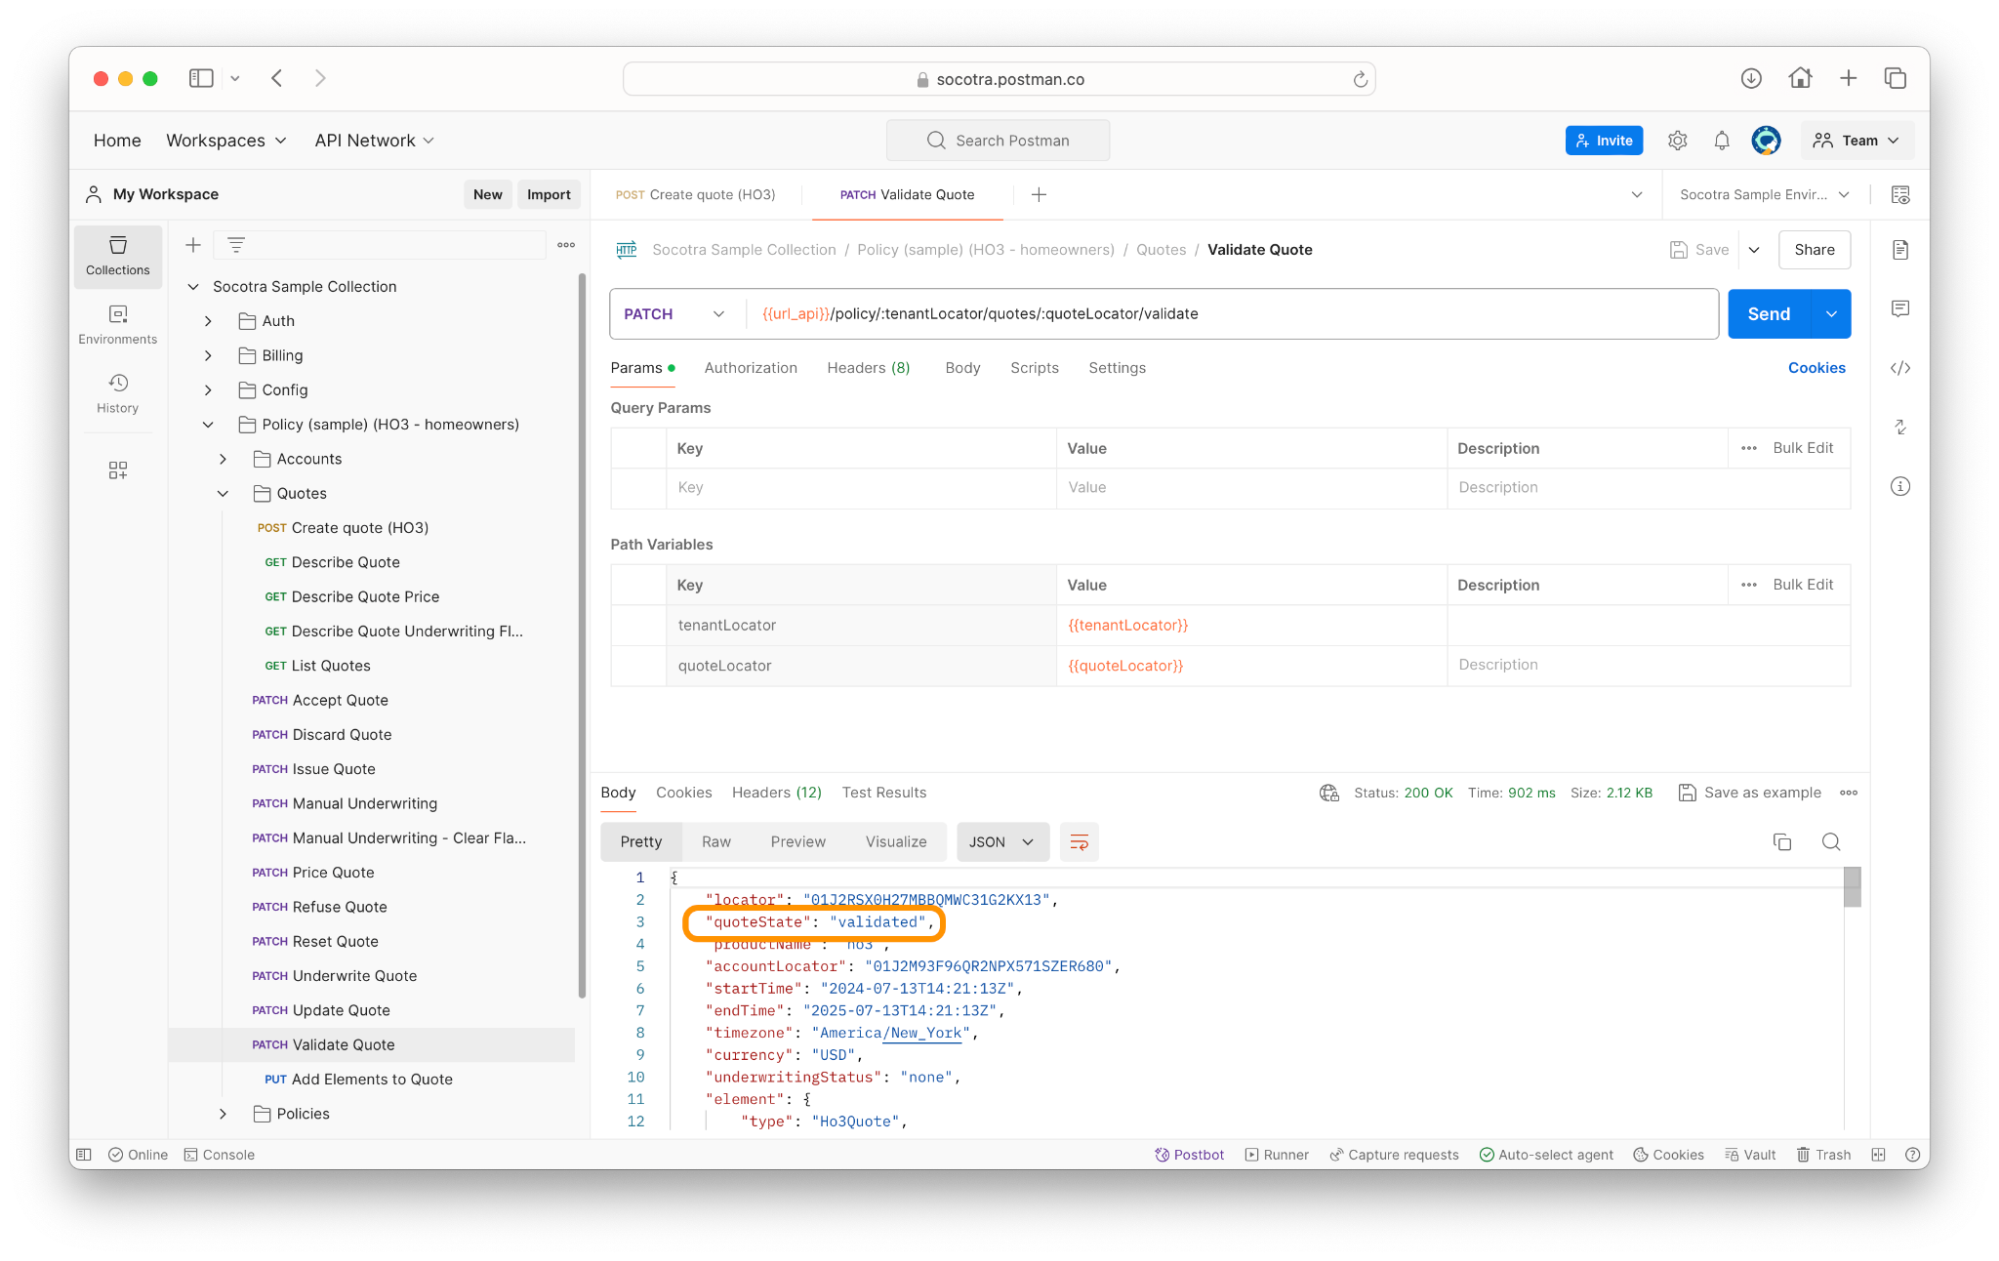
While viewing the Socotra Sample Collection, navigate to Policy > Quotes > Validate Quote.
Make sure your
quoteLocatoris set as an environment variable.Click Send.
Upon successful validation, the response body should show that the quote state has changed to validated.
Continue on to Part 3 to learn how to price the quote.
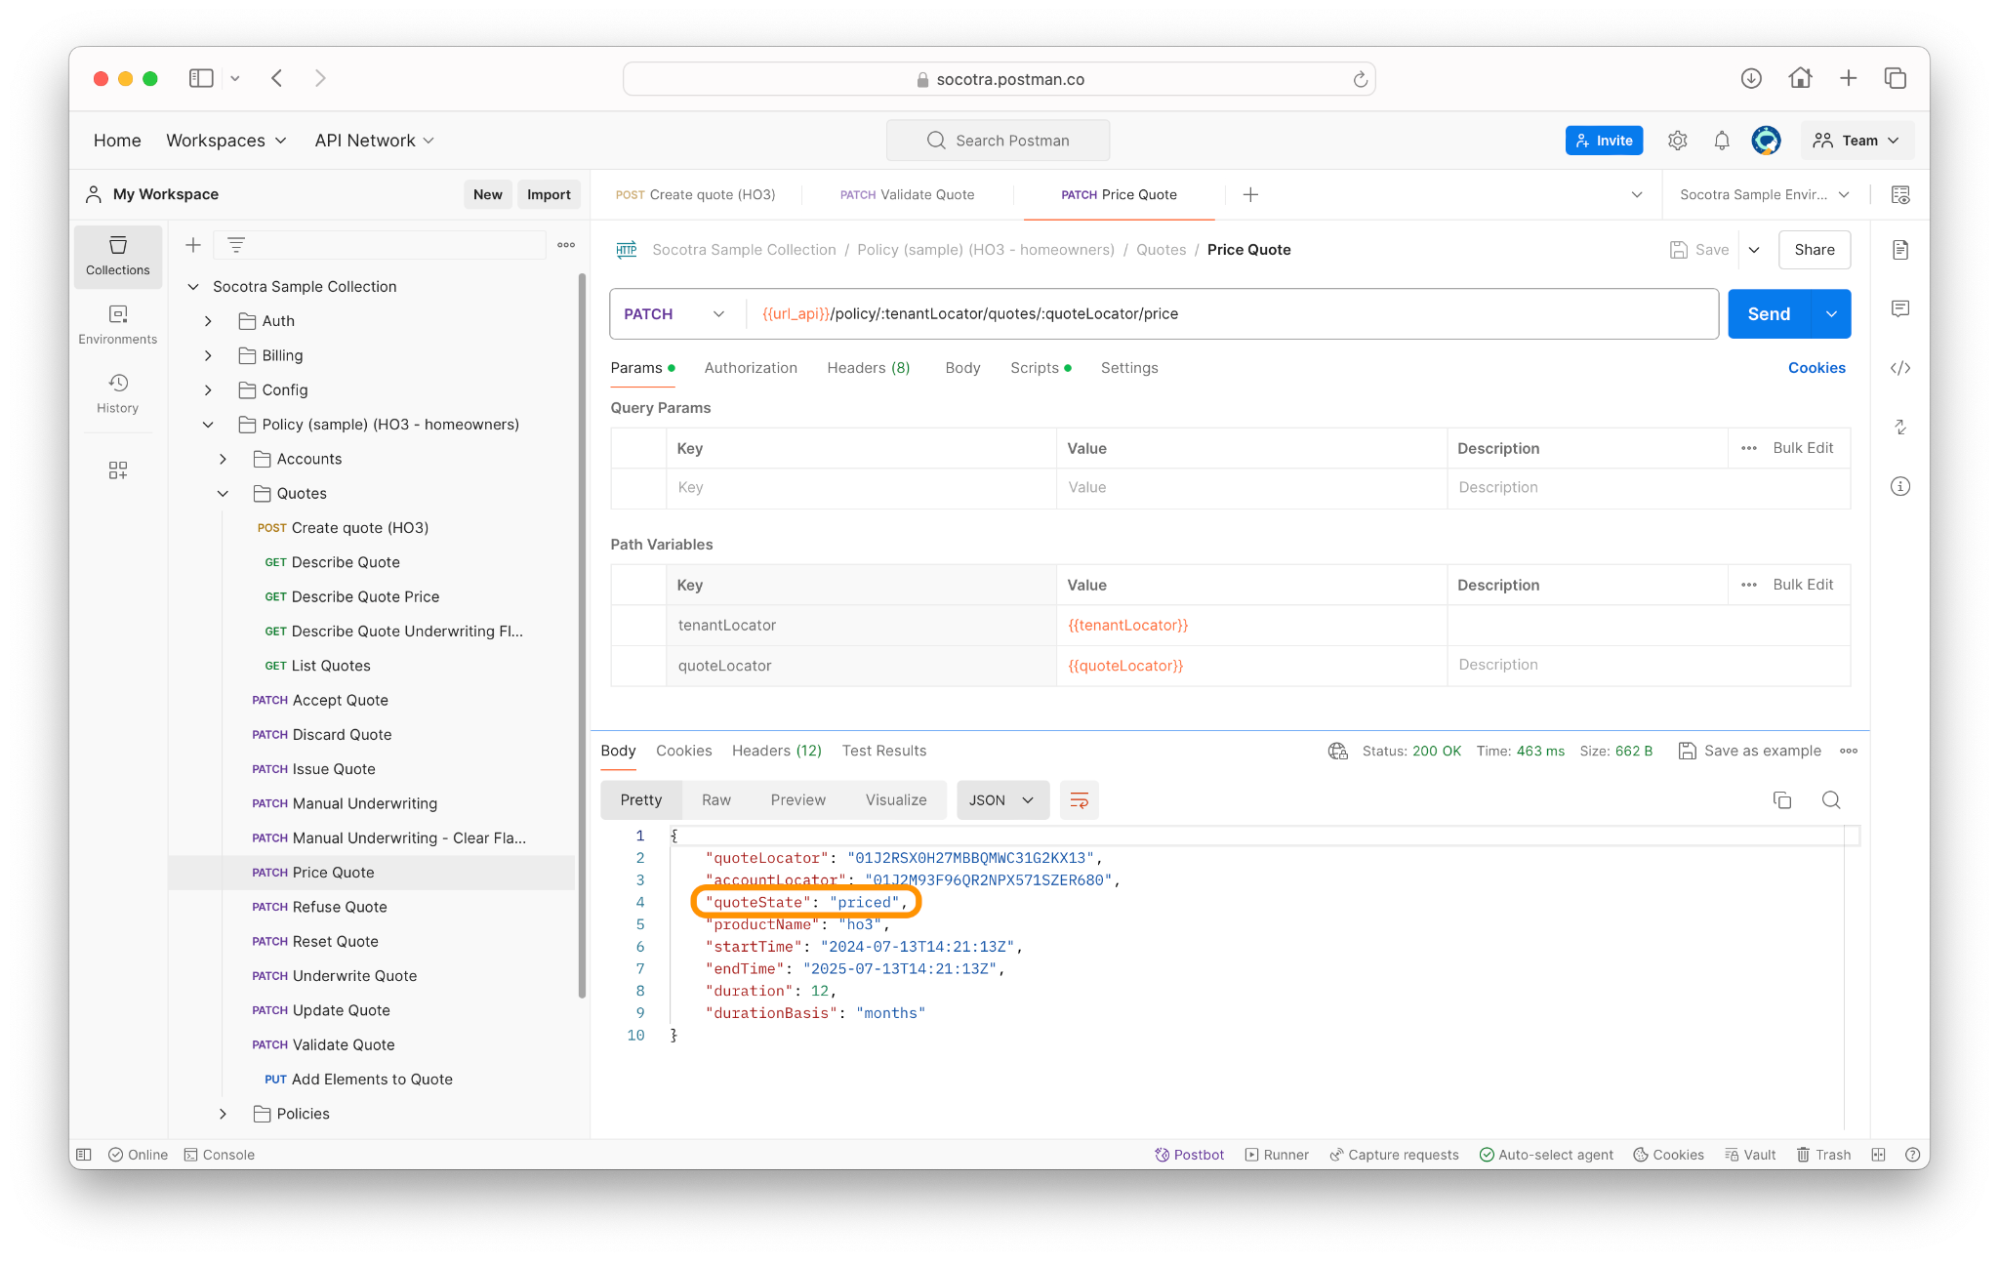
Part 3 - Price the quote
Follow the steps below to validate the quote.
While viewing the Socotra Sample Collection, navigate to Policy > Quotes > Price Quote.
Make sure your
quoteLocatoris set as an environment variable.Click Send.
Upon successful validation, the response body should show that the quote state has changed to priced.
Continue on to Part 4 to learn how to underwrite the quote.
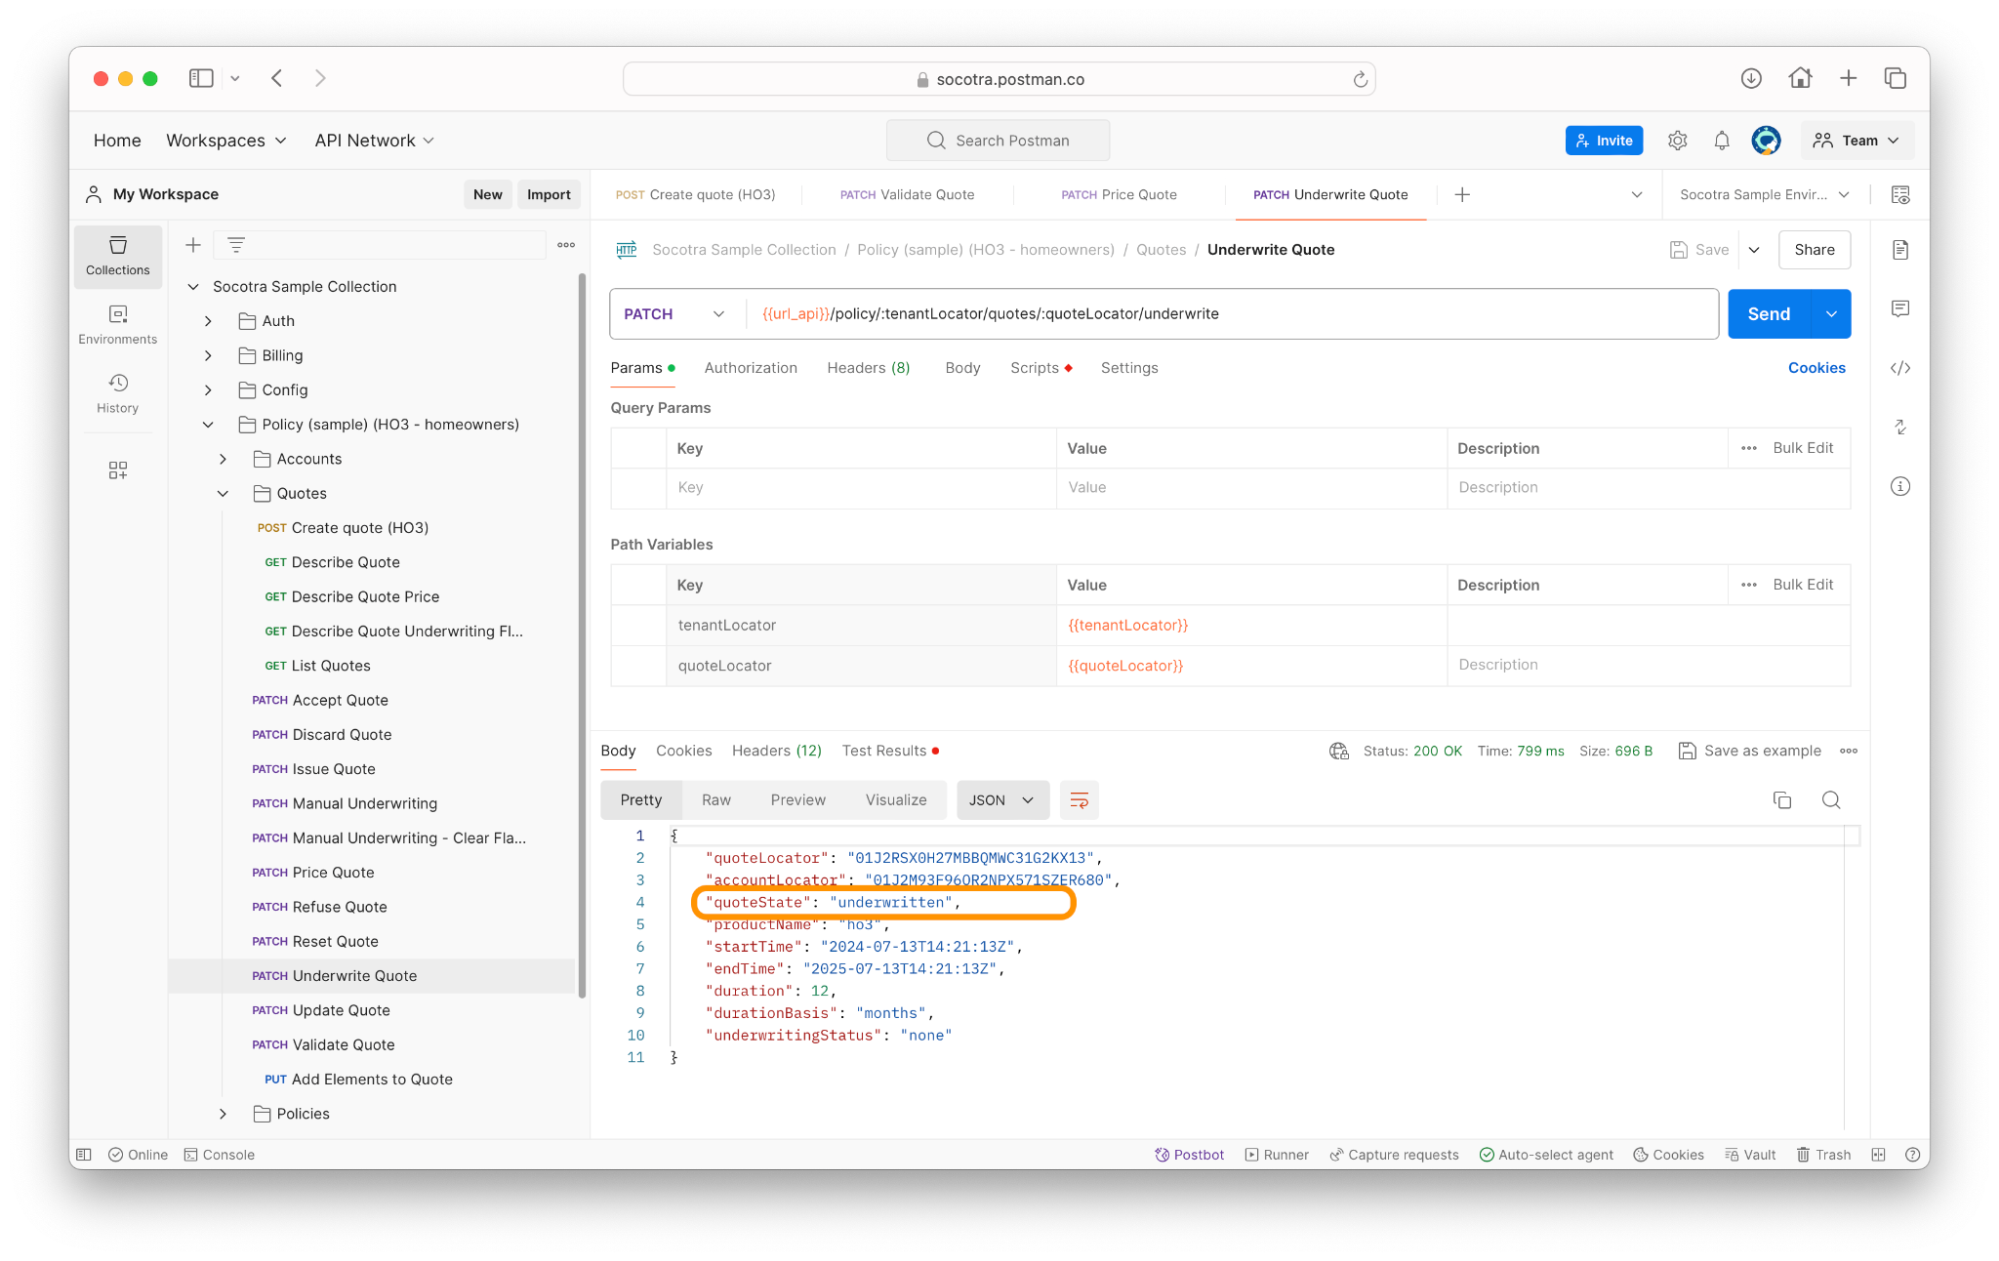
Part 4 - Underwrite the quote
While viewing the Socotra Sample Collection, navigate to Policy > Quotes > Underwrite Quote.
Make sure your
quoteLocatoris set as an environment variable.Click Send.
Upon successful validation, the response body should show that the quote state has changed to underwritten.
Continue on to Part 5 to learn how to accept the quote.
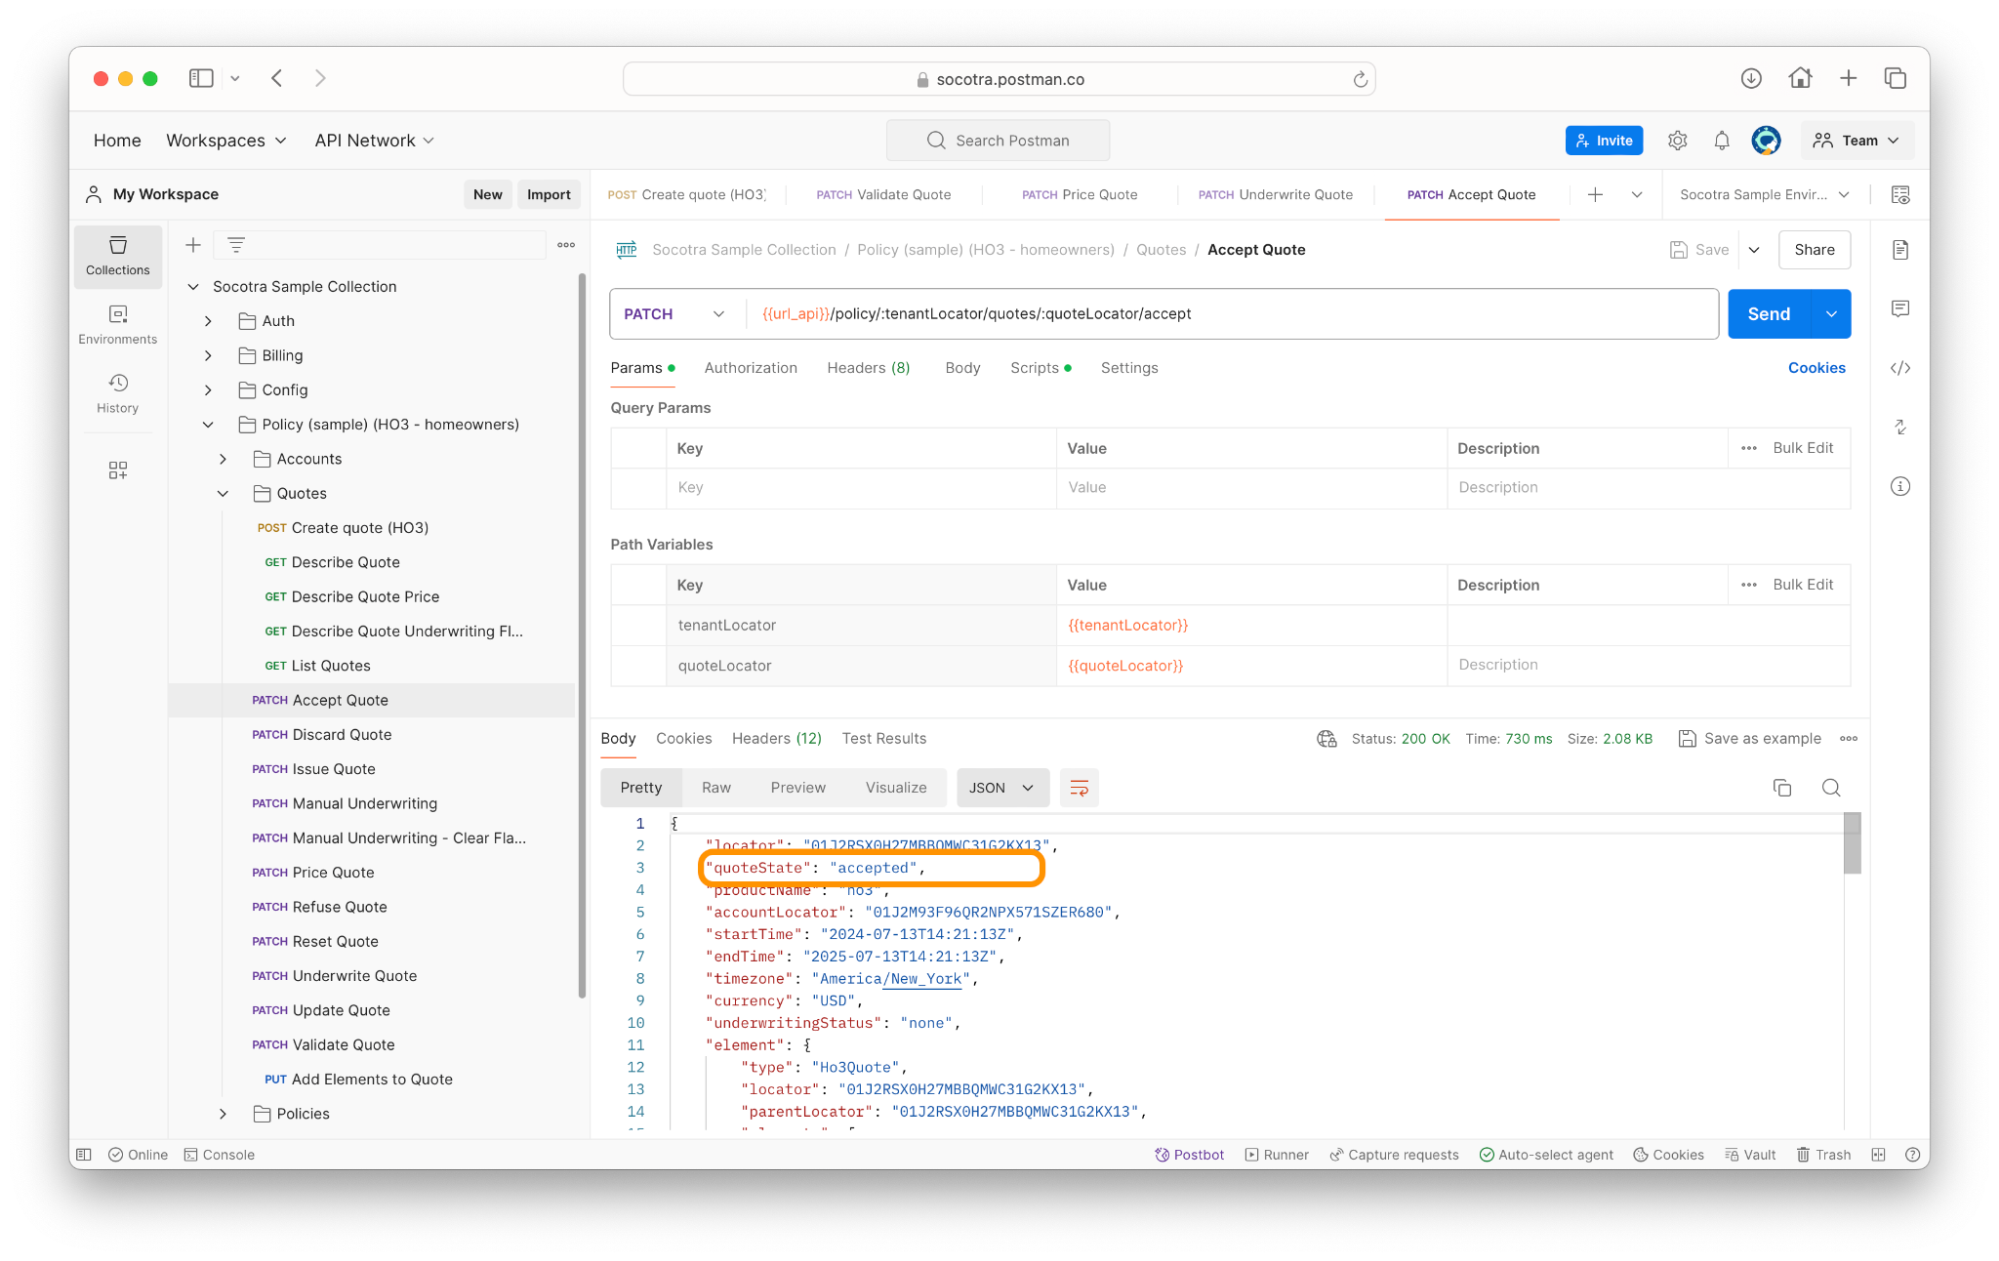
Part 5 - Accept the quote
While viewing the Socotra Sample Collection, navigate to Policy > Quotes > Accept Quote.
Make sure your
quoteLocatoris set as an environment variable.Click Send.
Upon successful validation, the response body should show that the quote state has changed to accepted.
Continue on to Part 6 to learn how to issue the quote.
Part 6 - Issue the quote
While viewing the Socotra Sample Collection, navigate to Policy > Quotes > Issue Quote.
Make sure your
quoteLocatoris set as an environment variable.Click Send.
Upon successful validation, the response body should show that the quote state has changed to issued.
Recap
In this tutorial, we covered:
The basics of quotes and policies.
How to create, validate, price, underwrite, accept, and issue a quote via the API.
In the next resource, we’ll cover what to do and how to make and execute changes on policies.
Ready for the next module?
See Execute policy transactions in Socotra to continue this learning path.