Execute Policy Transactions
This article explains how to execute policy transactions in Socotra.
Overview
What will I learn in this tutorial?
By the end of this tutorial, you will have an understanding of:
Policies in Socotra, including their terms and segments.
How to describe, change, renew, cancel, or reinstate a policy using the Socotra API.
What will I need?
You will need the following:
A Postman account
A workspace configured to use the Socotra API
For more information about using Postman, see: Set up Postman to use the Socotra API
Key concepts
What is a policy?
In Socotra, a policy is a transaction between the insurer (an insurance company) and the insured (a customer). Policies outline products provided to the insured by the insurer.
For example, a home owner’s insurance policy typically contains information related to:
The exposure (the home being insured)
The coverages (definitions of how much the home is insured for)
The general administration of the policy
Policies are subdivided into terms and segments.
What are terms and segments?
Terms
In an insurance policy, a term is the period of time between the policy’s start and end.
A term spans from the initial effective date to the expiration date of the policy.
When a policy is renewed, a new term is created and the expiration date is pushed further into the future, typically by the same length of time as the original term.
For example, the terms of a homeowners policy that’s been renewed twice would look something like sample below:
Term 0: January 2024 - January 2025 (initial policy creation)
Term 1: January 2025 - January 2026 (first renewal)
Term 2: January 2026 - January 2027 (second renewal)
Segments
In an insurance policy, a segment is a subdivision of a term. A segment contains all of the elements of a policy, meaning any of the following:
Policy Lines
Exposure Groups
Exposures
Coverages
When a policy is first created, it has a single default term and a single default segment. The graphic below shows an example of a basic policy.
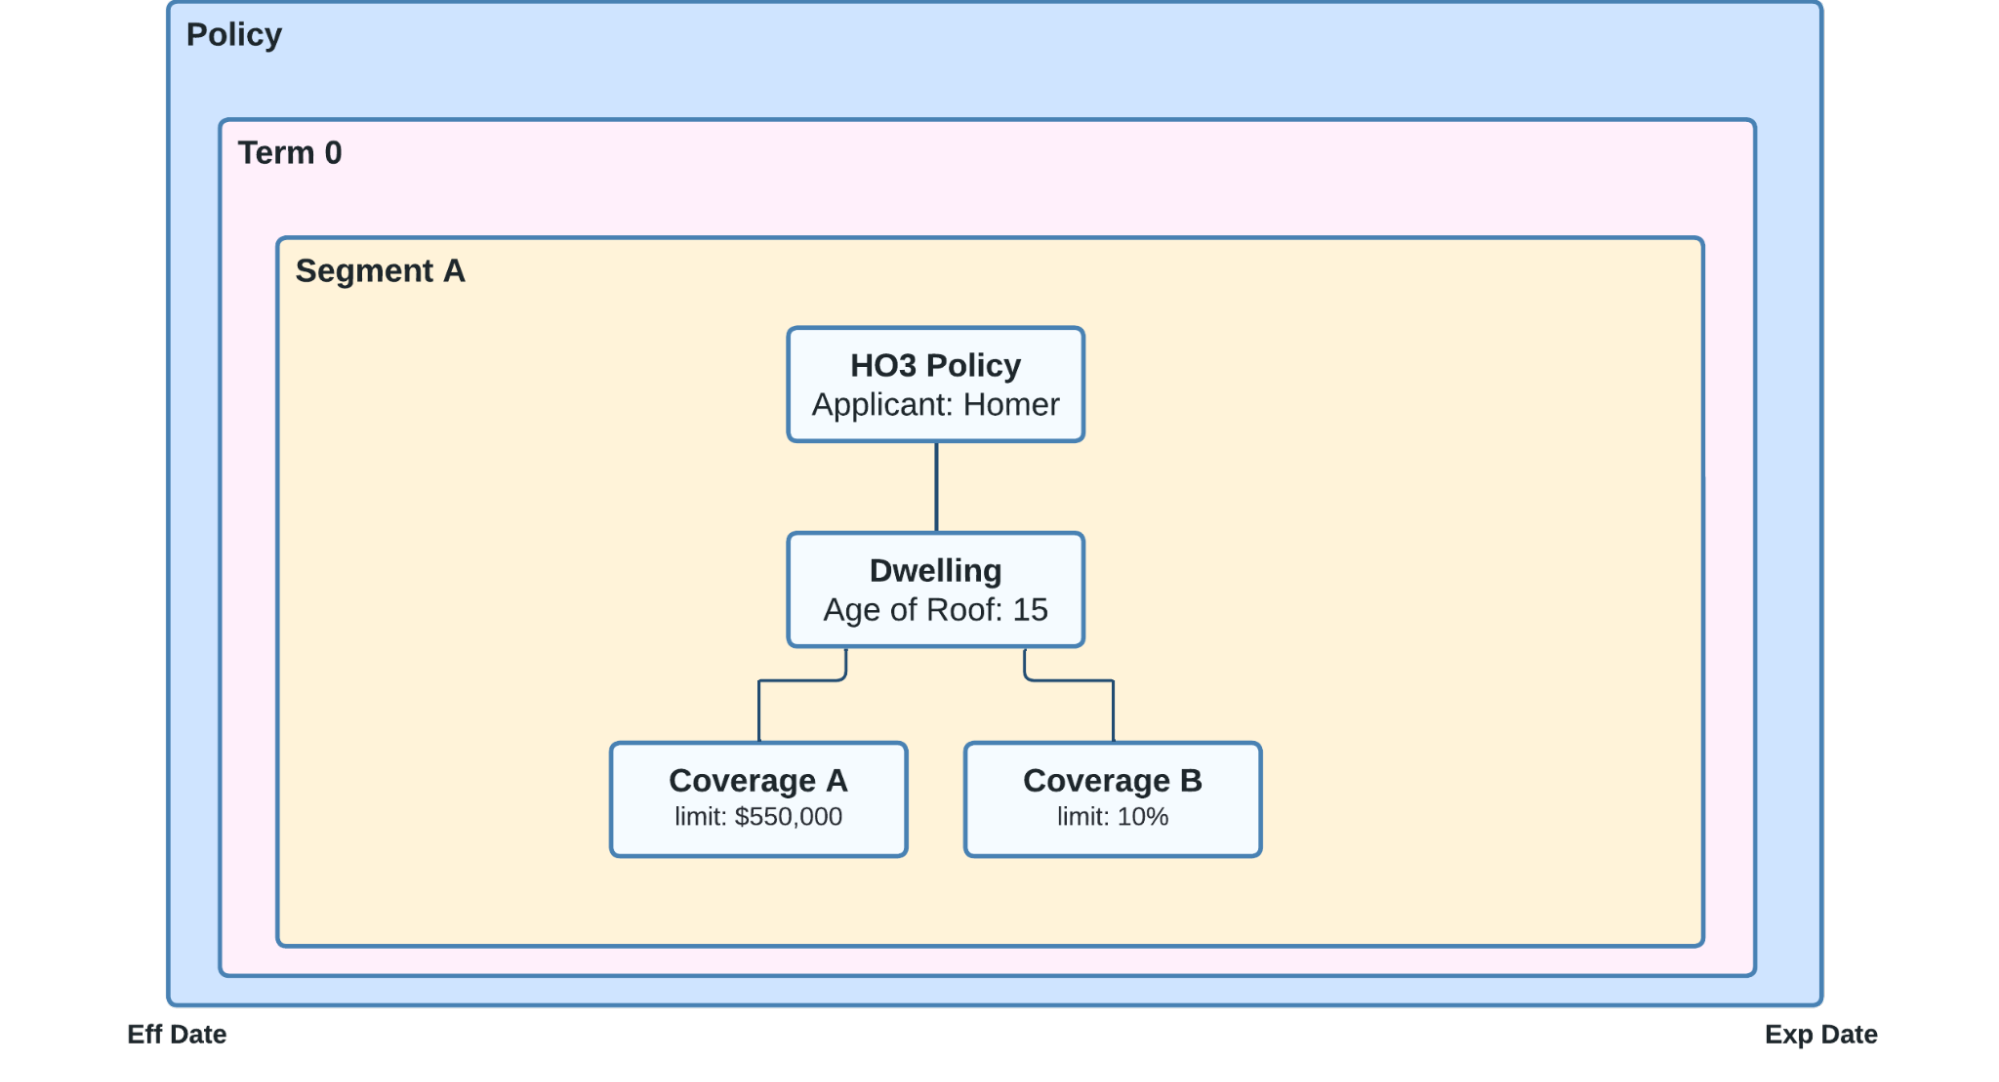
Graphical representation of a basic policy, term, segment, and elements. It begins on the Effective Date (Eff Date) and ends on the Expiration Date (Exp Date).
What is a policy transaction?
A policy transaction is a change made to an existing policy. There are four basic types of policy transaction:
Change
Renew
Cancel
Reinstate
It takes two steps to make a policy transaction:
Creation (define instructions for what to do to the policy) Issuance (execute the instructions)
In the section below, we’re going to cover some examples of each of these types of policy transactions.
Example scenarios
Example 1 - Changing a policy
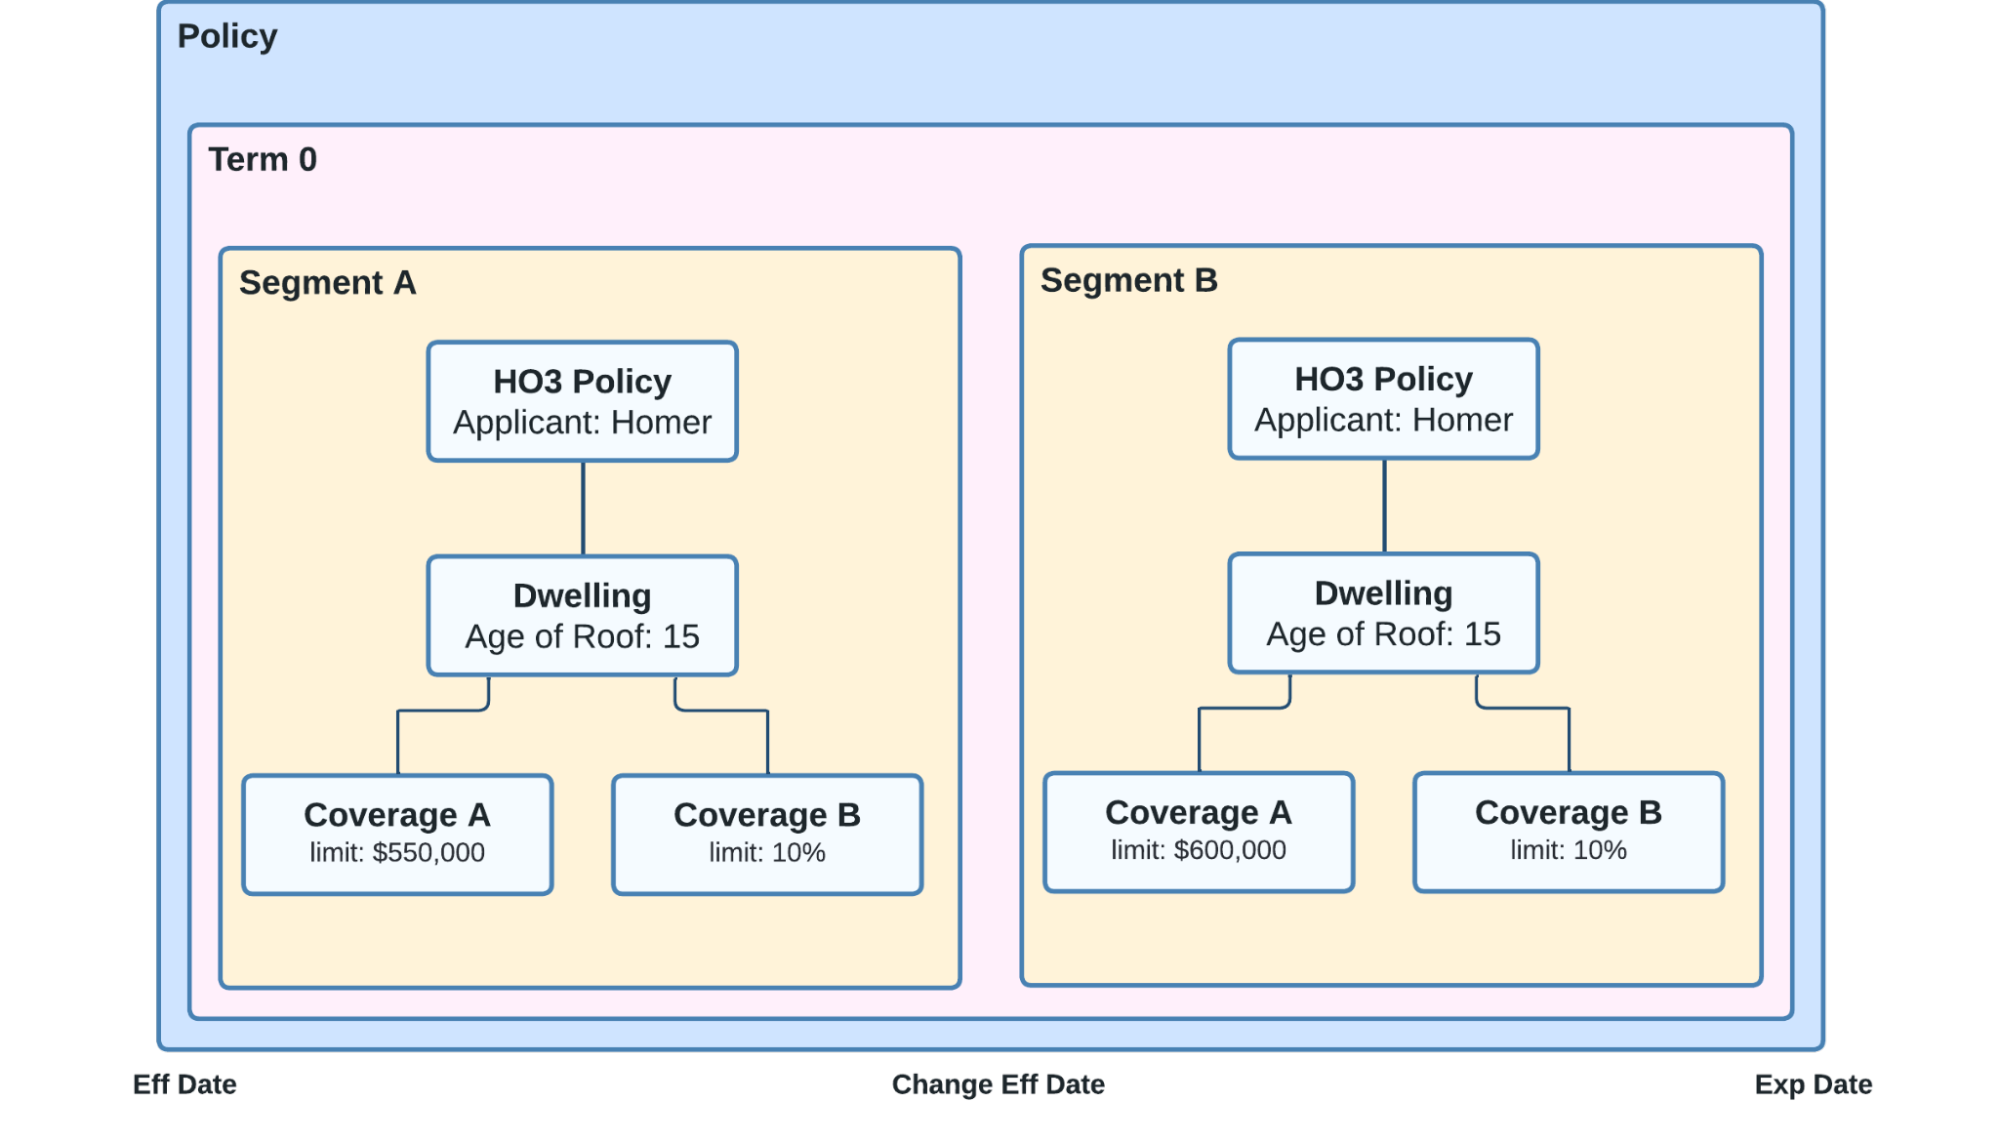
In this example, we see a policy with a single term and two segments. This means that the policy was modified sometime during the first term.
In Segment A, they have two coverages:
Coverage A: $550,000 limit
Coverage B: 10% limit
Mid-way through the customer’s first term, they request that their limit for Coverage A be increased from $550,000 to $600,000. This would be accomplished by creating and issuing a change transaction.
Upon issuance of the change transaction, a new segment is created in the term with two coverages:
Coverage A: $600,000 limit (increased from $550,000)
Coverage B: 10% (stays the same)
Example 2 - Renewing a policy
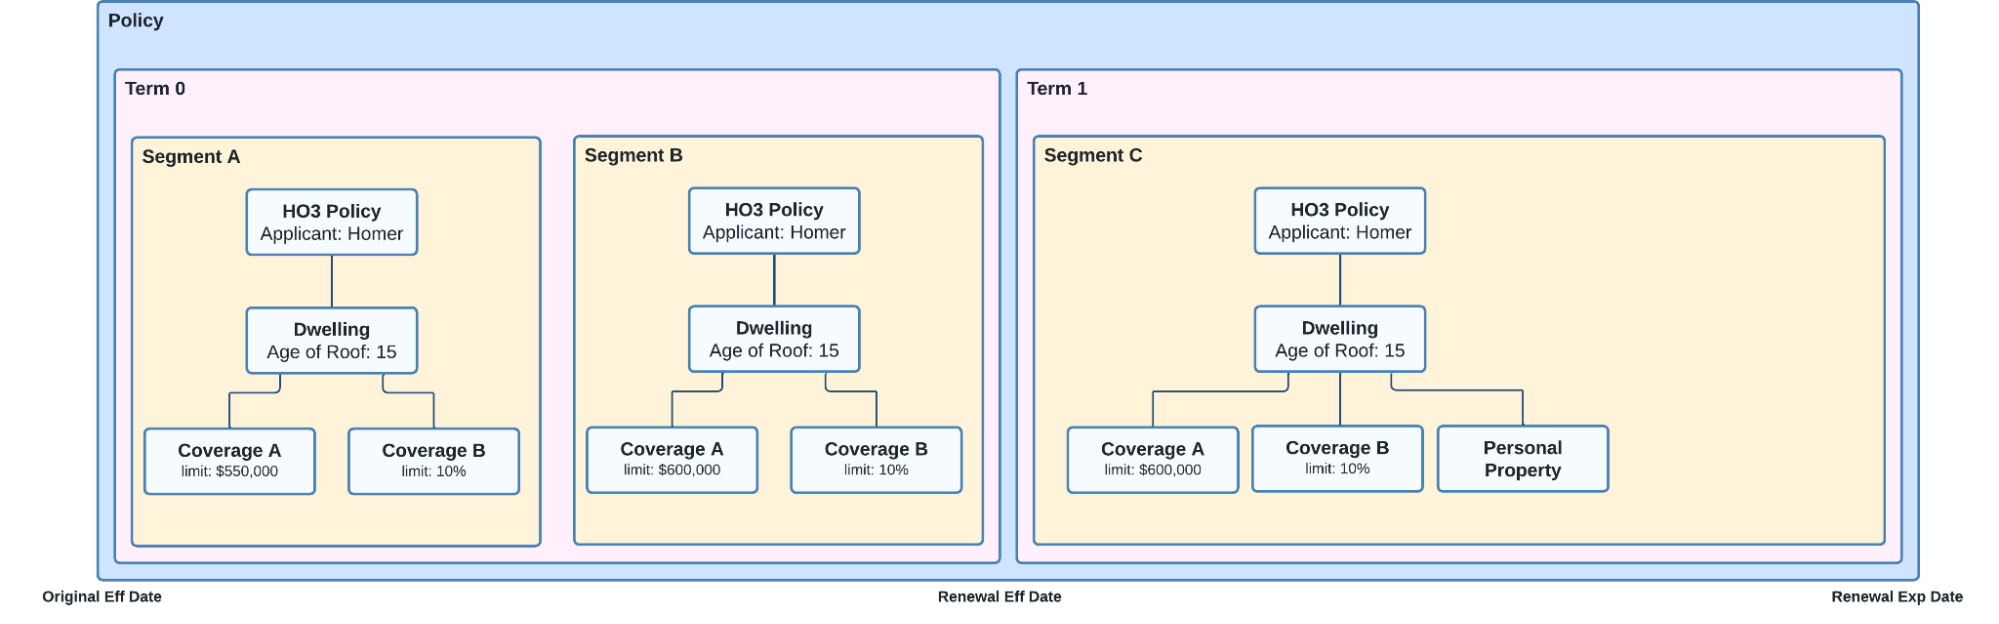
In this example, we see a continuation from Example 1. The customer wants to renew their coverage, but they also want to add an additional Personal Property coverage. This would be accomplished by creating and issuing a renewal transaction containing data for the new coverage.
Upon issuance of the renewal transaction, the system would:
Create a new term
Create a new segment in the term
Add all requested coverages to the new segment
Example 3 - Canceling a policy
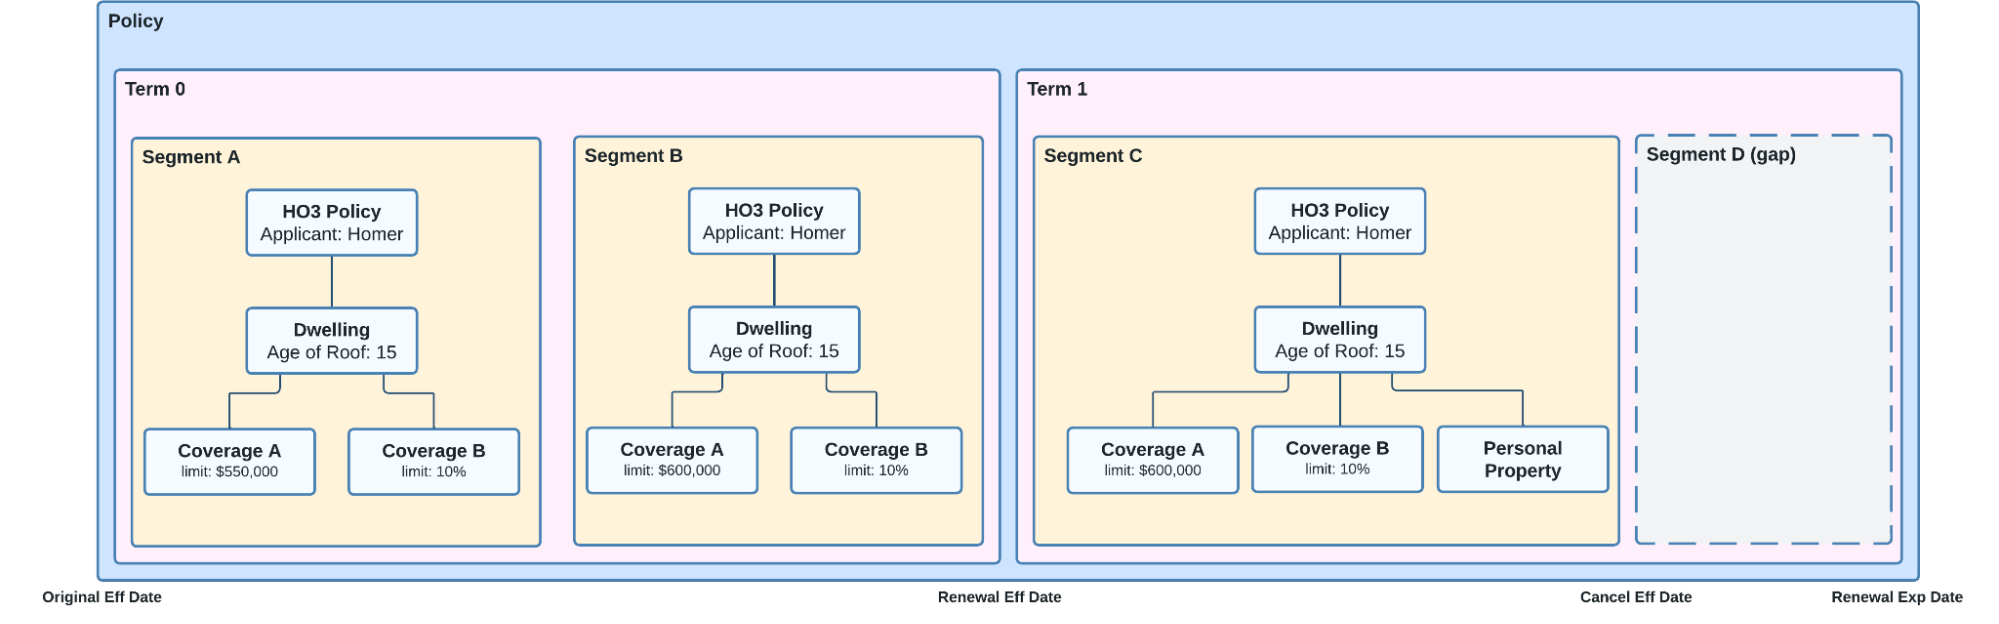
Continuing the scenario in examples 1 and 2, the customer has decided they would like to cancel their policy, which has four months remaining until the end of its second term.
Upon creating and issuing the cancellation transaction, the system would make a “gap” segment to represent the remaining period where no coverage was provided to the customer.
Tutorials
Scenario - Homeowner seeking to modify home insurance coverage
For these tutorials, let’s use the example of a homeowner called Homer Sample.
Homer Sample owns a home with a roof that is 15 years old.
He has an existing policy from Example Insurance with an effective date of January 1, 2024.
The policy has two coverages:
Coverage A, with a limit of $550,000
Coverage B, with a limit of 10%
For these tutorials, we’ll use Postman to simulate policy transactions Socotra can make based on Homer Sample’s requested changes.
Tutorial 1 - Making a change to a policy
Homer Sample reaches out to Example Insurance Company with a request:
Homer Sample wants to increase the coverage on his dwelling from :math:`550,000 to `600,000.
He wants this to take effect on June 1, 2024.
We can easily accomplish this with the Socotra API.
However, before we can make any policy changes, first we need to locate his customer account number.
1.1 - Locating customer’s account number in Postman
To locate a customer’s account number using the Socotra API in Postman, follow these steps:
In the Socotra Sample Collection, navigate to Policy > Accounts > List Accounts.
Click Send to run the request.
The response body will include a list of all the accounts on the current tenant.
Locate the account you want to use. For this tutorial, we’ll use Homer Sample’s account.
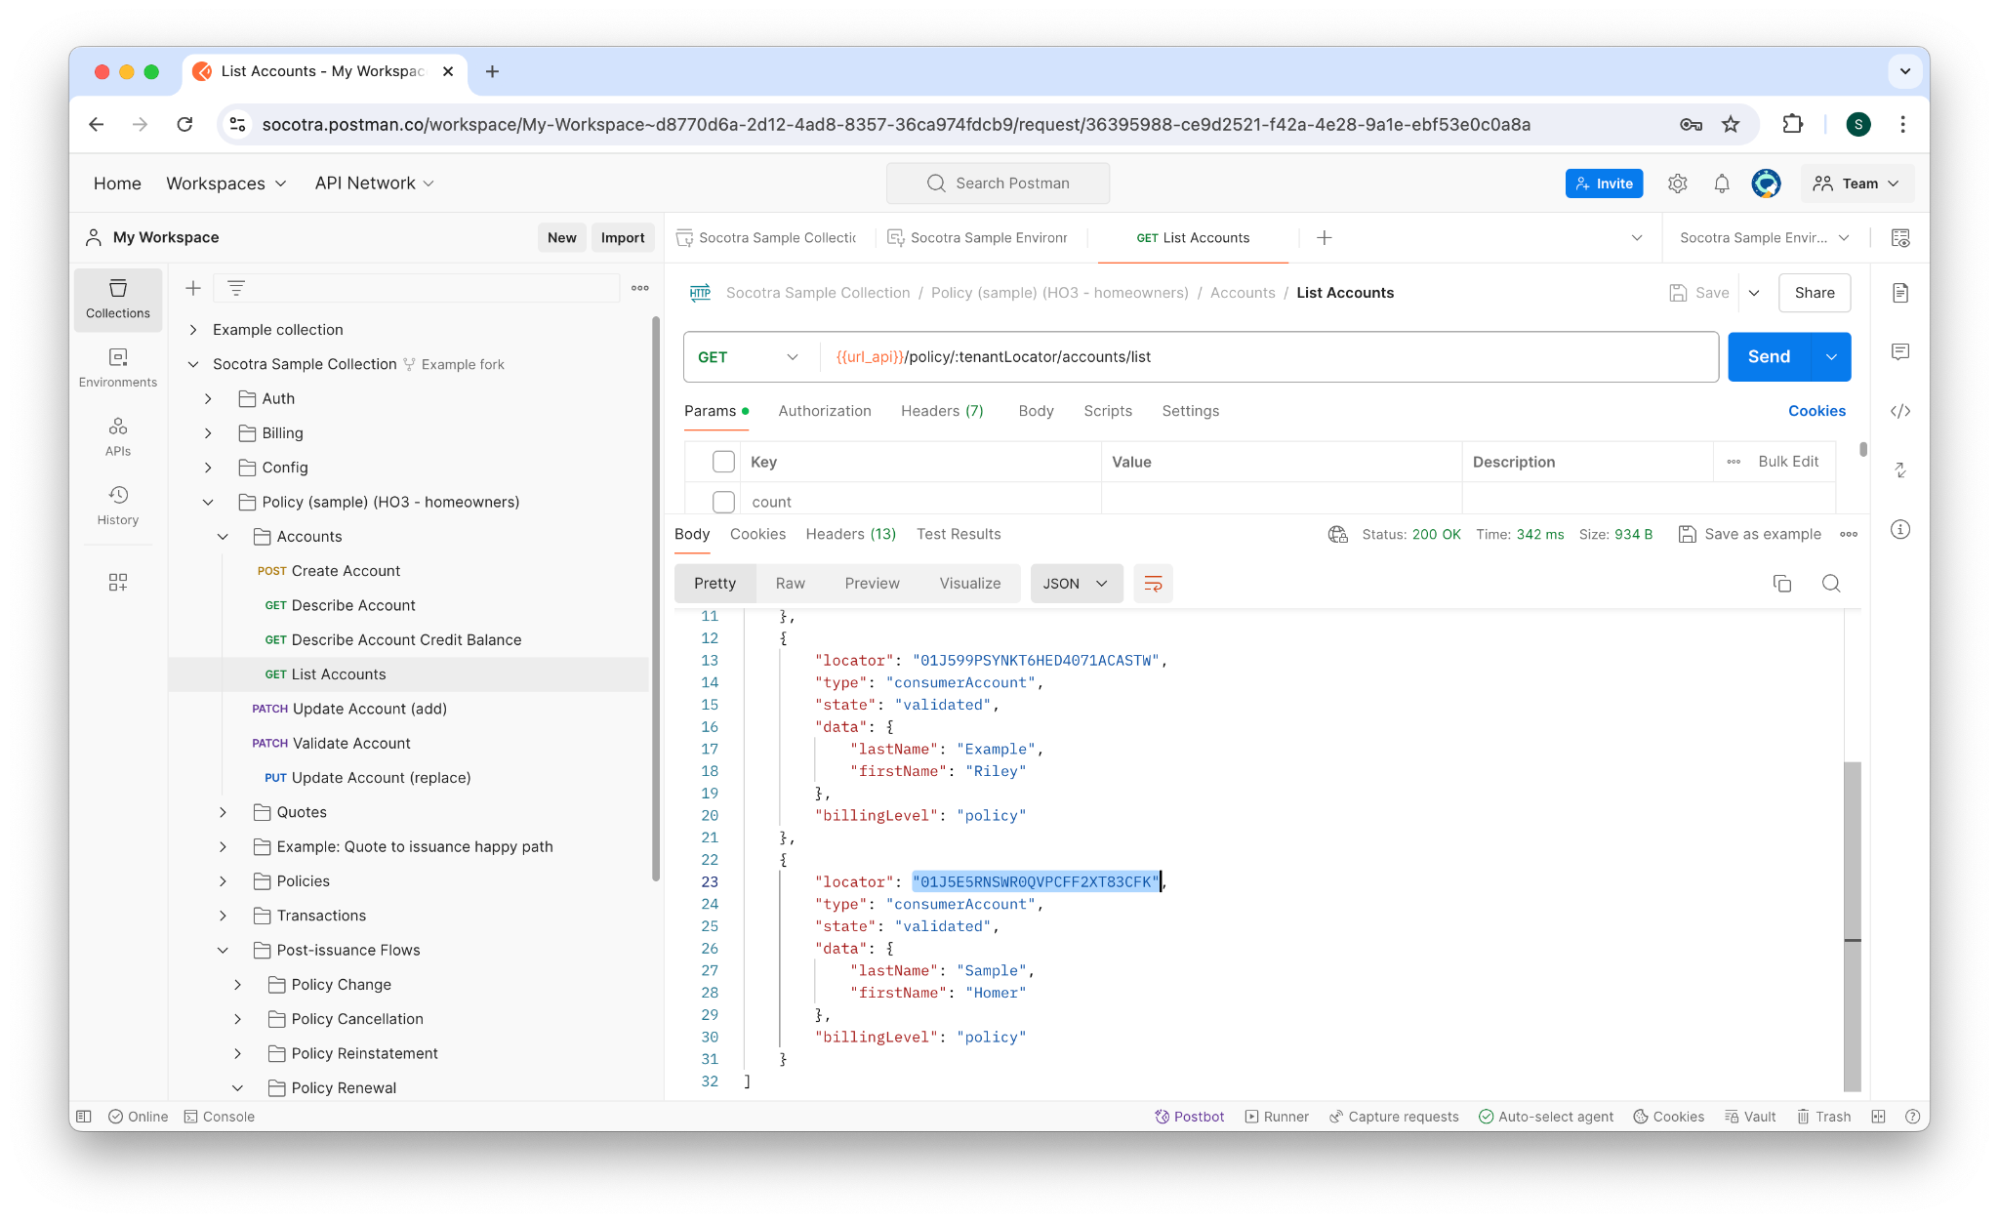
Copy the account’s
locatorvalue (the unique identifier of the account) and paste it into theaccountLocatorenvironment variable in the Socotra Sample Environment.
Tip: Keep the Socotra Sample Environment open as a tab in Postman so you can easily switch back and forth between it and the requests.
1.2 - Locating customer’s policy in Postman
The next step is to locate Homer Sample’s policy.
When a quote is issued in Socotra, the system automatically generates a corresponding policy. To find the policy, we’ll first search for the issued quote that created it.
To locate a customer’s policy using the Socotra API in Postman, follow these steps:
In the Socotra Sample Collection, navigate to Policy > Quotes > List Account’s Quotes.
Run the request.
Locate the quote in the response body. The relevant quote should have a
quoteStatusofissued.

Once you’ve identified the issued quote, scroll down until you find the quote’s
policyLocator.
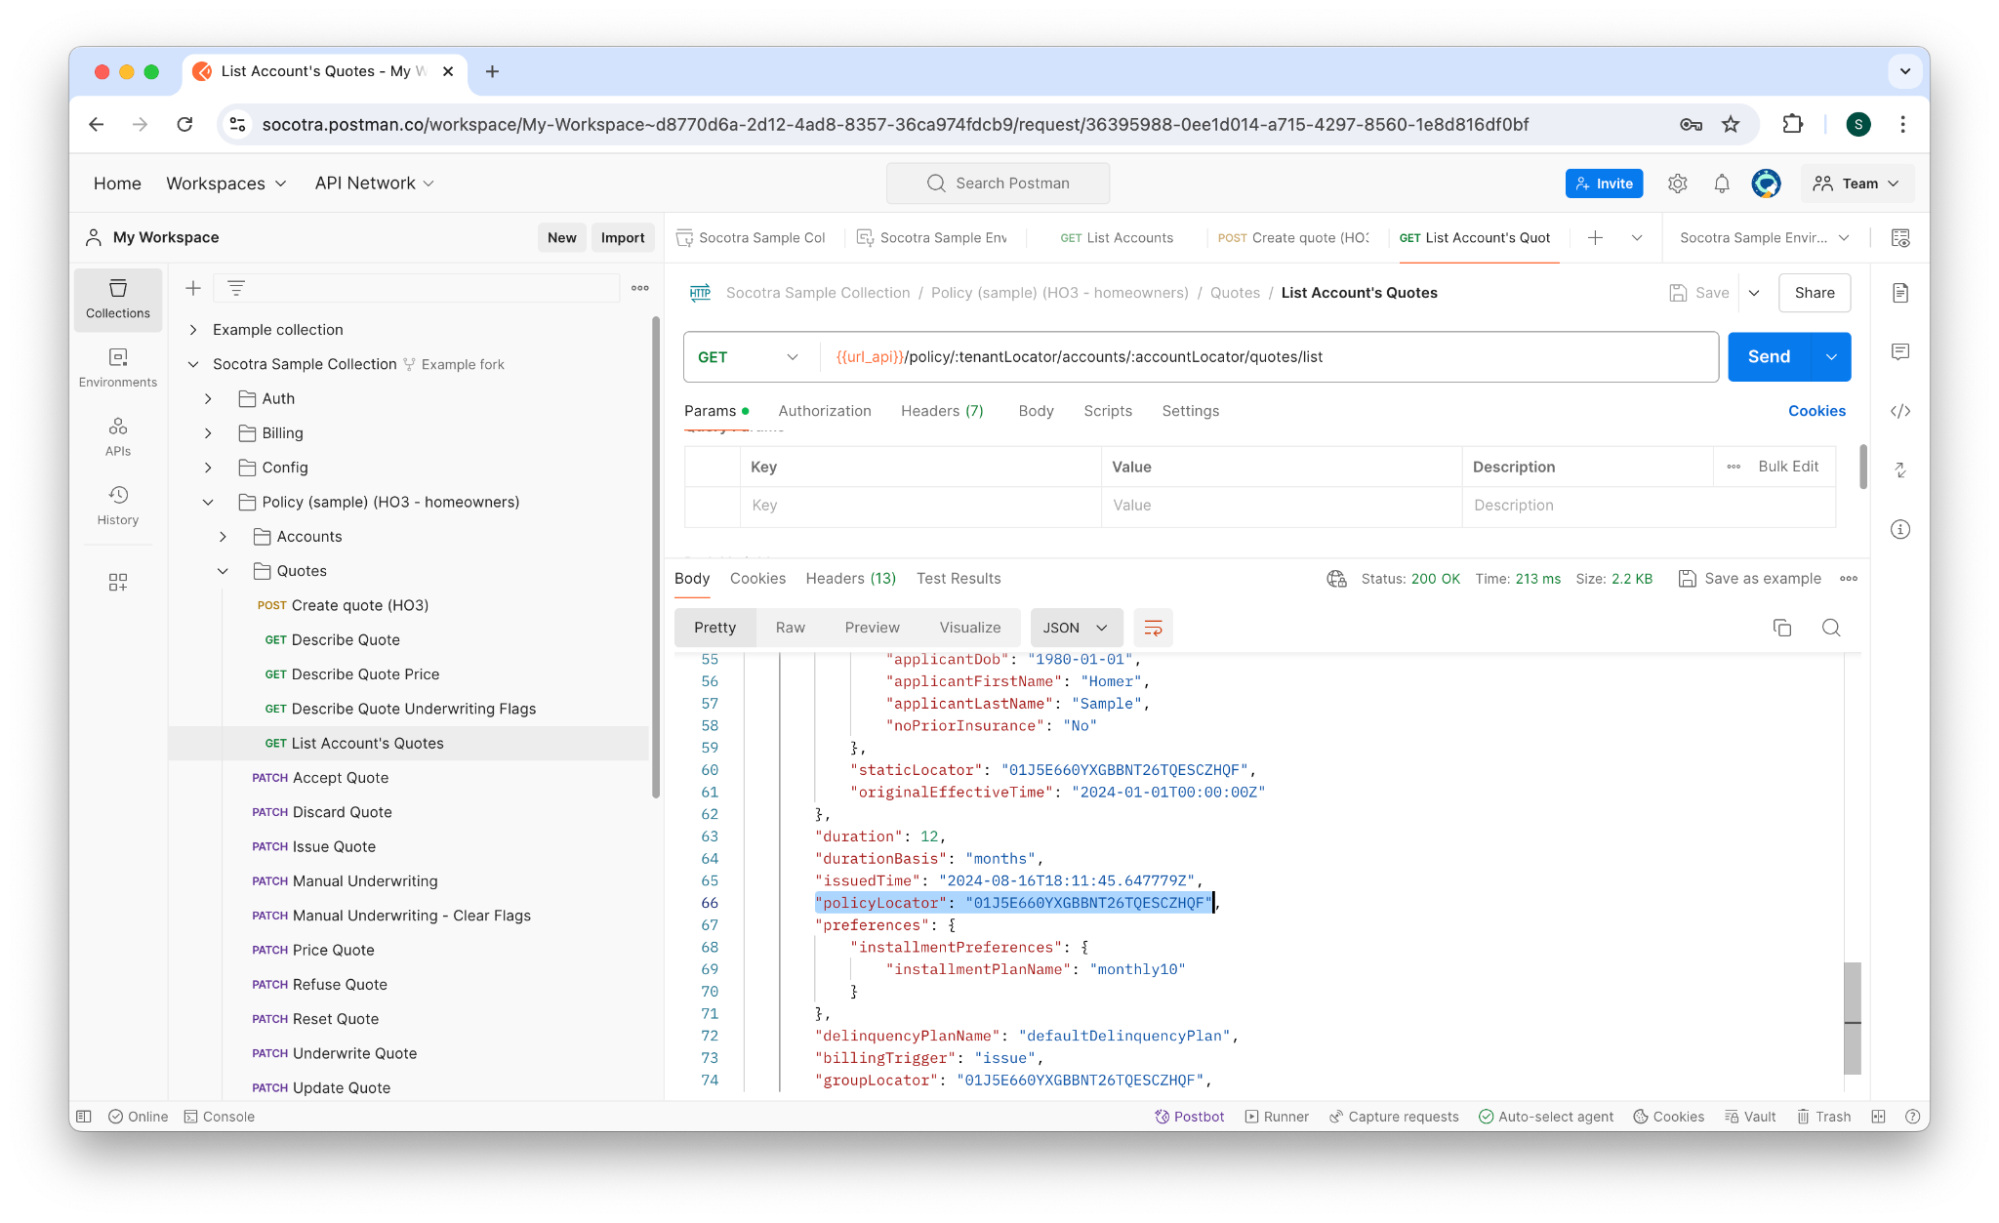
Copy the policy locator and paste it into the
policyLocatorenvironment variable in the Socotra Sample Environment.
1.3 - Retrieving customer’s policy details
Now that we have Homer Sample’s policy number, we can retrieve details about the elements of his policy.
In particular, we’re interested in finding the policy’s:
Exposures (i.e. the dwelling)
The exposure’s coverages
To retrieve a customer’s policy details, we can use the Describe Policy Snapshot endpoint of the Socotra API, which retrieves information about a policy as it exists at a current date and time.
To locate a customer’s policy details, follow these steps:
In the Socotra Sample Collection, navigate to Policy > Policies > Describe Policy Snapshot.
In the date query parameter, enter the following: 2024-06-01T00:00:00Z.
This is a timestamp that tells the endpoint to retrieve the policy as it existed on the specified date.
In this scenario, Homer Sample wants the insurance coverage to change on this date, so we’ll retrieve the policy information at this point to ensure we have the most up-to-date information.
Run the request.
The response body will look similar to the JSON contained in the code block below:
{
    "locator": "01J5E660YXGBBNT26TQESCZHQF",
    "accountLocator": "01J5E5RNSWR0QVPCFF2XT83CFK",
    "productName": "Ho3",
    "timezone": "America/New_York",
    "currency": "USD",
    "transaction": {
        "locator": "01J5E660YXGBBNT26TQESCZHQF",
        "transactionCategory": "issuance",
        "transactionType": "issuance",
        "effectiveTime": "2024-01-01T00:00:00Z",
        "issuedTime": "2024-08-16T18:11:45.647779Z",
        "preferences": {
            "installmentPreferences": {
                "installmentPlanName": "monthly10"
            }
        },
        "segment": {
            "locator": "01J5E66VBHEQWA7Z8Y3XDVFAXV",
            "segmentType": "coverage",
            "startTime": "2024-01-01T00:00:00Z",
            "endTime": "2025-01-01T00:00:00Z",
            "element": {
                "type": "Ho3Segment",
                "locator": "01J5E66VBHEQWA7Z8Y3XDVFAXV",
                "parentLocator": "01J5E66VBHEQWA7Z8Y3XDVFAXV",
                "elements": [
                    {
                        "type": "DwellingPolicy",
                        "locator": "01J5E66VBJYBESTDJFYAZBPAXX",
                        "parentLocator": "01J5E66VBHEQWA7Z8Y3XDVFAXV",
                        "elements": [
                            {
                                "type": "Coverage_bPolicy",
                                "locator": "01J5E66VBMACX1D1K00K0YYZNE",
                                "parentLocator": "01J5E66VBJYBESTDJFYAZBPAXX",
                                "coverageTerms": {
                                    "Coverage_b_limit": "CB20"
                                },
                                "staticLocator": "01J5E660YX6ZEJSYTVN9XAXF14",
                                "originalEffectiveTime": "2024-01-01T00:00:00Z"
                            },
                            {
                                "type": "Coverage_aPolicy",
                                "locator": "01J5E66VBKYGJZT44JYPCNA3T6",
                                "parentLocator": "01J5E66VBJYBESTDJFYAZBPAXX",
                                "coverageTerms": {
                                    "Coverage_a_limit": "CA550000"
                                },
                                "staticLocator": "01J5E660YXV5ZQC2MM6CW5DW8Q",
                                "originalEffectiveTime": "2024-01-01T00:00:00Z"
                            }
                        ],
                        "data": {
                            "windHailExclusion": "No",
                            "yearBuilt": 2013,
                            "distanceToCoast": 3000,
                            "occupancy": "Primary"
                        },
                        "staticLocator": "01J5E660YX1PHQNZ1F0404830V",
                        "originalEffectiveTime": "2024-01-01T00:00:00Z"
                    }
                ],
                "data": {
                    "applicantInsuranceScore": "800",
                    "applicantDob": "1980-01-01",
                    "applicantFirstName": "Homer",
                    "applicantLastName": "Sample",
                    "noPriorInsurance": "No"
                },
                "staticLocator": "01J5E660YXGBBNT26TQESCZHQF",
                "originalEffectiveTime": "2024-01-01T00:00:00Z"
            },
            "duration": 12
        }
    },
    "delinquencyPlanName": "defaultDelinquencyPlan"
}
The ``transaction`` object is the most relevant portion of the response body for the purposes of this tutorial. It contains all of the information about the segment, exposure, and coverages.
Navigating down the JSON tree, the transaction object contains:
transactionsegment(a default period of 12 months from startTime to endTime)element(the exposure group)elements(the exposures, i.e. the dwelling)elements(the coverages, i.e. Coverage_aPolicy and Coverage_bPolicy)
For the purposes of this tutorial, Homer Sample wants to change the
coverage_a_limit from $550,000 to $600,000.
1.4 - Creating a change transaction
Now that we’ve located Homer Sample’s policy, we’re ready to create a change transaction to modify it.
There are essentially two steps to making any transaction, including change transactions:
Creating the transaction
Issuing the transaction
In this section, we’ll cover creating the transaction. In the next section, we’ll cover issuing the transaction.
We’re going to change the coverage from $550,000 (CA550000) to
$600,000 (CA600000).
The code sample below shows the Coverage_aPolicy (extracted from the
full code block above).
{
    "type": "Coverage_aPolicy",
    "locator": "01J5E66VBKYGJZT44JYPCNA3T6",
    "parentLocator": "01J5E66VBJYBESTDJFYAZBPAXX",
    "coverageTerms": {
    "Coverage_a_limit": "CA550000"
    },
    "staticLocator": "01J5E660YXV5ZQC2MM6CW5DW8Q",
    "originalEffectiveTime": "2024-01-01T00:00:00Z"
}
The staticLocator is the unique identifier we’ll use to target the
coverage for modification.
To create a change transaction to a policy, follow these steps:
While viewing the Socotra Sample Collection, navigate to Policy > Policies > Post-issuance Flows > Policy Change > Create Change Transaction.
Click the Body tab.
Paste the
staticLocatorvalue of theCoverage_aPolicyobject into the request body.
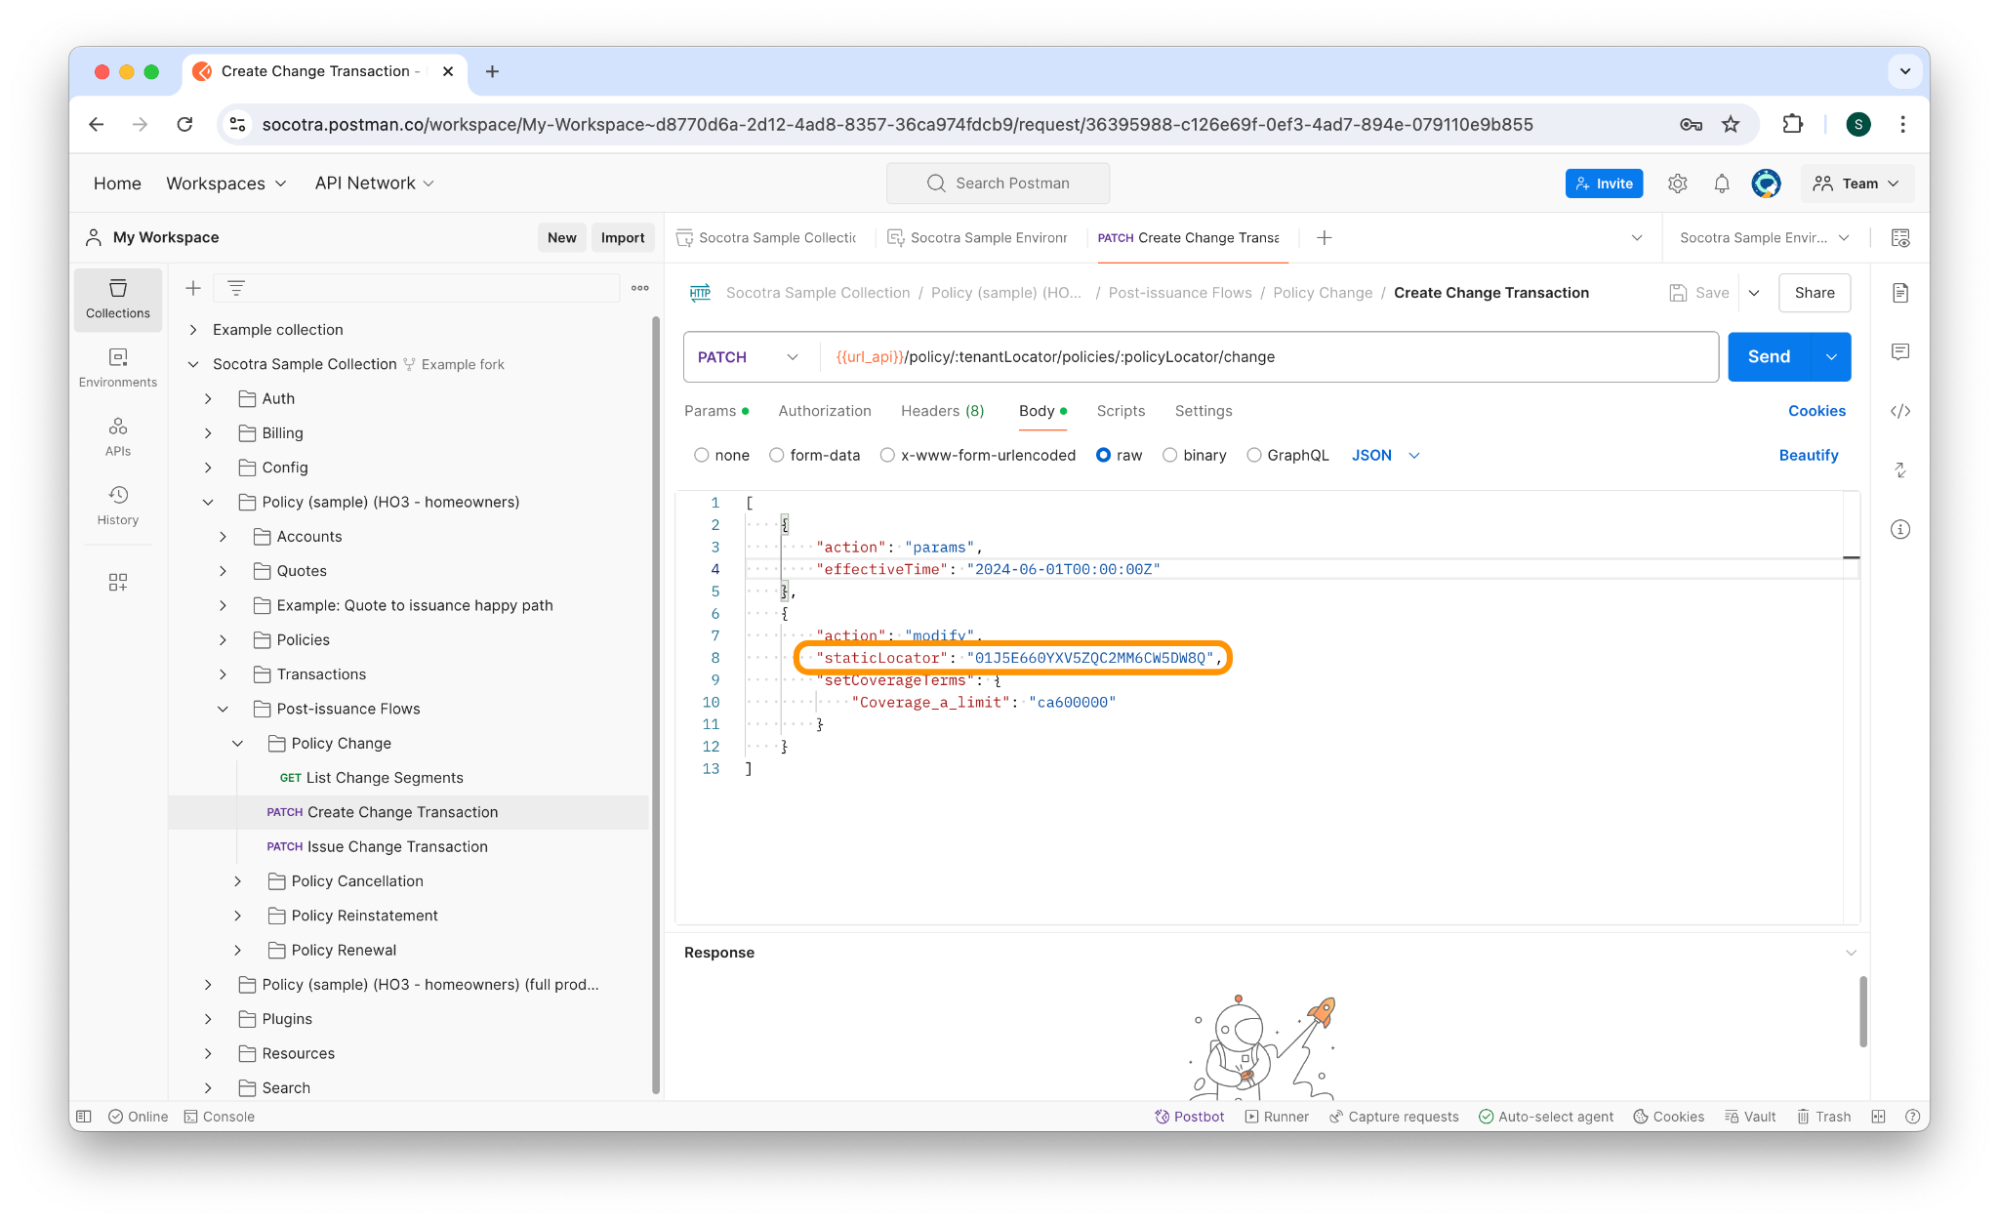
Set the
effectiveTimefield to June 1, 2024 (2024-06-01T00:00:00Z).
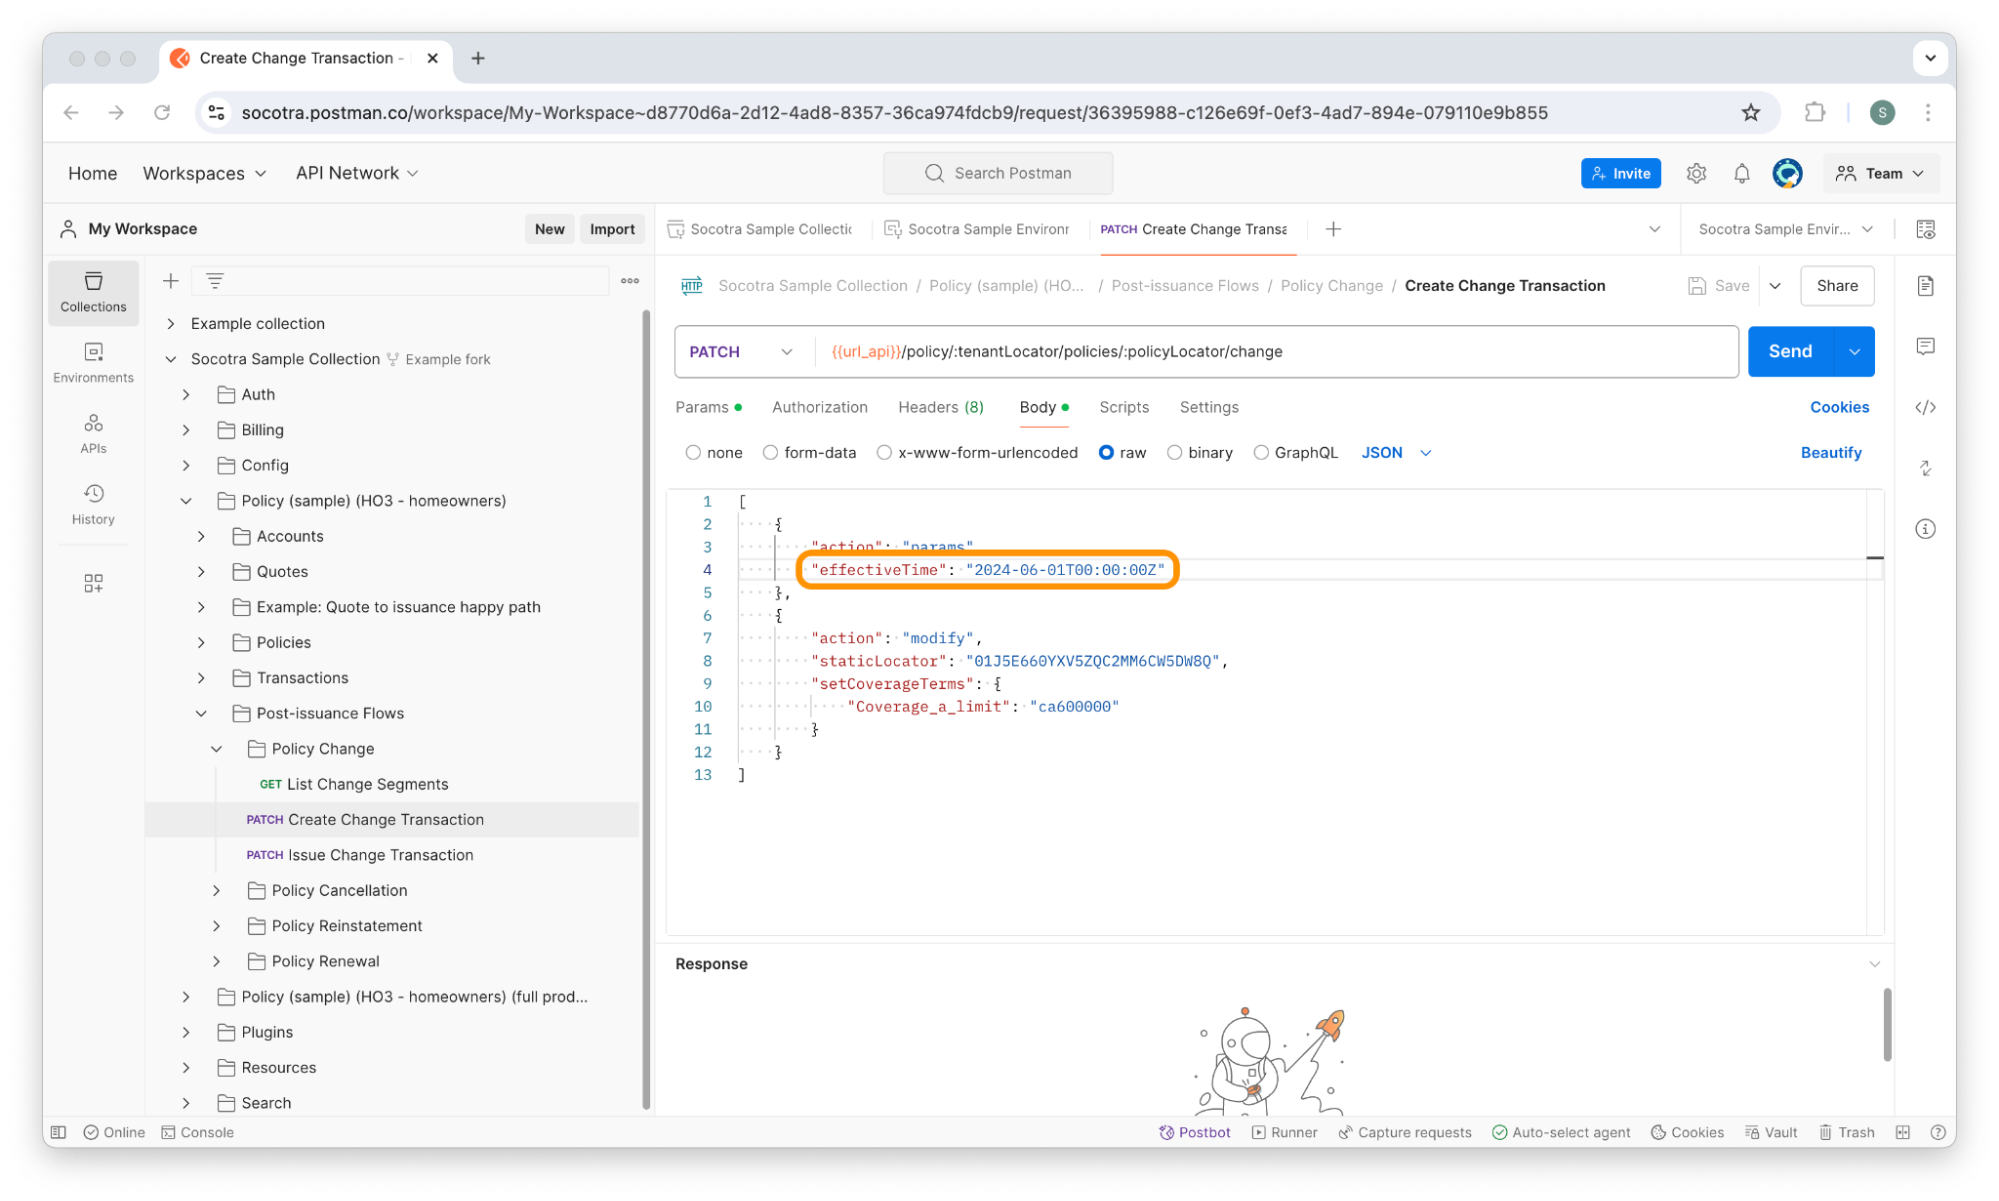
Click Send.
You should receive a response message containing a
locatorvalue.
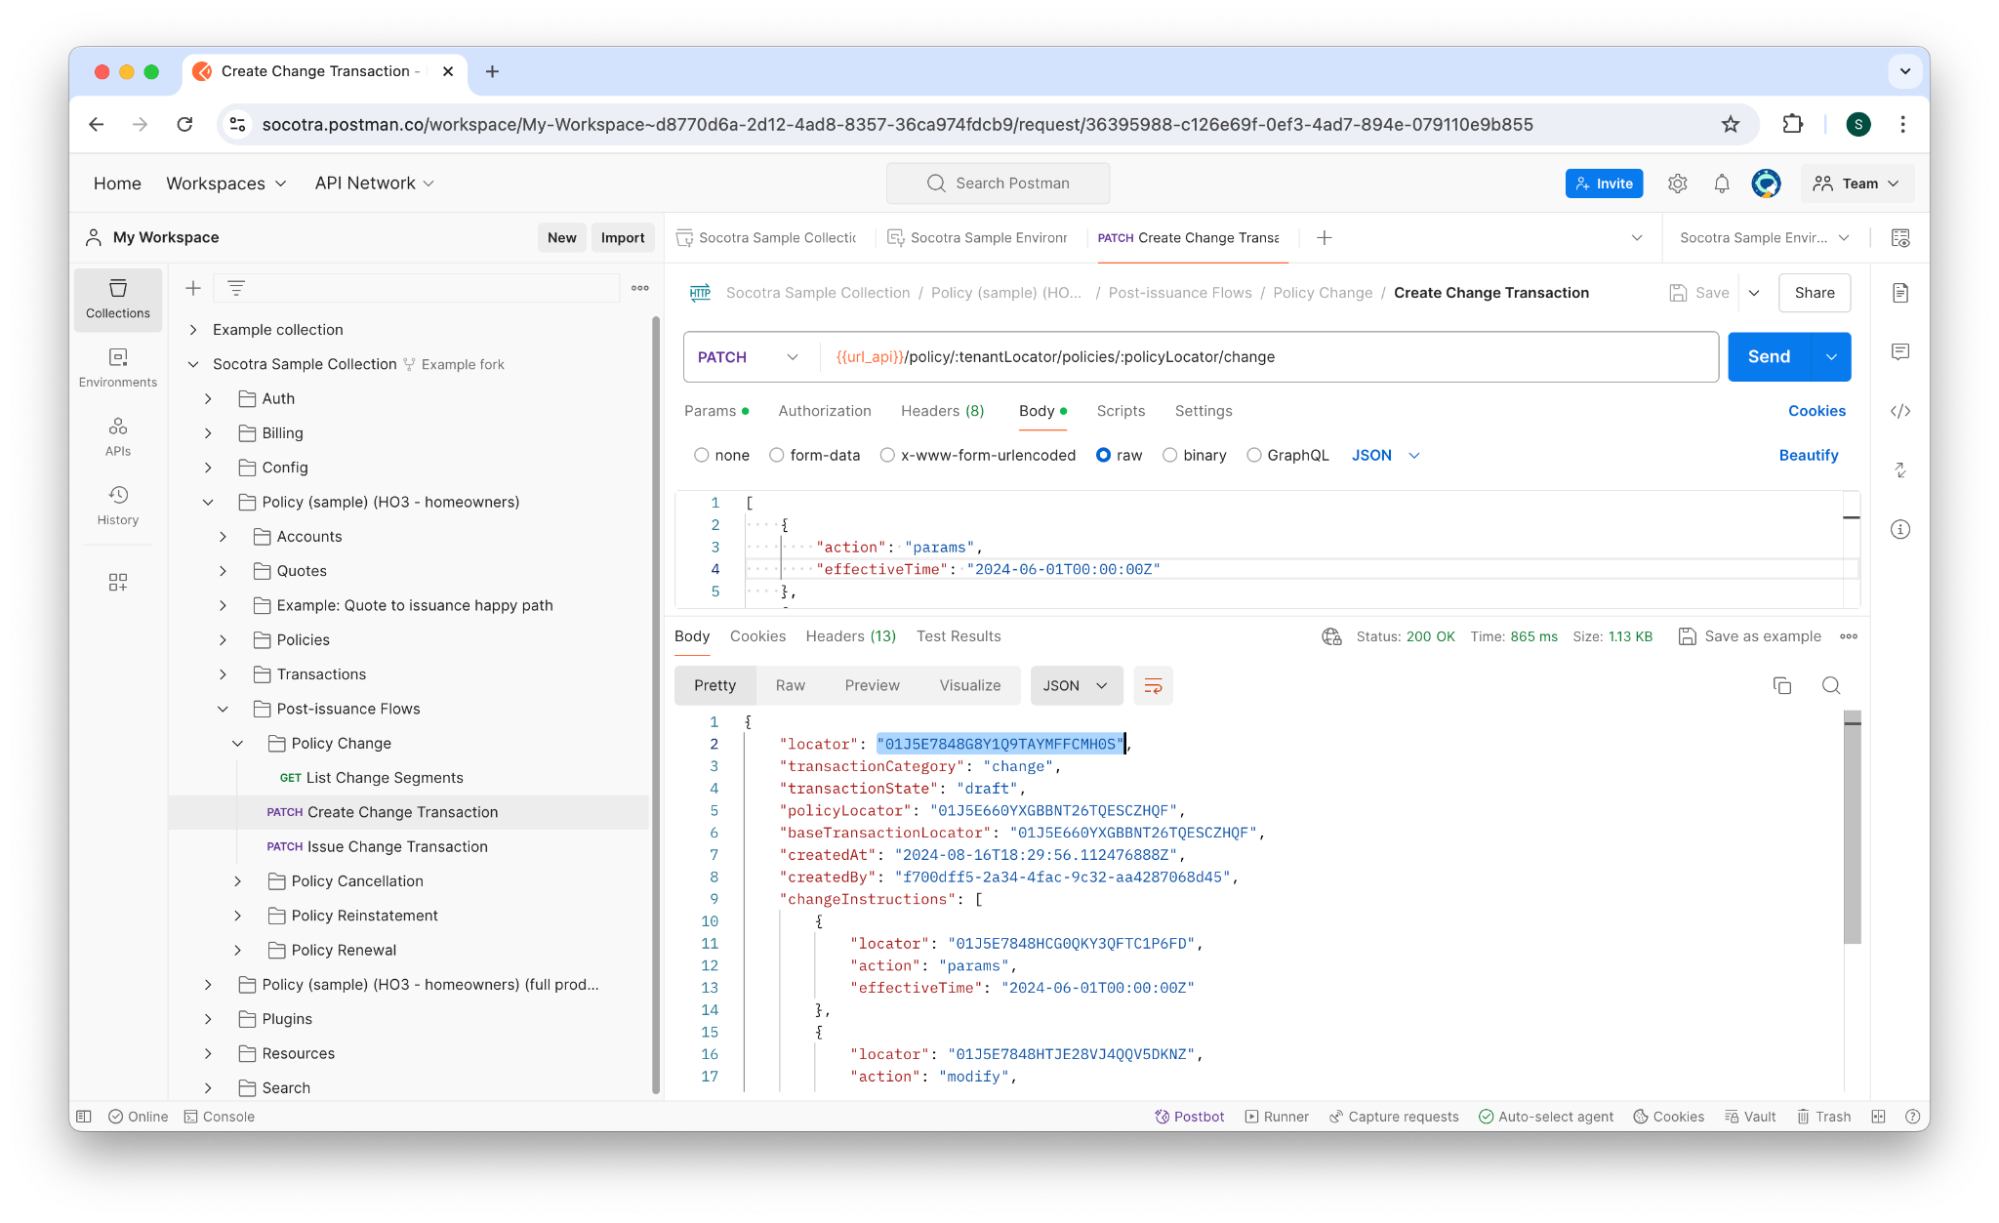
When you create a transaction, it’s assigned a unique identifier stored in the locator field. Note that the transaction is in a draft state, meaning it won’t go into effect until it’s issued.
Copy and paste the locator value into the transactionLocator environment variable in the Socotra Sample Environment.
1.5 - Issuing a change transaction
Now that we’ve created a change transaction for Homer Sample’s policy, we’re finally ready to issue the transaction.
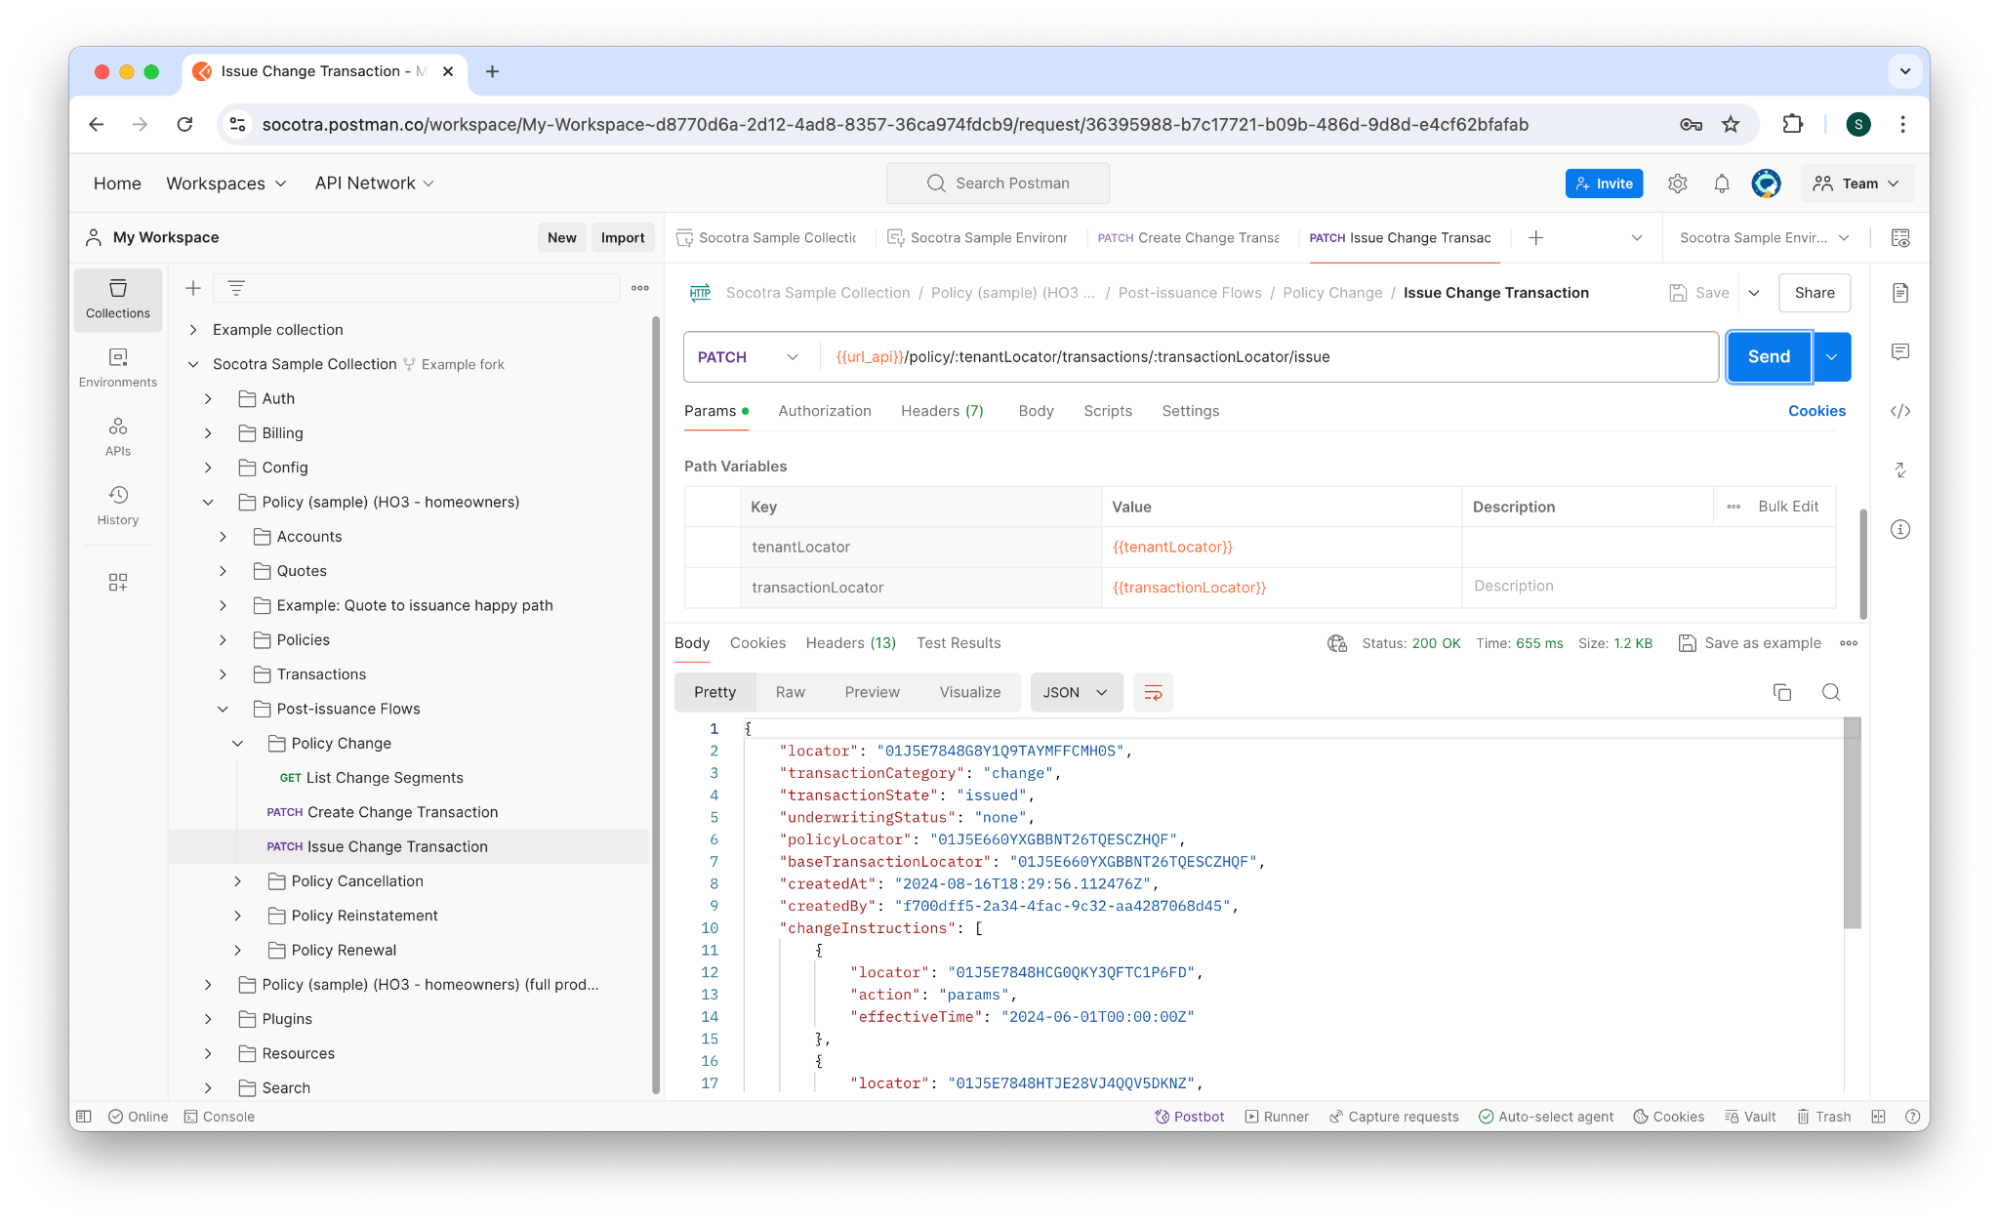
To issue a change transaction, follow these steps:
While viewing the Socotra Sample Collection, navigate to Policy > Policies > Post-issuance Flows > Policy Change > Issue Change Transaction.
Click Send.
You should receive a response indicating success.
1.6 - Viewing the changed policy
Now that the change transaction has been issued, we can check the policy to see the reflected changes to Homer Sample’s policy.
To do that, we’ll use the Describe Policy Term endpoint (Policy > Policies > Describe Policy Term). Running this endpoint for this policy reveals that there are now two subsegments:
The original segment (the policy before the change)
The new segment (the policy after the change)
The JSON in the code block below should look similar to your response body. Note the two objects in the subsegments array.
{
    "policyLocator": "01J5E660YXGBBNT26TQESCZHQF",
    "locator": "01J5E660YXGBBNT26TQESCZHQF",
    "staticLocator": "01J5E660YXGBBNT26TQESCZHQF",
    "termNumber": 0,
    "startTime": "2024-01-01T00:00:00Z",
    "endTime": "2025-01-01T00:00:00Z",
    "duration": 12,
    "durationBasis": "months",
    "subsegments": [
        {
            "locator": "01J5E66VBHEQWA7Z8Y3XDVFAXV",
            "type": "coverage",
            "startTime": "2024-01-01T00:00:00Z",
            "endTime": "2024-06-01T00:00:00Z",
            "duration": 5.001344086021505,
            "elements": [
                {
                    "locator": "01J5E66VBKYGJZT44JYPCNA3T6",
                    "staticLocator": "01J5E660YXV5ZQC2MM6CW5DW8Q",
                    "type": "Coverage_aPolicy",
                    "chargeSummaries": {
                        "coverage_a_premium": 343.84
                    }
                },
                {
                    "locator": "01J5E66VBMACX1D1K00K0YYZNE",
                    "staticLocator": "01J5E660YX6ZEJSYTVN9XAXF14",
                    "type": "Coverage_bPolicy",
                    "chargeSummaries": {
                        "coverage_b_premium": 68.77
                    }
                },
                {
                    "locator": "01J5E66VBHEQWA7Z8Y3XDVFAXV",
                    "staticLocator": "01J5E660YXGBBNT26TQESCZHQF",
                    "type": "Ho3Segment",
                    "data": {
                        "noPriorInsurance": "No",
                        "applicantInsuranceScore": "800",
                        "applicantDob": "1980-01-01",
                        "applicantFirstName": "Homer",
                        "applicantLastName": "Sample"
                    }
                },
                {
                    "locator": "01J5E66VBJYBESTDJFYAZBPAXX",
                    "staticLocator": "01J5E660YX1PHQNZ1F0404830V",
                    "type": "DwellingPolicy",
                    "data": {
                        "occupancy": "Primary",
                        "windHailExclusion": "No",
                        "yearBuilt": 2013,
                        "distanceToCoast": 3000
                    }
                }
            ]
        },
        {
            "locator": "01J5E7AV7P2CEWGEX4K034V1XE",
            "type": "coverage",
            "startTime": "2024-06-01T00:00:00Z",
            "endTime": "2025-01-01T00:00:00Z",
            "duration": 6.998655913978495,
            "elements": [
                {
                    "locator": "01J5E7AV7QBNBRHTTGQHPXHKDW",
                    "staticLocator": "01J5E660YXV5ZQC2MM6CW5DW8Q",
                    "type": "Coverage_aPolicy",
                    "chargeSummaries": {
                        "coverage_a_premium": 481.16
                    }
                },
                {
                    "locator": "01J5E7AV7RE6HPEDDFE2RSTR57",
                    "staticLocator": "01J5E660YX6ZEJSYTVN9XAXF14",
                    "type": "Coverage_bPolicy",
                    "chargeSummaries": {
                        "coverage_b_premium": 96.23
                    }
                },
                {
                    "locator": "01J5E7AV7P2CEWGEX4K034V1XE",
                    "staticLocator": "01J5E660YXGBBNT26TQESCZHQF",
                    "type": "Ho3Segment",
                    "data": {
                        "applicantInsuranceScore": "800",
                        "applicantDob": "1980-01-01",
                        "applicantFirstName": "Homer",
                        "applicantLastName": "Sample",
                        "noPriorInsurance": "No"
                    }
                },
                {
                    "locator": "01J5E7AV7PP2XY7593HGP537HY",
                    "staticLocator": "01J5E660YX1PHQNZ1F0404830V",
                    "type": "DwellingPolicy",
                    "data": {
                        "windHailExclusion": "No",
                        "yearBuilt": 2013,
                        "distanceToCoast": 3000,
                        "occupancy": "Primary"
                    }
                }
            ]
        }
    ]
}
Tutorial 2 - Renewing a policy
Now that we’ve practiced making and executing a change to a policy, let’s try renewing a policy. Homer Sample has decided that he want to renew his coverage:
His original term was from January 2024 to January 2025.
He wants to renew coverage through January 2026.
He also wants to add a personal property coverage to his dwelling.
With the Socotra API, we can easily renew the policy while also adding a new coverage.
Note: For a refresher on how to locate a customer’s account number or policy number, refer back to sections 1.1 and 1.2.
To create a renewal transaction for a policy, follow these steps:
While viewing the Socotra Sample Collection, navigate to Policy > Policies > Post-issuance Flows > Policy Renewal > Create Renewal Transaction.
Click the Body tab. You should see something similar to the JSON in the code block below:
[
      {
            "action": "params",
            "effectiveTime": "<insert_time_stamp_here>"
      },
      {
            "action": "add",
            "elements": [
                  {
                        "parentLocator": "<insert_dwelling_locator_here>",
                        "type": "Personal_Property"
                  }
            ]
      }
]
The code block above contains the data required to add a coverage to a policy during the renewal process. There are two placeholders:
“effectiveTime”: “<insert_time_stamp_here>”
“parentLocator”: “<insert_dwelling_locator_here>”
For the <insert_time_stamp_here> placeholder, you should provide a time stamp that’s on the same day as the end date of the previous segment.
The excerpt below shows you where to find the segment’s startTime
and endTime (near the bottom).
{
    "locator": "01J5E660YXGBBNT26TQESCZHQF",
    "accountLocator": "01J5E5RNSWR0QVPCFF2XT83CFK",
    "productName": "Ho3",
    "timezone": "America/New_York",
    "currency": "USD",
    "transaction": {
        "locator": "01J5E7848G8Y1Q9TAYMFFCMH0S",
        "transactionCategory": "change",
        "transactionType": "change",
        "effectiveTime": "2024-06-01T00:00:00Z",
        "issuedTime": "2024-08-16T18:31:25.332935Z",
        "preferences": {
            "installmentPreferences": {
                "installmentPlanName": "monthly10"
            }
        },
        "segment": {
            "locator": "01J5E7AV7P2CEWGEX4K034V1XE",
            "segmentType": "coverage",
            "startTime": "2024-06-01T00:00:00Z",
            "endTime": "2025-01-01T00:00:00Z",
            "element": {
        <SHORTENED FOR BREVITY>
        ...
To find the effective time, look for the endDate of the previous
term.
For example, if the endDate of the previous term is
2025-01-01T00:00:00Z, the time stamp used for renewal should be the
same value. This shows that the policy renews on the same day that the
old policy ended so that coverage does not lapse.
To find the unique identifier of the dwelling, we can look at the
response body of Describe Policy Snapshot. You can find the dwelling
locator at transaction.segment.element.elements.[0].locator (under
the type value DwellingPolicy).
{
    "locator": "01J5E660YXGBBNT26TQESCZHQF",
    "accountLocator": "01J5E5RNSWR0QVPCFF2XT83CFK",
    "productName": "Ho3",
    "timezone": "America/New_York",
    "currency": "USD",
    "transaction": {
        "locator": "01J5E7848G8Y1Q9TAYMFFCMH0S",
        "transactionCategory": "change",
        "transactionType": "change",
        "effectiveTime": "2024-06-01T00:00:00Z",
        "issuedTime": "2024-08-16T18:31:25.332935Z",
        "preferences": {
            "installmentPreferences": {
                "installmentPlanName": "monthly10"
            }
        },
        "segment": {
            "locator": "01J5E7AV7P2CEWGEX4K034V1XE",
            "segmentType": "coverage",
            "startTime": "2024-06-01T00:00:00Z",
            "endTime": "2025-01-01T00:00:00Z",
            "element": {
                "type": "Ho3Segment",
                "locator": "01J5E7AV7P2CEWGEX4K034V1XE",
                "parentLocator": "01J5E7AV7P2CEWGEX4K034V1XE",
                "elements": [
                    {
                        "type": "DwellingPolicy",
                        "locator": "01J5E7AV7PP2XY7593HGP537HY",
                        "parentLocator": "01J5E7AV7P2CEWGEX4K034V1XE",
                        "elements": [
                            {
                                "type": "Coverage_bPolicy",
                                "locator": "01J5E7AV7RE6HPEDDFE2RSTR57",
                                "parentLocator": "01J5E7AV7PP2XY7593HGP537HY",
                                "coverageTerms": {
                                    "Coverage_b_limit": "CB20"
                                },
                                "staticLocator": "01J5E660YX6ZEJSYTVN9XAXF14",
                                "originalEffectiveTime": "2024-01-01T00:00:00Z"
                            },
                            {
                                "type": "Coverage_aPolicy",
                                "locator": "01J5E7AV7QBNBRHTTGQHPXHKDW",
                                "parentLocator": "01J5E7AV7PP2XY7593HGP537HY",
                                "coverageTerms": {
                                    "Coverage_a_limit": "CA600000"
                                },
                                "staticLocator": "01J5E660YXV5ZQC2MM6CW5DW8Q",
                                "originalEffectiveTime": "2024-01-01T00:00:00Z"
                            }
                        ],
                        "data": {
                            "windHailExclusion": "No",
                            "yearBuilt": 2013,
                            "distanceToCoast": 3000,
                            "occupancy": "Primary"
                        },
                        "staticLocator": "01J5E660YX1PHQNZ1F0404830V",
                        "originalEffectiveTime": "2024-01-01T00:00:00Z"
                    }
                ],
                "data": {
                    "applicantInsuranceScore": "800",
                    "applicantDob": "1980-01-01",
                    "applicantFirstName": "Homer",
                    "applicantLastName": "Sample",
                    "noPriorInsurance": "No"
                },
                "staticLocator": "01J5E660YXGBBNT26TQESCZHQF",
                "originalEffectiveTime": "2024-01-01T00:00:00Z"
            },
            "duration": 6.998655913978495,
            "basedOn": "01J5E66VBHEQWA7Z8Y3XDVFAXV"
        }
    },
    "delinquencyPlanName": "defaultDelinquencyPlan"
}
The value we want to copy and paste into the renewal request body is the
staticLocator of the dwelling.
So, for a policy that renews on January 1 2025, we’d use a request body something like the one below:
[
      {
            "action": "params",
            "effectiveTime": "2025-01-01T00:00:00Z"
      },
      {
            "action": "add",
            "elements": [
                  {
                        "parentLocator": "01J5E7AV7PP2XY7593HGP537HY",
                        "type": "Personal_Property"
                  }
            ]
      }
]
Click Send to execute the request.
You should see a response body like the one in the screenshot below.
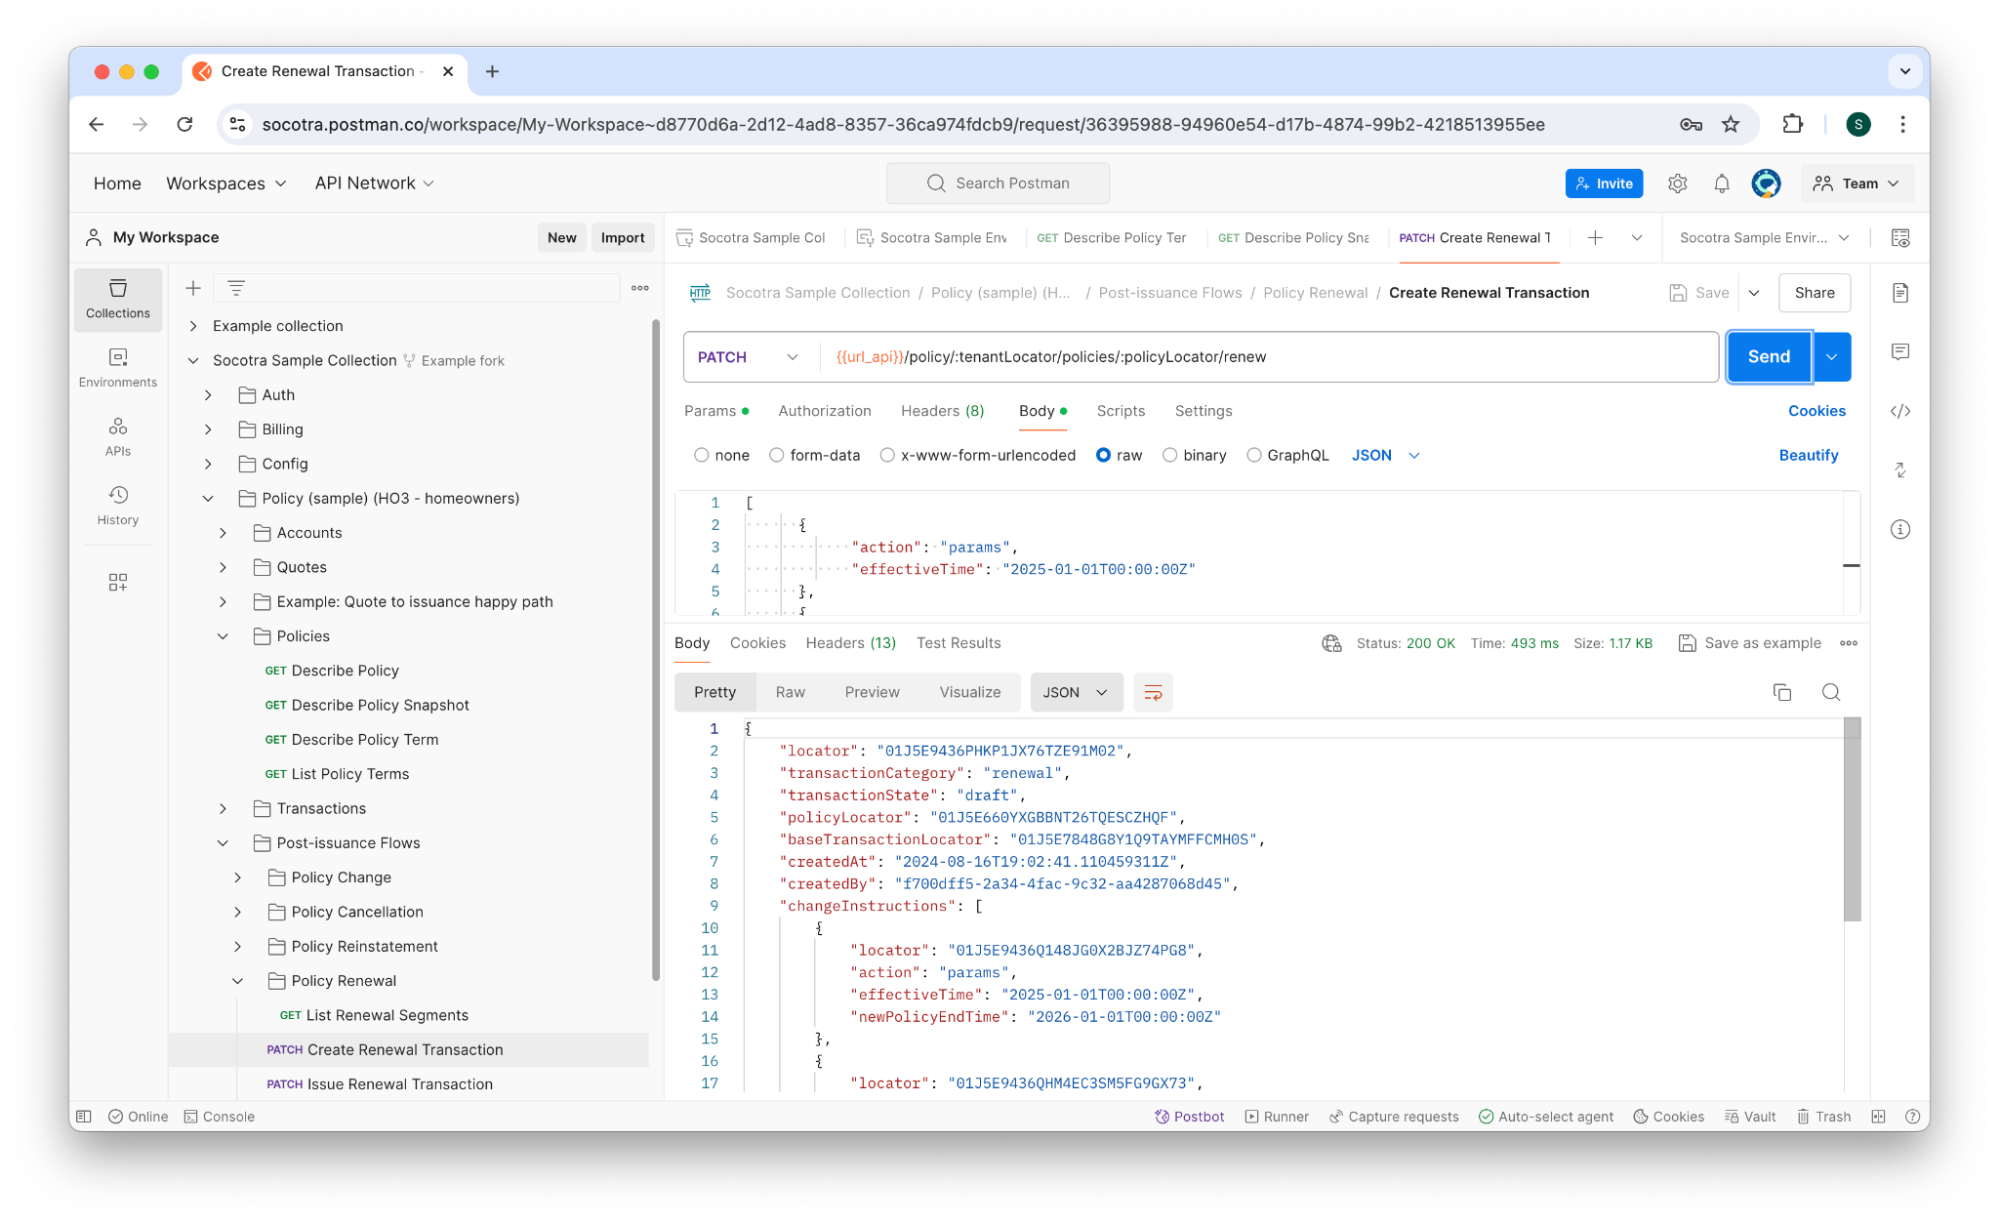
Copy and paste the
locatorinto therenewalTrxLocatorenvironment variable in the Socotra Sample Environment.Navigate to the Issue Renewal Transaction endpoint.
Click Send to execute it.
You should receive a response like the one below, indicating that the policy has been renewed.

Tutorial 3 - Canceling a policy
Now that we’ve renewed the policy, let’s learn how to cancel a policy. Homer Sample has decided that he want to cancel his coverage:
His original term was from January 2024 to January 2025
He renewed for a new term from January 2025 to January 2026
In March 2025, he decided he wanted to cancel his policy.
With the Socotra API, we can easily cancel the policy. This is considerably more straightforward than changing or renewing a policy because there’s no request body to build. We simply need to create a cancellation transaction and then issue it.
While viewing the Socotra Sample Collection, navigate to Policy > Policies > Post-issuance Flows > Policy Cancelation > Create Cancellation Transaction.
Click the Body tab.
Set the timestamp to the requested cancellation date.
In this case, March 1 2025 is the requested end date
For a time stamp, this is:
2025-03-01T00:00:00Z.Click Send.
You should receive a response message similar to the one in the screenshot below:
Copy the
locatorfield in the response body.This is the unique identifier for the transaction.
We’ll use this value to issue the transaction.
While viewing the Socotra Sample Collection, navigate to Policy > Policies > Post-issuance Flows > Policy Cancellation > Issue Cancellation Transaction.
Paste the
locatorvalue you copied in step 6 into thetransactionLocatorfield.Click Send.
You should receive a response indicating success.
Tutorial 4 - Reinstating a policy
Finally, let’s practice reinstating a policy. Homer Sample has changed his mind. After canceling his policy in March of 2025, he decided in July of 2025 to reinstate the policy.
Reinstating the policy is a virtually identical process to canceling it, except we’ll be using the Reinstatement endpoints instead of the cancellation endpoints.
While viewing the Socotra Sample Collection, navigate to Policy > Policies > Post-issuance Flows > Policy Reinstatement > Create Reinstatement Transaction.
Click the Body tab.
Set the timestamp to July 2025 (e.g. 2025-07-01T00:00:00Z).
Click Send.
You should receive a response message similar to the one in the screenshot below:
Copy the
locatorfield in the response body.This is the unique identifier for the transaction.
We’ll use this value to issue the transaction.
While viewing the Socotra Sample Collection, navigate to Policy > Policies > Post-issuance Flows > Policy Reinstatement > Issue Reinstatement Transaction.
Paste the
locatorvalue you copied in step 6 into thetransactionLocatorfield.Click Send.
You should receive a response indicating success.
Ready for the next module?
See Trigger billing, pay, and invoices in Socotra to continue this learning path.