Autopay
Overview
The Autopay feature enables insureds to set up a payment method and have regular payments executed automatically, so they don't have to worry about mailing a physical check or going online before the due date and possibly incurring late fees or policy lapses. This also leads to more predictability for payments and fewer mismatches between payments and amounts due.
The typical autopay process looks like this:
- Add an
autopayLeadDayssetting to your installment plans. This specifies the number of days before invoices become due that the autopay process will start. - Installments and invoices will have their
autopayTimevalue set using the lead days. - At the autopay time for an invoice, the Autopay Plugin will fire.
- The plugin may be implemented to create a Payment in
requestedstate. - The Payment Execution Service will attempt to execute the actual transaction with an external financial institution.
- If successful, the payment will advance to
postedstate and settle the invoice; otherwise retries may be attempted.
Installments and Invoices
When installments are generated, the autopayTime will be set using the autopayLeadDays property on the installment plan. This time will be used to set the autopayTime on the invoice when it is generated.
If more than one installment is added to an invoice, the invoice's autopay time will be the earliest autopay time of its installments.
The autopay timing looks like this:
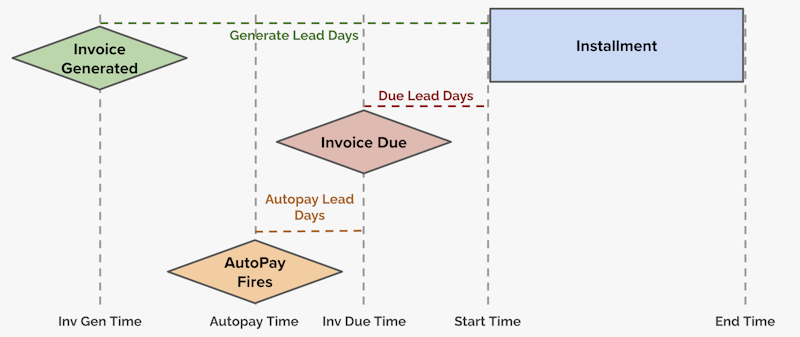
To suppress autopay for an invoice, you can set its suppressAutopay property to true using the Update Invoice endpoint.
Autopay Plugin
The autopay plugin will receive the invoice for which autopay has triggered. It may then optionally provide a response with a PaymentCreateRequest and a next_request_time. If a payment create request is returned, a payment will be created with the given data, including:
- The
typeof the payment, which must be one of the payment types configured - The
amount(typically this would be the same as the invoice amount) - The desired payment
state(typicallyrequested) - The
currency, to match the invoice's currency - The locator of the financial instrument which will be used to clear the payment
- The
targetsfor the payment (typically the invoice itself) - The
retryPlanfor the payment's execution, if it is desired to use a specific plan for this payment - And any extension data needed to be tracked on the payment
If next_request_time is not specified, the payment execution service will be started immediately. You can set this to some time in the future to delay the first call to the external system.
You may choose to call to an external system from the autopay plugin and execute the payment. If this is done, you can create the payment in posted state and the payment execution service will not be invoked.
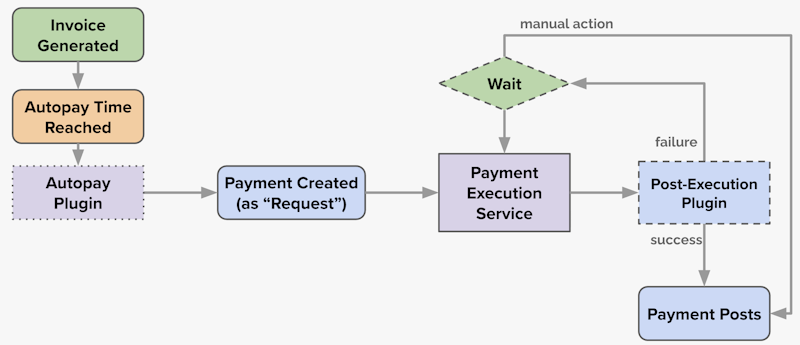
Payment Requests
After a payment is created in requested state the payment execution service will take over. The overall flow looks like this: