Payment Execution Service
The payment execution service processes invoice payments through payment providers such as Stripe and Braintree. Payments can be executed automatically using the Autopay plugin or manually using the Payments API.
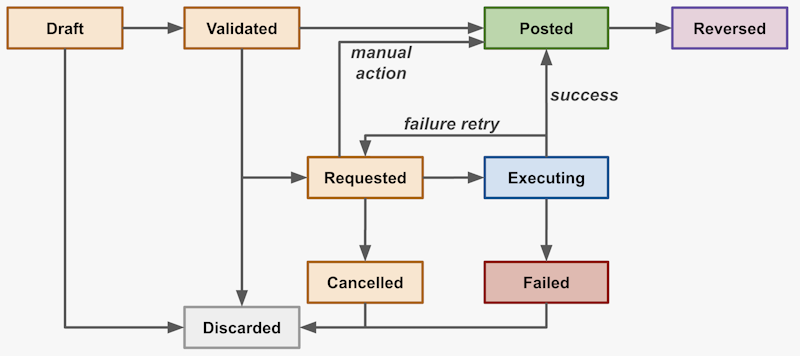
Payment Lifecycle
Payments typically begin in the draft state before moving to the validated state. However, the Autopay plugin can be configured to create payments that begin in one of the following states: draft, validated, requested, or posted.
Once a payment is in the requested state, the payment execution service will attempt to execute the payment through a payment provider and financial instrument associated with the account to be charged, and the payment will move to the executing state.
If the payment provider successfully executes the payment request, the payment will be moved to the posted state, and payments will be distributed according to the targets specified in the payment request. An external cash transaction record will also be generated for the payment.
If the payment provider fails to execute the payment request, and a retry plan has been defined, the retry plan will be executed, and the payment will revert to the requested state. If the retry plan fails or a retry plan has not been defined, the payment will move to the failed state.
Refer to the diagram below for more information on the payment lifecycle.
Setup
Follow the instructions below to begin processing payments through the payment execution service.
Create a Default Financial Instrument
The payment execution service requires a default financial instrument associated with the account to be charged.
First, call the Create a Financial Instrument API endpoint.
Here's an example request:
{
	"externalIdentifier": "example_identifier",
	"institutionName": "Example Bank",
	"instrumentType": "checking",
	"defaultTransactionMethod": "ach",
	"externalAccountNumber": "1234567890",
	"accountLocator": "01JAB5N9X2M7QFZ4YWT8K3HV6R",
	"nickname": "Example Nickname"
}
Then call the Set the Default Financial Instrument for a Tenant API endpoint using the financial instrument that was created in the previous step.
Here's an example URL for this endpoint, since the request body will be empty:
POST billing/01JAB5N9X2M7QFZ4YWT8K3HV6R/financialInstruments/01HZX9Y4P6D2W8TBK3F7QJM9RV/setAsDefault?value=trueBefore payments are posted, they may be in requested state. This indicates that the payment should be processed with a transaction with an external financial institution and then distributed according to the payment request's targets. Payments in requested state are typically called Payment Requests.
Payments can be created in requested state either using the Autopay feature, or directly using the Create Payment API. They will be processed by the payment execution service in the same way.
Add a Payment Provider Configuration
Call the Add Payment Provider Configuration API endpoint. The request details differ based on the payment provider the policyholder is using to make payments.
Braintree
For Braintree, the paymentServiceProvider, merchantId, publicKey, and privateKey fields are required. The paymentServiceProvider value should be set to "braintreeSandbox" for sandbox environments and "braintree" for production environments.
The merchantId, publicKey, and privateKey values can be found by navigating to the account icon in the upper right corner of the Braintree dashboard , clicking My User, then clicking View Authorizations under the API Keys, Tokenization Keys, Encryption Keys section.
Here's an example request for the Add Payment Provider Configuration API endpoint using a Braintree sandbox account:
{
	"paymentServiceProvider": "braintreeSandbox",
	"merchantId": "hfa37hqzhf",
	"publicKey": "3c8zEmhfshd",
	"privateKey": "ZzFe7v7vcd"
}
Stripe
For Stripe, the paymentServiceProvider and secretKey fields are required. The paymentServiceProvider value should be set to "stripeTest" for sandbox environments and "stripe" for production environments.
The secretKey value can be found by navigating to the Developer tab in the lower left corner of the Stripe dashboard and clicking API keys.
Socotra will automatically create a webhook configuration in Stripe after validating payment provider credentials. To view webhook configurations in Stripe, navigate to the Developer tab, then click Webhooks.
Do not edit or delete webhook configurations in Stripe.
Here's an example request for the Add Payment Provider Configuration API endpoint using a Stripe sandbox account:
{
	"paymentServiceProvider": "stripeTest",
	"secretKey": "3c8zEmhfshd"
}
Add Payment Execution Configuration for Financial Instrument
Call the Add Payment Execution Configuration for Financial Instrument API endpoint using the paymentProviderLocator from the payment provider configuration that was created in the previous step.
Payment execution configurations contain payment method tokens required to execute payment requests on behalf of policyholders.
The offlinePaymentToken refers to the Payment Method Token in Braintree and the Payment Method ID in Stripe.
The Payment Method Token can be found in Braintree by navigating to the Transactions tab, searching for a transaction, clicking the transaction ID, and then locating the Payment Method Token field under the Payment Information section.
The Payment Method ID can be found in Stripe by navigating to the Transactions tab, clicking a transaction, then looking for the ID field under the Payment Method section.
Here's an example request for the Add Payment Execution Configuration for Financial Instrument API endpoint:
{
	"paymentProviderLocator": "01M4QZ7X2Y8P5K9B0R3F6T1VJS",
	"offlinePaymentToken": "j2fd9fhHyeNHe32"
}
The details of the payment providers and tokens are managed in a separate service in order to facilitate PCI-Compliance . Please review Socotra's PCI Compliance Statement for more information.
Retry Plans
Retry plans contain the following properties:
attempts: The maximum number of attempts to execute a payment requesthoursBetweenAttempts: How long to wait between attempts
The retry plan can be set in any of the following places, and the system will go through this list in order until it finds a plan:
- The payment
- The financial instrument
- The account
- The default retry plan defined in the tenant configuration
While the payment is awaiting a retry, you can manually override the process using the following API endpoints:
- Use the Execute Payment API endpoint to execute a payment manually
- Use the Post Payment API endpoint to update the payment state to
posted - Use the Fail Payment API endpoint to indicate that the payment cannot be processed
- Use the Cancel Payment API endpoint to indicate that the payment is no longer needed
- Use the Update Payment API endpoint to manually change the
nextRequestTimeto retry sooner or later than scheduled
The Execute Payment API endpoint can also be used to move a payment from the requested state to the validated state without waiting for the autopayTime.
Refer to the diagram below for more information on the retry process.
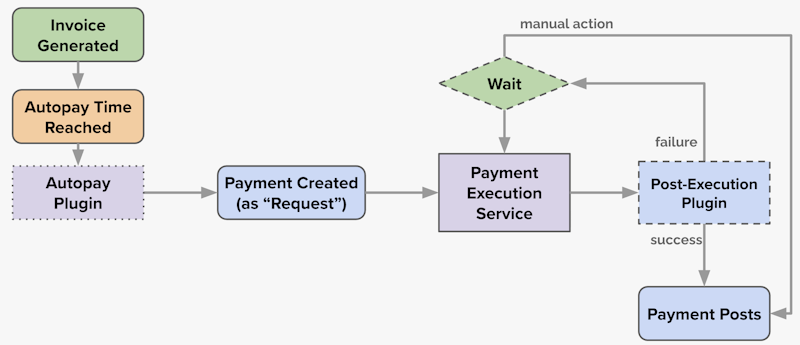
Post-Execution Plugin
After the payment execution is attempted, the Payment Post-Execution Plugin is called with the following fields:
- The
paymentLocator - The
financialInstrumentLocator - The payment
amount - The payment
state - An
externalTransactionId, if one exists - The payment
currency - Extension
datafor the payment
The plugin returns a response with the following fields:
- The
nextRequestTime, if you wish to override the defaulthoursBetweenAttemptsin the retry plan - An updated payment
amount - An updated
statefor the payment (posted,cancelled, orfailed) - A
note
The Post-Execution plugin will not be called under certain circumstances, such as when the payment provider system is unavailable or if credentials are outdated. Plugin execution will fail if the payment state field is updated to either of the following values: executing or reversed.
If the Post-Execution plugin returns a nextRequestTime, even if the number of retry attempts has already exceeded the number of retry attempts specified in the retry plan, retry attempts will continue.
If the Post-Execution Plugin fails for a payment, the payment will be moved to the failed state, even if the payment provider successfully executed the payment. The information from the provider's response will be available in the payment history, including failure details in the note. If a payment provider fails to execute a payment, you should post the payment manually and resolve the cause of the failure to prevent future issues.
Execution Log
The history of execution attempts is maintained in the executionLog property for each payment.
Here's an example of a log entry:
Required properties
| Property | Type | Description |
|---|---|---|
paymentRequestLocator | ulid | |
paymentRequestState | Enum pending | completed | failed | error | |
data | map<string, object> |
Optional properties
| Property | Type | Description |
|---|---|---|
note | string? | |
requestTime | datetime? | |
transactionId | string? |